Big T
Well-Known Member
Not liking what I’m seeing with the valve cover girdles. Maybe the cork gasket would be better under the valve cover and the girdle directly on the valve cover? Or no gasket at all and girdle directly on the valve cover?
Follow along with the video below to see how to install our site as a web app on your home screen.
Note: This feature may not be available in some browsers.
Not liking what I’m seeing with the valve cover girdles. Maybe the cork gasket would be better under the valve cover and the girdle directly on the valve cover? Or no gasket at all and girdle directly on the valve cover?
But the cork gasket apparently allows for irregular compression when the girdle is torqued down as per Marty’s experience. Thus it would seem better to place the gasket under the valve cover (or no gasket at all) and the girdle directly on top of the valve cover.
He explained that. Skip to the 10:00 mark for it.
The valve cover is so uneven and thin in places that the secondary gasket is to help put the load evenly around the surfaces.
The GM design is just crap. They made the metal too thin so they made the uneven surface design to clamp just the edge tighter. Factory original leaks under warranty were stupid common. Seriously when the GM field reps would come out, mechanics would get fired that day and many went to jail for assaulting the guy.
You think it aggravates you- try it when you are doing the same truck for the third time for free and putting on new covers is not allowed. Mechanics would sometimes buy the covers themselves, loosing $ for a week to deal with one truck. Ive seen guys jb weld a flashing inside the cover to get the oil to bypass the gasket area. One guy confessed to jamming a dab of silicone into each pushrod to stop oil flow from coming up so the truck would leave and he made $ for a month then quit to work elsewhere. That was at a dealership!
I got good at it but I was 100% clear that any leaking gaskets on these and a couple other engines with bad designs- I refuse to work on or was not responsible for leaks.
I always tried my best but it was horrible. Especially with “GMS” (GM Silicone) their official part number back then. We called it Gooey Messy Shittt.
Years later when I learned about “the right stuff” it helped a ton. Mechanics would just buy that themselves and bring it in.

Me too. Buckets and all sorts of containers.I'd skip the new glow plugs if the current batch looks good and is operating properly.
New glow plugs may not last any Longer than what you have.
I do usually keep a set of Ac Delco 60G glow plugs on hand.
It can save me 2 hours if I just need one. Apparently I do that with lots of stuff.
I seem to have lots of spare stuff sitting around.

I was trying the two gasket system, one gasket between cover and head and the other gasket atop of the cover.But the cork gasket apparently allows for irregular compression when the girdle is torqued down as per Marty’s experience. Thus it would seem better to place the gasket under the valve cover (or no gasket at all) and the girdle directly on top of the valve cover.
Oh yeah. When I first got this truck. New injectors and new GPz.I'd skip the new glow plugs if the current batch looks good and is operating properly.
New glow plugs may not last any Longer than what you have.
I do usually keep a set of Ac Delco 60G glow plugs on hand.
It can save me 2 hours if I just need one. Apparently I do that with lots of stuff.
I seem to have lots of spare stuff sitting around.
I was trying the two gasket system, one gasket between cover and head and the other gasket atop of the cover.
I thought all was well, using Honda Bond for a sealer.
Let it set for a while and came back. There was sealer had run from under the rocker cover and onto the exhaust manifolds, also a spot or two of oil, from the breather compartment within the valve cover, RH side. I knew there would be no sealing once oil had flowed a channel. Removed the cover, the gasket and then let the cover set, olen side down so it could finish draining oil out of the CDR chamber.
Went back together with the right stuff, gasket on top of cover then got too carried away with the torque.
It is straightened out now and I did have another gasket and put the new gasket under the girdle. This time snugged them nuts down nicely and it should be good to go now.
After I get the injectors installed, put the pipes to them and then I’ll fire up the engine, run it at a high idle for probably a half an hour or longer to be assured there will be no oil leaks from under them covers.
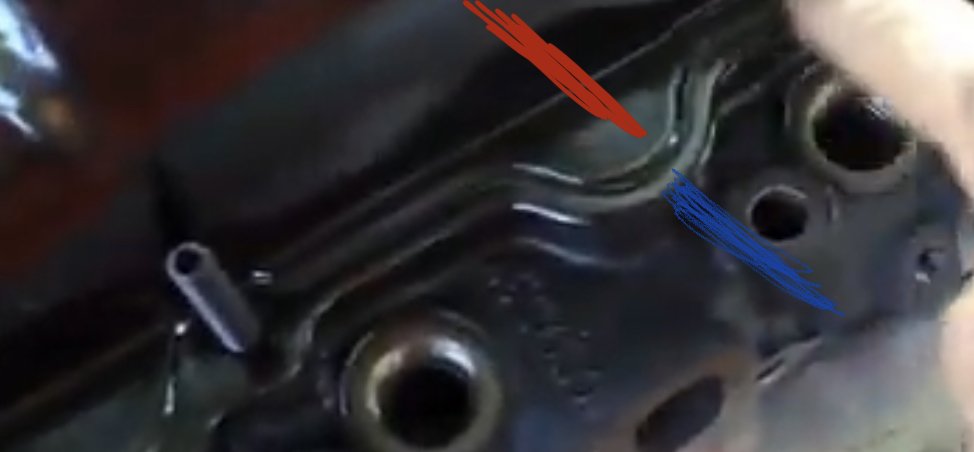
My experience is that they leak on the lower corners, especially the rear. The passenger side one is a pita to get it without wiping off sealant. Probably better to apply sealant to the head side. I still think girdle directly on valve cover, then maybe gasket underneath, would be the best way to go.A gasket on both sides is probably the best with this girdle. Go look how narrow these two levels are on your cover. It is really skinny. So a gasket will squish on the high part and help spread some of the load to the lower part. Compare area marked blue vs red.
Realize the girdle covers both.
View attachment 80337
This has been a seriously annoying problem since the 80’s. I wanted to punch out the engineer of this a long time.
I wish the engine was more popular so that aftermarket companies would make some cast aluminum valve covers to eliminate it.
Be careful where you buy from .Oh yeah. When I first got this truck. New injectors and new GPz.
I saved the GPz I removed. Had them in the boxes, in the box, in my tool box.
Someone in the forum was quite penniless and needed a set of GPz so I sent that set to that person.
I guess now I’ll have another set for such an emergency.
Got these from NAPA, AC/Delco, boxes marked made in Germany.Be careful where you buy from .
Counterfeit glow plugs are or at least were an issue
Not yet. The injector tester I was building from a couple of old jacks would not pump past about 500 PSI. Gave up on those and ordered in one of them made in India affairs.@MrMarty51 did you get your issues sorted out on the new injectors? the few that were pissing streams?


I did my door pins as well. I had to grind a little off to get it to go in.thought i'd start this thread with... What did i do...
replaced the door roller hinge thingy....
went from this:
to this:
still creaks when i open the door but i will straighten it out.
couldn't figure out how to drive the pin all the way.
also got this in the mail:
hard to see at night:
but i will get pics when the sun comes up.
hope you like the thread.......
Delete the vacuum pump. I replaced mine and it gave out less than 30k. Just get a smaller belt and a manual waste gate.
Do the part in the door that catches the pin. I replaced my pins and door seals. Still has play but it’s much better.Yesterday, rescued truck stranded 100+ miles away in Ventura from a water in fuel event. Then treated her to new door latch pins. Still play in the doors. Next I'll try the door weather seal trick.
You can load pics into Your posts directly from Your phone, camera or card.I did my door pins as well. I had to grind a little off to get it to go in.