• Welcome to The Truck Stop! We see you haven't REGISTERED yet.

    Your truck knowledge is missing!
    • Registration is FREE , all we need is your birthday and email. (We don't share ANY data with ANYONE)
    • We have tons of knowledge here for your diesel truck!
    • Post your own topics and reply to existing threads to help others out!
    • NO ADS! The site is fully functional and ad free!
    CLICK HERE TO REGISTER!

    Problems registering? Click here to contact us!

    Already registered, but need a PASSWORD RESET? CLICK HERE TO RESET YOUR PASSWORD!

What did you do with your GMT400 today...or yesterday....

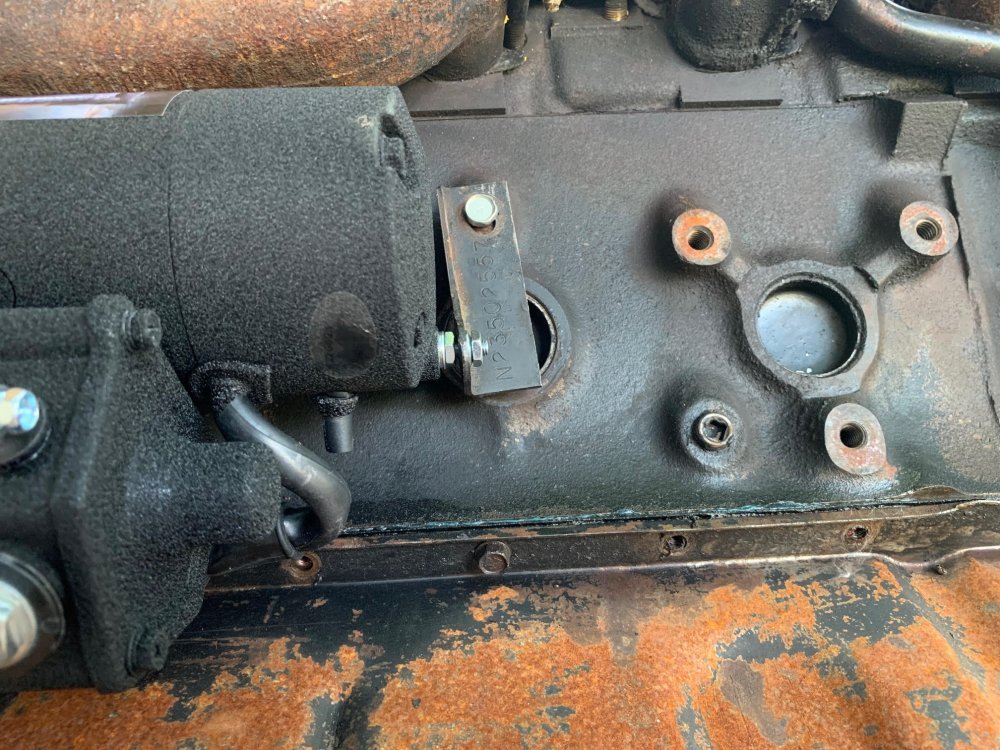
Got the seal removal tool from ebay. It worked great. Had to file the shift shaft slightly to remove some burrs, in order to get the seal removal device to slide over the shaft.
I tried pressing in on the tool and rotating it with the 3/4” wrench, not enough pressure, I must have turned into a weakling in my old age. Removed the puller bolt from the end. Used the brass/mag hammer and tapped the tool while turning it with the wrench. That worked wonderfully.
IMG_6555.jpeg

The kit came with a new seal and a seal driver sleeve. That also was a mighty fine unit to add to the tool collection.
Coated the OD of the new seal with no1 permatex, Seal lips with some lube and the little seal driver punched it right to home.
The seal that came with the tool kit looked more substantial than the CR seal I had bought so I installed the seal furnished with the kit.
IMG_6556.jpeg
For about $20.00 this kit should be in every tool box.
 
Gave grandson a short lesson on reversing out of the garage.

Checking mirrors….
IMG_0069.jpeg

IMG_0070.jpeg

Probably will have to repeat it later when his feet touch the pedals.

Sorry for the grainy pic. Screen capture from a video that isn’t supported by the site. It was texted to me so, lost all resolution.
 
Has anyone had bad experience with the hayden fan controller? I have the electroviscous fan clutch tied into the controller using the fan 1 wire and fan 2 wire is heading onto the dash to power a light in the dash to tell me when it's on. the fan does come on when the temp rises like I have it set, but the override part that uses the AC green wire on the controller is not turning the fan on. I have this wired into my ac fan pressure switch

Yesterday I noticed my ac not getting as cool as it used to and figured it's just low on juice (has a slow leak) checked the static pressure and sure enough it was showing about 40 psi lower than the static chart according to the outside temp. I added one can of 134a that night and it seemed to cool nicely.

Today leaving from work I couldn't get vent temps below 70 and noticed that the fan clutch wasn't kicking on. got home and toyed around with the gauges and a test light. high side pressures were getting upwards of 350-400 and I had signal to the controller from the pressure switch but no fan engagement. Checked all power and grounds to the controller, other than not having a spare relay to use on the controller, I think the controller had gone kaput even though it still works thorough the temp sensor!
 
Last edited:
Did some cleaning up. Used a can of B&P cleaner and dried most the oil off the heads. Got under and dried some more.
One spot of oil. Seems to be coming from the HB or the pan are just behind the HB.
HB is a new fluid dampener and a new cranking shaft seal was installed at that time.
One slight prestone leak, tightened the lower radiator hose clamp and cured that.
Someday, in the not real distant future, going to pull this engine. Dismantle it as far as possible, without disturbing mains if block is cracked, do a total out of frame reseal and a set of them gapless rings. Yeah ! ! ! ! 😹😹😹
 
Fan controller confirmed partially fried, wired up the compressor direct to the controller and nothing, no power out to the fan clutch. ran the engine a bit till it got up to 200 on the temp gauge, and I had power and heard the fan kick in. so a new controller is on the shopping list. I managed to rig up a relay and get the override working again, separate from the controller, so that's temporarily fixed.

Back to the new power master starter... I dug out my other starter bracket which is a GM one, gave it a good look since I had used it before and can see it's slightly bent same as the one that's now installed on the truck. Went out and gazed at the 6.2 engine on the stand holding the bracket up to the block looking for a way to possibly reinforce the bracket to give it a little more rigidity. I realized the angle the bracket is bolted to the block and it's shape, if the bracket (which is nothing more than a small piece of angle iron with some carvings) was about an 1-1/2" longer, the other end could rest on the lower area of the block just slightly above where the oil pan meets the block. Plan now is to take the bracket to work, cut a section of angle iron a bit longer than the bracket, drill holes that match the bracket. bring it home and use the 6.2 engine as a mock up fitting the new starter, shaping the newly made bracket for clearance issues. then seeing what else I can do to help keep the starter from torquing and pivoting on the block.

being the engine in my truck has the weld repair on the starter mounting ear, this might help hold the starter in place better and longer to keep it running till the rest of it wears out. :)

for a visual reference, below is a pic of a bracket, I marked where it is getting bent. It's only a slight bend, not enough to touch the block but there is also a freeze plug behind it on the engine, if and when that welded ear lets go completely, I fear also it's going to send the bracket and starter into that area punching the freeze plug in!


1686794635341.png
 
@MrMarty51
Is your fan controller the one with relay(s) built in? If not you need to have some for it & make sure they are higher amperage relays to withstand the power.

@dbrannon79
Beefier is better, yes. But what would be best is if it were hardened. There is videos how to heat it, incase in carbon powder, properly temper it to make it much harder therefore not able to flex.

The other way is trying to have one made from tool steel and all the cutting/ drilling done on a water jet so none of it’s temper is lost. Lets not talk about the money involved in this theory, it will just make us all feel bad how broke we are!
 
I figured anything would be better that what is here now. with the factory bracket, most of the angle iron is carved out leaving a mostly flat steel bracket with an ear for the starter taking a lot of the strength away. I'm sure they had to do this to have clearance on the factory starter. with the smaller Powermaster starter, there is nothing behind it that would make an clearance issue if the bracket was a full un-carved angle iron. at least that was my thought anyway. making the length longer to allow to bottom end to rest on the block was another idea to help stop the flex at the top block mounting point too. it would be nice if the block had two threaded mount points for the bracket, but I some how think GM was unaware of the amount of torque from the starter allowing the block to break when they first designed these engines. this bracket was probably a quick fix from the engineers before they went full mass production. Not to mention GM's bean counters trying to keep low costs and high profits.
 
I figured anything would be better that what is here now. with the factory bracket, most of the angle iron is carved out leaving a mostly flat steel bracket with an ear for the starter taking a lot of the strength away. I'm sure they had to do this to have clearance on the factory starter. with the smaller Powermaster starter, there is nothing behind it that would make an clearance issue if the bracket was a full un-carved angle iron. at least that was my thought anyway. making the length longer to allow to bottom end to rest on the block was another idea to help stop the flex at the top block mounting point too. it would be nice if the block had two threaded mount points for the bracket, but I some how think GM was unaware of the amount of torque from the starter allowing the block to break when they first designed these engines. this bracket was probably a quick fix from the engineers before they went full mass production. Not to mention GM's bean counters trying to keep low costs and high profits.
I realize you’re dealing with a block with prior damage from an improperly installed starter, but this type of damage is more of the exception than the norm. The stock set up works if installed correctly.
 
That is true, Mine has prior damage where others that don't, the normal bracket would be more than adequate. LOL the hillbilly side of my re-engineering skills come out when trying to keep this thing running!

Hopefully there will be some good that comes out of this though. I have that 6.2 that fell into my lap siting on the stand. I haven't had time or funds to mess with it, but now after I replace this starter, I will have a spare starter that still cranks to do some testing on that block. compression tests, and maybe even get to hear it run on the stand!. I will have to but a flex plate to install unless I can use the manual flywheel to do the testing on it.

it has a DB2 pump on it but if it is a working engine worthy of installing, it will end up getting a DS4 installed unless I win the lottery and can convert it over.
 
Ok, I'm in need of a little advice. I tool the new starter and snuggly mounted on the donor block to see how or what I could do dealing with my damaged engine to help secure it from moving and maybe lasting long enough till the engine wears out. after securing the starter (not torqued, only snugged up the bolts) I placed the factory bracket in and noticed it has to be at a slight angle to align the hole on the block! not sure if anyone noticed this before or if this is any issue. also need help coming up with an idea for a heat shield. I also have the piece of cut angle iron in the pics too for ideas and suggestions. The stud that's on back of the starter has a nut, lock washer, and also has a hex that looks like the stud can be removed from the starter.

First issue... I'm not sure if others have had to pull that stud to mount the bracket behind the hex or not, or even if leaving the bracket at an angle to line it up is fine to do.

Second issue... I need some suggestions for rigging up some sort of heat shield since the starter motor is only a fingers width from the bottom of the manifold. I have some exhaust wrap I could wrap around the manifold in that area, or maybe attempt to forge some sort of shield from a beer can like I did for the injector return lines under the turbo, just not sure how I'd mount it. band clamp around the starter motor?

Third issue... need ideas about the piece of angle iron if that will help any more than the factory bracket to not bend and keep the starter from pivoting. Now I did check the fitment of the bolts in the starter holes..... well at the top where the threads go into the block, there is a minuscule amount of slop. at the bolt head end there is much more slop as if the holes in the starter nose are tapered slightly. I could possible wrap a piece of beer can or something thin around that end of the bolt to try and take up that slop, but I doubt that will do much. over all the bolt hole slop is not much at all, I left the bolts loose enough to try moving the starter. it barely moves any at all. My old starter can move a lot as a comparison, but again the outer ear on the block I don't want to trust to hold. Hence wanting to reinforce the rear bracket to take more side load.


Img1.jpgImg2.jpgImg4.jpgImg5.jpgImg6.jpgImg7.jpgImg8.jpgImg9.jpgImg10.jpg
 

Attachments

  • Img3.jpg
    Img3.jpg
    185.1 KB · Views: 0
What did the factory one look like? I seem to recall most heat shields clamp to the starter solenoid. this wouldn't work with this style starter
though

I saw this on amazon, a starter wrap.

 
As an Amazon Associate we earn from qualifying purchases.
Well, I decided to start a new thread on the starter sage. here is the link.

 
Had the truck and trailer loaded down with supplies and items to haul to the cabin.
That was Friday morning.
Left for the cabin about noon or so.
Made it about 15 miles out and I see this nasty puff of smoke emitting from under the truck. Pull over, oil leaking. 💩 call AAA.
My son He hauls @s and takes the lake boat back to town, comes back and he hooks to the utility trailer to take it back to town.
after about an hour and a half and no response back from AAA, risk it and haul @s back to town OIL leak and all.
Borrow the stepsons pickup, which also has a 6.2 liter engine, except a gasser HP Corvette kind of a enjun and back to the cabin we go.
Weekend consisted of a couple more problems but we got the new propane fridge delivered, hooked up and working like a champ.
Now I’m planning on pulling the engine. Changing every gasket and seal and then using an oil pump drive adapter spinning up the oil pressure to make sure there is no leaks.
I’m totally sick of this and am most ready to throw in the towel. Just been too many months without the use of this truck then have it go to leaking again after all the work of sealing up those rocker covers.
New covers will be on order: I’ll be starting a thread on that too.
IMG_6584.jpeg
 
was it leaking bad? I'm curious if possibly crankcase pressure blew out the gasket or sealant. wondering if the CDR is to blame.
 
Back
Top