• Welcome to The Truck Stop! We see you haven't REGISTERED yet.

    Your truck knowledge is missing!
    • Registration is FREE , all we need is your birthday and email. (We don't share ANY data with ANYONE)
    • We have tons of knowledge here for your diesel truck!
    • Post your own topics and reply to existing threads to help others out!
    • NO ADS! The site is fully functional and ad free!
    CLICK HERE TO REGISTER!

    Problems registering? Click here to contact us!

    Already registered, but need a PASSWORD RESET? CLICK HERE TO RESET YOUR PASSWORD!

HE351VE with functional VGT on 1997 6.5L

I could probably make the current battery locations work with just the intercooler, but I want that real estate right behind the core support on the passenger side for a CAI as well, and I'm sure I can make use of the battery location on the driver side as well.

Oh I just remembered, I have to figure out new mounting for the power steering cooler. It was bolted to the front of the core support between the AC condenser and the driver side lights, that won't work now. I believe new brackets can be mount it in the same location, away from the core support, in front of the intercooler. Essentially next to the oil cooler.
My p/s cooler was the OEM coiled mounted inside of the d/s chassis rail....
 
Still making progress...

The intercooler and radiators are mounted. Next problem is the headlight adjusters, they aren't going to fit. What did you guys do to get them to fit besides trimming them down?
 
Looking at aftermarket headlights because my stock housing are pretty cloudy anyway...

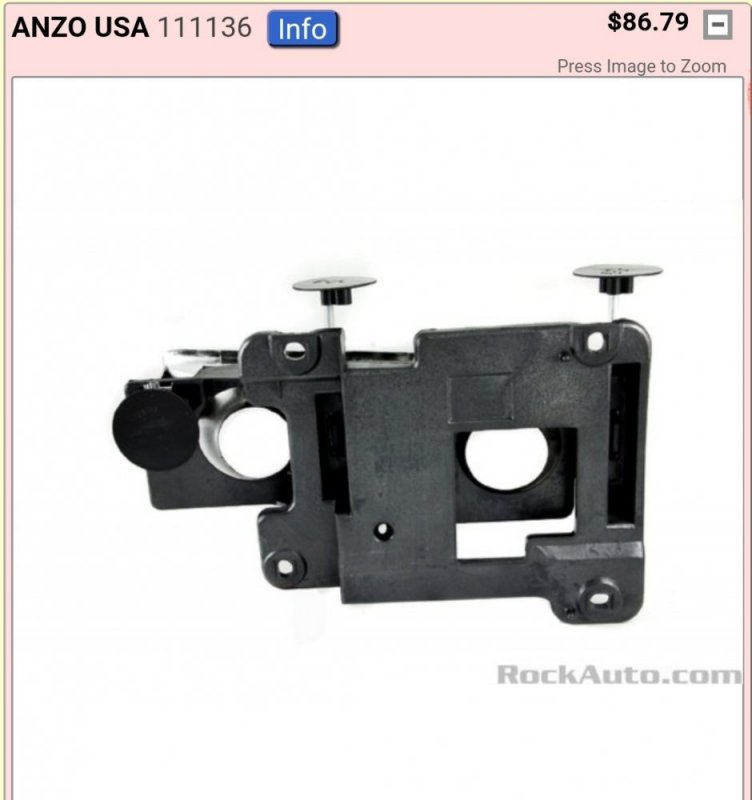
The mounting/adjuster brackets on these Anzos looks much smaller and the horizontal adjustment looks to be a plastic foot on the end of the screw.
Screenshot_20200219-193939_Chrome.jpg
 
Looking at aftermarket headlights because my stock housing are pretty cloudy anyway...

The mounting/adjuster brackets on these Anzos looks much smaller and the horizontal adjustment looks to be a plastic foot on the end of the screw.
View attachment 59562
No, those are just covers over the drive end of the adjustment screws to protect the the shipping box from accidental puncturing from the inside out in case it is dropped, etc during shipping. Remove those caps and you will find that underneath it will most likely be either an external 7mm hexagon for using a socket on a 1/4" drive extension, or have a recessed #2 Phillips drive in the end for using a long-shanked screwdriver.
 
Ah shucks... that won't work then. I'm better off moving forward with modifying the stock adjuster brackets.
 
Looking at aftermarket headlights because my stock housing are pretty cloudy anyway...

The mounting/adjuster brackets on these Anzos looks much smaller and the horizontal adjustment looks to be a plastic foot on the end of the screw.
View attachment 59562
If looking at replacing your headlights, now would be a good time to consider going with projector headlights and aftermarket HID retrofit kits for the Hi and Lo Beam lamps. I went that route, using 55W 5,000°K (natural daylight) capsules. The results were night and day (pun intended) from OEM w/55W halogen to that upgrade. The added benefit is that the rear of the housings are much smaller, as they don't need the large parabolic focussing reflector that the OEM-style lights do.
 
If looking at replacing your headlights, now would be a good time to consider going with projector headlights and aftermarket HID retrofit kits for the Hi and Lo Beam lamps. I went that route, using 55W 5,000°K (natural daylight) capsules. The results were night and day (pun intended) from OEM w/55W halogen to that upgrade. The added benefit is that the rear of the housings are much smaller, as they don't need the large parabolic focussing reflector that the OEM-style lights do.

Have a link or part number for housings?
 
FWIW The Anzo brand delivered some unusable headlight assemblies for my 2003 Dodge. Had bright and dark lines in the light beam. Avoid them or make sure where you get them pays the return shipping as well.

@Husker6.5 suggestion of HID retrofit: make sure you do a 4 on high mod as well as HID low beams may take a moment to warm up. This is a problem switching from high to low beams if the HID low beams are not on. Further problems are one HID may not always light up being switched (high/low beam) so much.

I don't get the "love" of the blinding glare daylight "blue" color headlights. Blue light is simply glare not only to oncoming drivers, but, in fog and will make it more difficult for the operator with 'more' blue light from their headlights. Just consider the oncoming driver at 65 MPH is blind from the blue glare and set up to indirectly hit you head on after possibly drifting off the right side of the road and loosing control, bouncing off something in front of you like a guard rail, telephone pole, etc. Eventually the excessive blue glare in headlights is going to come to the attention of government regulators like coal rolling did.

As it is HID's alone in a normal (traditional yellow) color make a world of difference. Add updated headlight assemblies for even more improvement and the blue glare isn't necessary.
 
@WarWagon I'm not a fan of the bright white or blue headlights either. 5 or 6K would be the lightest I would go, but a projector retrofit does interest me. I just need to find some solid lenses to pull the trigger on.
 
Incase this helps: sunlight as we see it reflect off everything (not looking at the color of the sun) is 4900-5000k

It is easier to producer higher lumen output (how bright it really is) by going higher up the k scale. So a 5,000 lumen light at 7,000k reflecting off something like a car is seen by us the same as a 7,000 lumen light at 2,500 k.
incase they advertise lumens and a competitor uses candle power: 12.57 lumens= 1 candle power.

As an electrician that has to do a TON of LED and other lighting work- 5,000k is the best light imo. everything else your eyes have to compensate for and is best left to the interior decorators to add that special feeling In the room for ambience...
In a work zone where peoples life Is on the line, regulations say only 5,000 k is allowed unless special provisions are required.


See the source image
 
@Chewy1576 No Friggin' Clue. Bought them off of eBay 10 years ago. German made with Bausch and Lomb lenses and optics. IIRC, about $200 for the Hi/Lo combination pair. The Lo positions are the projectors and the Hi are reflectors, but with precision parabolic profiles so they have a precise 10° vertical x 20° horizontal dispersion pattern and just a plain, flat lens (no fluting needed like on sealed beams/halogen OEMs). A 55W 5000°Kelvin HID is just over 8 times brighter than a standard 55W halogen headlight. I almost never used my Hi beams, except on very deserted rural back roads/highways/Interstate, as the Hi beams were able to light up overpass exit signs just over 3 miles off. The Lo beams throw and almost 160° wide horizontal beam, that's almost straight across the front. There is a "mask" behind the lens and in front of the HID capsule. Becauae of the Laws of optics, this mask creates a sharply defined horizontal cutoff line above which there is no light. When properly aimed vertically, the lamp creates a very distinct cutoff on the pavement in a half circle in front of the vehicle. There is a "notch" built into the mask, so that when aimed properly, on the center or lane line the cutoff dark zone dips down sharply and much closer so that oncoming vehicles aren't blinded by the Lo projector. On my Burb, with the 55W HID 5000K capsules, my Lo cutoff point was about 450' in front of me and the dip zone to the left's cutoff point was about 200' in front. Since the pattern is nearly a half circle, I was lighting the right shoulder/ditch to the side out a good 400' - easy to spot a bambi or five in the ditch or that semi obstructed by tall weeds driveway entrance off of a gravel road. To the left, out about 175' or so. Improper aim with HIDs - OEM headlights or aftermarket - is the cause of the majority of what @WarWagon was talking about with the glare.
 
A lot has happened since last update...

The intercooler install and all supporting mods are done. Been back on the for a few days trying to dial things back in. Max boost is only getting to about 18 psi, but IATs are about 10 degrees above ambient when cruising along, 20 or so degrees above ambient under high boost. I will get a better idea how it will work under load when I get the travel trailer out, but for now I'm really impressed.
 
Your turbo is breathing easier and more efficiently and the air charge leaving it is being cooled and made more dense as it passes through the charge cooler on its way to the intake manifold. Plenty of cool oxygen, more complete burn of fuel in the pre-cup and cylinder gives you cooler exhaust temps and lower coolant temps as an added benefit. Let us know how it does towing.

I've always wanted to do a VGT with a cooler on my Burb for high speed, low RPM cruising on the Interstate with maybe a smaller camping/recreational trailer in tow or the occasional haul of a full cord of firewood to the house. I have both a 1st Gen Duramax and a 2nd Gen Dodge intercooler sitting here while I hem and haw on which cooler retrofit I wish to undertake once I can secure an affordable turbo to do it with AFTER I address my IP and transmission issues first.

EGTs are way down as well. I took it on the interstate for the first time today. It cruised along at 80 mph at 7 psi of boost, 1:1 drive ratio, 75 degree IAT, and 600 degree EGT. Going down the highway at 55 mph, it sits at 3 psi of boost, same IAT, and 400 degree EGT. I need to retime my IP after finding it flopping around because all of the nuts were loose also.

I will tell you from experience that there is a lot of cutting and fitting with how I did the 2nd gen CAC. I cut and/or trimmed the core support, headlight housings, marker light housings, lower grille valance, and both inner fenders. In addition to relocating the batteries, making a Cummins radiator fit, redoing the transmission cooler, rerouting the turbo oil drain, reclocking the turbo compressor outlet, building a new turbo air intake (that im still working on. The SPECTRE filter can thing I was using is super restrictive. I don't even have a filter on it right now waiting for the new PDD cone filter to get here).

If you're up for blazing a new path, the Duramax CAC is supposed to fit about the same and be able to use the stock radiator. The rest of the stuff around it may still need the same custom fitment treatment though.
 
Last edited:
Haven't updated in a while...

Towed my 7500 lb travel trailer for the first time after the intercooler install. IAT maxed out at 135 degrees and EGT never went above 900 degrees. Although, I created more issues. Climbing a long, steep mountain grade coolant temp peaked at 240 and transmission fluid temp got to 260 before i pulled off and let it cool down. The coolant reservoir level is noticeably lower, so I assume it was boiling off coolant and pushing out of the drain tube. There isn't pressure in the coolant hoses so hopefully the head gaskets are still intact. Transmission is still shifting so I assume it is OK, but I should probably check the fluid after we get home.
 
Back
Top