• Welcome to The Truck Stop! We see you haven't REGISTERED yet.

    Your truck knowledge is missing!
    • Registration is FREE , all we need is your birthday and email. (We don't share ANY data with ANYONE)
    • We have tons of knowledge here for your diesel truck!
    • Post your own topics and reply to existing threads to help others out!
    • NO ADS! The site is fully functional and ad free!
    CLICK HERE TO REGISTER!

    Problems registering? Click here to contact us!

    Already registered, but need a PASSWORD RESET? CLICK HERE TO RESET YOUR PASSWORD!

Fuel pressure gauge

Fuel pressure gauge T and clear fuel line link


1988 thru 95 are the same then the spec changes by 1 foot pound Diesel Engines
1988-95 models
See Figure 11
  1. Disconnect both batteries.
Click image to see an enlarged viewFig. 11: Intake manifold bolt tightening sequence-1988-95 diesel engines
  1. Remove the air cleaner assembly.
  2. Remove the alternator rear bracket.
  3. Remove the EPR/EGR boost solenoids and bracket.
  4. Tag and disconnect the Crankcase Depression Regulator (CDR) hose.
  5. Tag and disconnect the EGR and crankcase vent hoses.
  6. Remove the intake manifold bolts. The injection line clips are retained by these bolts.
  7. Remove the intake manifold.
  8. To install:
    1. Clean the manifold gasket surfaces on the cylinder heads and install new gaskets before installing the manifold.
      The gaskets have an opening for the EGR valve on light duty installations. An insert covers this opening on heavy duty installations.
    1. Install the manifold. Tighten the bolts in the sequence illustrated to 32 ft. lbs. (42 Nm).
    2. Install the ground straps and fuel line brackets.
    3. Engage any electrical connections and vacuum hoses that were removed.
    4. Install the EPR/EGR valve bracket. Reconnect the hoses.
    5. Install the alternator bracket bolt.
    6. Install the air cleaner assembly.
    7. Connect both batteries.
    1996-98 models
    See Figure 12
    1. Disconnect the negative battery cable.
    2. Remove the fuel filter.
    3. Drain the cooling system.
    4. Remove the thermostat bolts.
    5. Remove the fuel line return hose and its retaining clips.
      Mark the location of the EGR/boost or boost (whichever your vehicle is equipped with) solenoid studs so that they can be installed in their original positions.
    1. Remove the EGR/boost or boost (whichever your vehicle is equipped with) solenoids with the bracket from the intake manifold studs.
    2. Remove the heater hose bracket and the vacuum hoses from the EGR valve.
    3. Remove the long pencil brace that attaches to the turbocharger.
    4. Remove the upper radiator hose.
    5. Remove the fuel filter assembly and the POE wiring harness bracket to the rear of the lower intake manifold.
    6. Remove the intake manifold that runs from the turbocharger to the upper intake manifold.
    7. Mark the location of the fuel line clips and brackets so that they can be installed in their original positions.
    8. Remove the intake manifold studs and the fuel line clips.
    9. Remove the intake manifold and the gasket.
    10. If any further work is to performed around the intake manifold area, cover the intake ports to prevent any dirt entering the ports.
    11. Use a scraper to clean the gasket mating surfaces.
    To install:
    Be sure to use the correct gasket, the engines that utilize an EGR valve should have an opening in the gasket. Likewise the vehicles that are not equipped with an EGR valve should not have an EGR valve opening in the gasket.
    1. Remove any covers placed over the intake ports to prevent dirt from entering the ports.
    2. Install the new gaskets and the intake manifold.
    3. Apply Teflon® sealer to bolts 9, 11, 13 and 15, as these bolts are exposed to the crankcase.
    4. Apply a threadlocker sealer to bolts 1, 2, 3 , 4, 5, 6 , 7, 8, 10, 12, 14 and 16.
    5. Install the intake manifold studs and the fuel line clips. Tighten the studs to 31 ft. lbs. (42 Nm) in the sequence illustrated.
    6. Install the upper intake manifold.
    7. If equipped, install the EGR tower gasket on the round center portion of the upper intake manifold.
    8. Slide the upper intake manifold into the turbocharger outlet hose.
    9. Apply a suitable silicone sealant to the turbocharger outlet before you install the turbocharger outlet onto the upper manifold.
    10. Install the clamp for the turbocharger connector hose and tighten the connector hose clamps to 50 inch lbs. (6 Nm).
    11. Install the fuel line bracket and the ground straps.
    12. Attach the upper radiator hose.
    13. If equipped, attach the pencil brace to the turbocharger.
      When installing the upper intake manifold, if equipped with an O-ring between the upper and lower manifolds, always replace this O-ring as failure to do so could cause a derivability problem.
    1. Attach the vacuum hoses and the install heater hose bracket.
    2. Install the EGR/boost solenoids with the bracket onto the intake manifold studs.
    3. Install the fuel return line hose and the fuel filter. Tighten the fuel filter bolts to 31 ft. lbs. (42 Nm).
    4. Install the thermostat bolts.
    5. Connect the negative battery cables.
    6. Refill the cooling system.
    7. Start the engine and check for fluid leaks.
      Click image to see an enlarged view


Read more: http://www.justanswer.com/chevy/1u4mo-torque-specs-6-2-6-5-intake-manifold.html#ixzz3OZ7DJ1k1
 
I plumbed my electric auto meter sender at a Tee and my needle bounced a lot that I believe shortened the life of the gauge. Are you going to put a length of hose so you get a decent sized air air pocket to dampen the pulsing pressure or use a Snubber adapter of some sort?
 
So with the adapter fitting, are there any other fittings or adapters we need to thread this into the IP on ether a DS4 or DB2? and then to the barb for the hose? it looks like this fitting is a 6an male to female. iirc the fitting the screen is attached to on the DS4 is female o-ring boss.
 
I too have been looking at electronic fuel pressure gauge kits.
I just dont know what a good brand name is.
Used to be Stewart Warner was the go to company but I know knottt now.
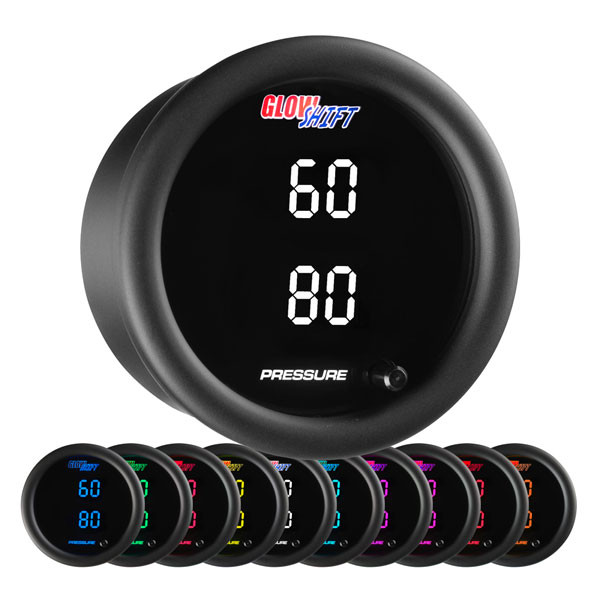
I was hoping to find a smaller gauge than what I have. I have a combo digital dial, normal sized gauge.
I'm not sure where to put it. Haven't looked much yet.
 
So with the adapter fitting, are there any other fittings or adapters we need to thread this into the IP on ether a DS4 or DB2? and then to the barb for the hose? it looks like this fitting is a 6an male to female. iirc the fitting the screen is attached to on the DS4 is female o-ring boss.
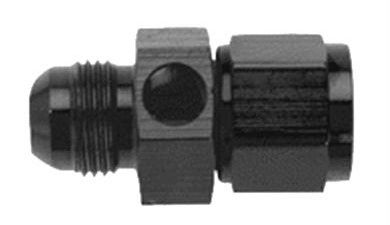
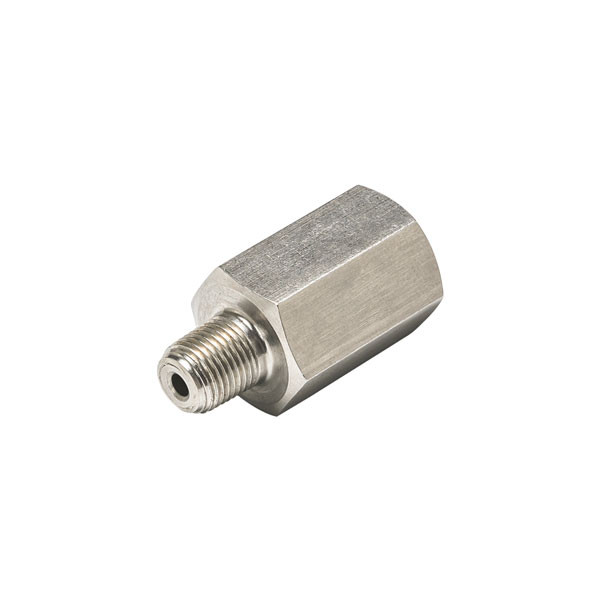
That's the question I need answered also. I've always wished. There was a kit to get at least to the sending unit and incoming fuel line.
I have a lot of fittings here, but it's often not that expensive to just buy a kit as opposed to spending 2 hours searching through stuff.
 
I plumbed my electric auto meter sender at a Tee and my needle bounced a lot that I believe shortened the life of the gauge. Are you going to put a length of hose so you get a decent sized air air pocket to dampen the pulsing pressure or use a Snubber adapter of some sort?
No idea. Now knowing that's an issue, It's something I need to consider.
 
As an Amazon Associate we earn from qualifying purchases.
Back to this again. It's been discussed several times.

But I still don't have a clue what all is needed or where to buy.

I have the gauge posted above, but I'm not liking it.

I've been searching dual source fuel pressure gauges, no results yet.
 
From what I understand the mod mafia gauge T is aluminum. I'd prefer steel.

What would I want for a T on the incoming side on the fuel filter?

I have to pull the intake and would like to have everything here, when I do.

 
I would use snubbers on the meter sensor(s) ( each if you use (2) 1. pre filter 2. post filter I am assuming). That should help meters not bounce a lot.

I would get 2 meters similar as you can ( the exact same better) That way the comparison would be more accurate. But I would think as long as they are same range should be almost as good and just checking LP is working fine almost anything would work. The pre filter guage could be mounted more hidden as you are you are not so much interested in it unless the post filter shows too low. I used brass plumbing tee's and hose barbs to tee into IP supply line I fished it out from under intake and fished as necessary to filter housing. Not the cleanest but was easier didn't require intake removal.
 
Like you, I prefer steel to aluminum. But finding that fitting would be hard in steel.
Probably have to buy a steel one, then drill & tap it.

For fitting before the ffm, Leroy’s top fitting works easy enough- it is prefilter. Otherwise get a T like the one in the pic below. I can’t find a pic with the 1/8 size on the side of the T, but have bought them before.

I am just using a single gauge. I’m actually trying to find just a digital read out that is a little rectangle. It will have a button/ switch next to it. When switch is in north position (or button not pushed) it will read the ip pressure. When I flip the switch or push button, it will read the prefilter pressure.
But I kinda like that glowshift option. I really like but would never spend that much on the aeronautical one. IMG_9418.jpeg
 
I am still considering the double readout glowshift gauge. Since I already have one gauge, I could save $80 by ordering another like I have.

I'd prefer something like the expensive gauge. But much cheaper. I'm guessing they're out there. Maybe even the same gauge that isn't labeled aeronautical.

Just a matter of finding one before I run out of shopping time.

I've taken to using mostly all stainless fittings, since ULSD doesn't seem to play well with brass.

I had brass fittings on the Toro and when I had to get into it, there was a fair amount of corrosion.

I was looking for the exact fitting Will described in stainless. I've struck out so far.

I'd like as few connections as possible.

Since I haven't figured out exactly everything I need on the IP end, I have been thinking of following schiker's lead and just using a stainless T and barbs.

Thanks
 
Back
Top