• Welcome to The Truck Stop! We see you haven't REGISTERED yet.

    Your truck knowledge is missing!
    • Registration is FREE , all we need is your birthday and email. (We don't share ANY data with ANYONE)
    • We have tons of knowledge here for your diesel truck!
    • Post your own topics and reply to existing threads to help others out!
    • NO ADS! The site is fully functional and ad free!
    CLICK HERE TO REGISTER!

    Problems registering? Click here to contact us!

    Already registered, but need a PASSWORD RESET? CLICK HERE TO RESET YOUR PASSWORD!

2008 GMC Envoy Denali

I get the feeling when Nate was growing up, the phrase that was said to him most often was -
“Son, no matter what- do your very best, don’t go half way.”
Nah, I think when he was growing up it was, "Son, remember. Finish what you're working on now before starting to work on something else." And like every rebellious kid, he's done the exact opposite of what his parent told him not to do!


You guys give me too much credit. I think maybe “more ambition than brains” might be more appropriate.
 
I got all the seams taped with foil tape tonight.

0EF614DB-A55B-4CDC-91F8-52E74D699BAF.jpegC551CDE4-0977-403F-BE34-C4F6B0BA29B0.jpegE5F73F24-6B4A-4AB4-BD81-BB956F3CAC67.jpeg

I also extended the coverage of the Tunnel Shield under the floor. I originally stopped where I did because there are factory heat shields there, but today I decided that was silly - why not add additional insulation there? So I did.

110A3B97-E881-473F-80CE-75043E85FAE2.jpeg4FBC8472-EA31-44E4-8ADD-D4C5BD73BE38.jpeg

Then I reinstalled the factory heat shields. I used fender washers at the fasteners because some of the holes were corroded oversize and were a rattle waiting to happen.

76558C10-3148-42A6-AB14-F2FE9C41ED00.jpeg1DAF3A47-9C0E-4D05-B322-A5216A36C1A6.jpeg
 
A couple finishing touches this evening.

I patched up a couple spots on the original firewall insulation pad and reinstalled it. I debated reinstalling it, but decided a little extra insulation would be a good thing for interior comfort. I’d love to get a new one, but I can’t find the part number......spending the time at the dealership trying to find it and then hearing what they want for it made me decide to just reuse this one. I also cleaned and reinstalled the coolant overflow container.

43AF7653-0631-4670-81BA-E40B92177135.jpeg

Then I assembled the motor mounts. I think the pictures pretty clearly show how much more compact they are when compared to the stock ones. Hopefully I don’t hate the additional vibration they transmit. People say the aftermarket ones that mine are a copy of don’t really have much more vibration - you feel a cammed engine either way. I sure won’t mind feeling the cam, now the girlfriend on the other hand....🤔

4F7FB347-F9A9-4C3A-B15B-51B7DF070F66.jpeg004A2D17-BDA1-47FD-891D-E86B7D84884B.jpeg7C75927E-F516-436B-BA38-1560C5C998DD.jpeg8167604E-ED49-4F75-B4E3-601B13BF8FD0.jpegA98E0F29-425B-4B3F-A005-C70C85EBCFB3.jpeg05FD4FD1-FD3F-4534-A70D-56642374431B.jpeg

One thing I didn’t point out before was what I did with the mounting studs. Rather than weld them solid to the mount like the factory design, I welded them together in a strap. This way I can drop them in after the engine is set in place. The reason this is significant is because the studs on the motor mounts gave me fits getting the engine removed with the diff still attached to the oil pan. Once I realized that was the holdup I was able to pop it out with some extra pry bar persuasion....in fact I noticed one of the studs on the factory mount was bent a little. This way it should slide in much easier (and out when I decide it’s time to turbo it and yank it back out and gap the rings). The factory service manual says to drop the diff and oil pan before removing the engine - screw that. I didn’t have the manual before I yanked the engine and I’m actually glad I didn’t - that would have made the removal a lot worse in my opinion.

7AB102BA-54CF-4A10-B5A4-319BE3BC82D8.jpeg09CDDE0B-B2A9-49A9-9F6F-8299636CFB47.jpeg

I called the shop today and still no cam and the heads aren’t done either. Sigh. So this weekend will be catching up on some other details and probably getting some other smaller things like getting tractors ready for spring/summer yard work. Hopefully the heads and cam happen this week so I can make the final push to get it together.
 
Yesterday I focused on the body some. There was a little rust starting on the bottoms of the doors so I decided to attack it now before it got any worse. I’m once again using KBS products. I’m following their 3 step process for rust repair. Here’s a nice video of the process.

The passenger side rear door was the worst of the bunch so I’m using that one for illustration (yes, it was actually pretty bad. #PureMichigan). Here it was before starting any repair.

9C7B3D66-811B-4BC7-BF5A-FD7225CE5FA0.jpeg4E40AA95-C96E-45CF-B9CB-666B4A710FA8.jpegCDDD7DEC-CA5B-4308-9586-4510BC08D504.jpeg135E405A-7E33-450C-BDDC-D074C063A278.jpeg

Next I did step one with the KBS Klean and wire brushes and Scotchbrite.

63884975-16AE-464C-99E7-0EC72F46F0A1.jpegD64D00BF-00A9-4809-9AD3-94D062FDAE60.jpeg

Then it was on to the Rust Blast.

6FCDCCBD-D93B-4D6D-871B-714BE17CB578.jpegAE1731FC-F8E4-4DA7-A7A7-0C59B46E64A8.jpegAE1731FC-F8E4-4DA7-A7A7-0C59B46E64A8.jpegCA1FA2EF-C989-46FF-8F2B-28F84F7D72D9.jpeg

I blew the doors dry with compressed air after that and then they will air dry overnight before painting.
 

Attachments

  • EBEFA93D-7D4A-4533-9B1B-700B9FE1D1E0.jpeg
    EBEFA93D-7D4A-4533-9B1B-700B9FE1D1E0.jpeg
    105.4 KB · Views: 1
I had some more time left in the day so I started making a heater hose fitting. The factory heater hoses have a bunch of plastic fittings, some aluminum tubing and bits of rubber hose. I’m going to get rid of all that nonsense and just use silicone hose. The factory hoses have a tee in the 3/4” line that ties into the steam line between the cylinder heads. I’ve read of people tapping the water pump to tie into the steam line instead of the heater hose, but the heater hose is in a higher location than the water pump so I thought I’d just keep the routing the same as factory. To do that I needed a tee that was 3/4” on the ends and 1/4” at the tee joint. I was having trouble finding this and I didn’t want to use a bunch of screw together fittings that would be bulky ajd clunky looking, so I sourced stuff to just make a welded one myself. I bought some fittings from McMaster-Carr.

AAD9F6F5-CAEF-463C-AC13-66F219CB6CF6.jpeg

Then I cut the unneeded parts off and cut and drilled a piece of tube for the middle.

33DCE5F6-3A43-4E05-B721-EF380DE7356B.jpeg

I ground a cope into the 1/4” fitting so it would fit tight against the tube connecting the fittings.

C8CDBB4A-9F8E-4460-87D1-B10ADCEB3698.jpeg

Today I’ll weld them together and make them purty.
 
No paint update today. I opened the can and it was weirdly separated. I stirred it and it was thicker than normal. So rather than risk putting bad paint on the doors I decided to not do it and call KBS tomorrow.

On to the heater hose tee. I debated taking the parts to work so I could TIG it together, but decided to just MIG it at home so I could get it done. Plus it’s been a couple years since I’ve touched a TIG....so no guarantees it would have even turned out that great. So I welded it. And since I had some extra time I decided to grind the welds to make them pretty.

BDD0EE11-E6A0-4A2A-ABC3-69F0FE78CD35.jpeg

I pressure tested it for leaks at 30psi.

63C6A4D8-FDC9-42F4-A608-7561581B72C3.jpeg

Then I threw some KBS Motor Koater on it.

87974200-2504-4F9A-AC71-D10ADDF66785.jpeg

Then I finished a project I started a few weeks ago: installing the transmission cooler. I had looked at a few different locations and in front of the cooling stack on the driver side seemed like the best location.

First I dialed in the location I wanted and installed rivet nuts in the core support.

960CFEEA-1839-4307-96B9-27B0FA8CC810.jpeg

I trimmed the grill support a couple times and came to the conclusion that I needed to trim it even more. So I needed to move the ambient air temp sensor to the passenger side. Here’s the original hole.

FFDFB0DD-A8D2-4981-B686-3D75BE83A72F.jpeg

And here’s the sensor installed in its new hole.

97187972-5746-45BB-8467-E4136CFFF2C1.jpeg

More trimming. And I made an adapter plate for between the cooler (a Tru Cool unit BTW) and the grill support. This gave me a location for installing clip nuts on the support. I had to get creative with the installation because of the order of operations for installing the radiator and the grill support. I wouldn’t really have any access to the back side of the trans cooler so that’s why I’m going with the clip nuts. They don’t really have to do a lot of work so I think they’ll work fine in this application.

C482356B-AEDE-452A-9198-6ABBCCF6DDFC.jpeg

Here’s the cooler before the other stuff is installed.

725BAA3B-BD3A-45E4-B89F-7C919FCACFE5.jpegDDCFCB0F-F315-479A-ACF8-2B9442CC3E56.jpeg

And here it is with the radiator and the grill support installed. It should get plenty of air flow! Note: this is just temporary hardware. I’ll get better hardware before final installation - especially the stainless that’s currently holding the cooler to the plate.....I’ll have carbon steel there so I don’t get galvanic corrosion between the stainless steel and the aluminum.
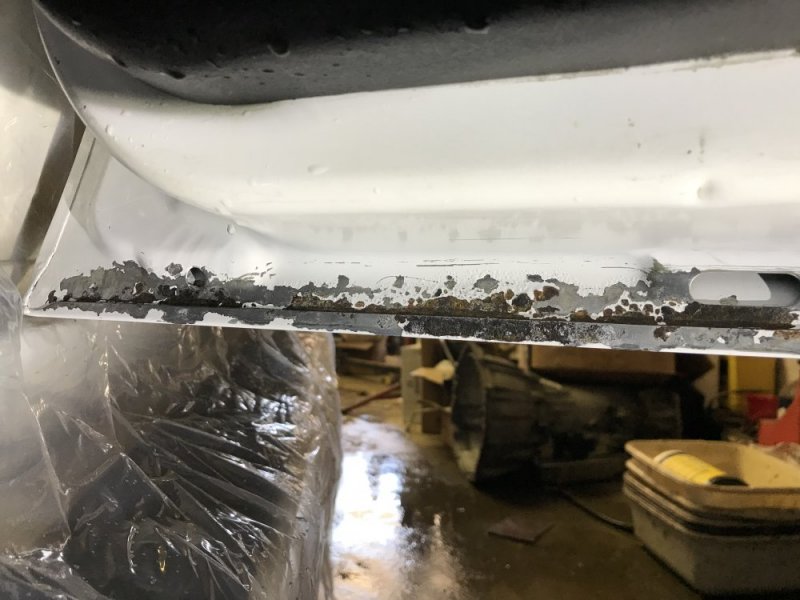
2E7C7BED-7E6F-4F73-997D-572CD8AF9F03.jpeg
 
Tonight I finally got around to changing the rear air springs. The passenger one was leaking when I bought it so the truck would end up ass down after you turned the key off. A lot of people delete the air system and put coils in instead, but I’ll likely be using this to tow our camper a couple times this summer so I like the idea of the ride height being maintained under load. The passenger side bag came out pretty easily, but for some reason the tang holding the driver side bag in place was a real pain! And there isn’t a lot of extra room to work. Finally got the new bags installed though.

55E61EA9-63C4-4DD7-9CEF-EC45DD49590F.jpeg6215CA95-DA56-475C-B015-34CA0650EC5C.jpeg

With the little time I had left I installed the heater hoses and the heat sheaths. I got the 1.25” heat sheath which was nice because it was not only big enough to slide over the hoses, but also slip over the clamps. I’ll of course route and trim the hoses and sheaths once the engine is installed - it just made sense to get the hoses on the heater core while it was easy to get to.

8996D572-5C51-47C5-90CD-A5437D12960A.jpegB3EC8C40-1D22-4FEF-997A-E10DC4D6A2C5.jpegD57F461B-FED0-404E-8687-4713961F0D68.jpeg1D07AC1B-43EC-47D8-9394-0E6CC9DCDAAE.jpeg
 
How's the Tahoe doing?
It's waiting for me to stop messing around with other projects. If I get too long of a delay with the Envoy I'll probably move back over to that for a little bit to finish up the welding I needed to do on the quarters. There's an IDI-only diesel event happening in Ohio in November so I need to get it back on the road for that. I won't have the truck all done by then I'm sure, but I at least want to have it road worthy....so I'll probably put some stuff back together and then take it back apart afterward just so I can attend. The project list for the year is:

Envoy
Skid Steer
Tear down a retaining wall with the skid steer and make it a sloped hill
Tahoe

I should have been working on the skid steer weeks ago..... sigh.
And that's just his list to get him to Memorial Day! LOL!
 
Between getting home from work late and not being able to finish tasks I didn’t get a lot completed tonight.

I received my larger DEI Heat Sheath today. So I installed that around the brake lines and power steering hoses. Then I wrapped the steering rack in the Heat Screen. Last thing to do is wrap the AC lines, but that will be after AC accumulator replacement.

4E1878AB-BA3D-486C-A410-CCF75CA9766B.jpeg5E5609A9-206D-44AD-8AB2-576E1FAE1AA4.jpeg38E8AA00-8ED1-43C2-B0C2-023C588A1C64.jpeg

I moved on to a task I’ve been putting off for a while - repairing the mounting latch on the passenger side of the front facia. It was totally detached when I bought the truck and it sounds like a common problem with GMT360s. The molded rivets were broken off the facia and that’s why it was detached.

D9791EB7-B003-4B86-87DF-B786969F0562.jpeg

After some research on appropriate adhesives to make this repair I bought some SEM Quick Set 50.

82F505C6-1F2D-4EFA-BE54-BAEFD45CD9B9.jpeg

I was going to do it tonight, but while reading the instructions I noticed it wasn’t quite warm enough out in the barn. Poop.

292660E2-932B-4D20-861E-7940FA8E0149.jpeg30EF9E85-CCA3-4EFD-9123-690E0E2E128A.jpeg

So I turned the heater on so I can do it tomorrow night. I did some prep work by scrubbing the repair area with the SEM Universal Surface Cleaner and a plastic bristled brush. Then I ground the facia and the latch with a Roloc disc to give the adhesive some tooth to grab onto. Then I scrubbed the parts again to make sure they were clean.

DDDD5219-D36A-4170-AA9E-11274E5A5261.jpeg

I also scrubbed the driver side because I will add some adhesive on that side at the same time to hopefully keep that side from failing in the future.

E97CCF9E-726C-47DE-BEF6-1D19988B35B3.jpeg

Tomorrow I will wipe this down again and then continue on with the repair.

With the little time I had left I thought I’d replace the tail lights. The truck had some aftermarket tail lights on it that I wasn’t fond of (the lights at the top of the picture below). I picked up a pair of factory lights from the junkyard a few weeks ago. I was going to install them tonight, but decided I should first put new bulbs in them. I’ll get bulbs tomorrow and finish this task as well.

43013B04-9F27-4229-BB35-25E3376FD596.jpeg
 
Back
Top