• Welcome to The Truck Stop! We see you haven't REGISTERED yet.

    Your truck knowledge is missing!
    • Registration is FREE , all we need is your birthday and email. (We don't share ANY data with ANYONE)
    • We have tons of knowledge here for your diesel truck!
    • Post your own topics and reply to existing threads to help others out!
    • NO ADS! The site is fully functional and ad free!
    CLICK HERE TO REGISTER!

    Problems registering? Click here to contact us!

    Already registered, but need a PASSWORD RESET? CLICK HERE TO RESET YOUR PASSWORD!

2008 GMC Envoy Denali

Tonight’s progress:

I got the taillights assembled and installed. (Yes the truck is filthy right now.....that’s road spray from the day I towed it home)

AF745E5C-8A58-4BA5-835B-FEF725FD249B.jpeg

I also got the latch glued to the bumper cover. I first applied the adhesive between the facia and the latch and squeezed it in place for a minute. Then I applied more over all of the tabs to try to lock it in place.

C560AA32-4E28-4B9E-90D0-8347EF9B4A05.jpeg

I also went over the latch that wasn’t broken off yet.

FD0F2A97-3172-4490-B3D1-FD3C74538614.jpeg

But THIS is the big news of the night: my parts are here!! Well mostly.....I was unpacking and inspecting and noticed I was missing an exhaust valve. I messaged the guy and said he knows right where it is. So tomorrow morning I’m going over there before work to pick it up. Assembly starts tomorrow!!!

4922BAD1-13E5-48B0-B666-BCE69DB2F25F.jpeg3CAA1E14-69C4-4812-8D1D-C4CF6998CA62.jpegA4D3427E-B5CF-420F-AD61-2E3A6F1A4B26.jpeg
 
Head stuff tonight.

When I picked up the valve this morning I took one of the heads with me. I asked him to critique it and tell me what he would have done differently. He looked at them for a sec and pointed out the sharp angle where his last cut ended in the throat. He said porting further into the seat would have helped that. He said that when he ports he does the valve job first so he knows how far to port. He said I could take a cartridge roll to them if I wanted without to much risk. So I did....I got as close to the seat as I felt comfortable 😬

Before:

9A690602-B985-43A0-AA3F-32E3A9C690F1.jpegD1DDF695-5134-4189-BA0A-9047402F6F68.jpeg

After:

D2CA8A4B-1CB9-4B4C-BB65-99439BD9AB89.jpeg5A10C8DF-EFF7-4396-92D0-258FE4A05E4C.jpeg

Once I was done with that I cleaned them and moved on to assembly. After assembly I measured the combustion chamber again. Based on some info online I had him shave .013” off the deck surface to try to reduce the chamber 2cc. Mission accomplished! I cc’d the chamber and got 66cc right on the money.

CEBF9F91-247A-453B-9D46-B0B3ABB073DE.jpegD706561E-A9E0-40CF-8401-CE37BD87857A.jpeg

I crunched the numbers and that puts me at 10.4:1, right where I want to be to run 87 gas.

More tomorrow night.
 
Not a ton done tonight. I got the cam installed. Then I installed the Trick Flow timing chain damper bracket - I should have taken a pic to show what this is, but I forgot. My block isn’t machined for a timing chain dampener since it’s an earlier Gen 3 block, but it’s a recommended item to have. Luckily Trick Flow makes an adapter bracket that is held on by the cam retainer bolts and then the dampener bolts to that. The dampener is the black piece just above the crank sprocket in the picture below. Next I installed the cam sprocket and chain......which is when I discovered an oversight on my part. The original cam in the 5.3 was the newer 1 bolt style. When I spec’d the cam and timing set I opted to go with the earlier 3 bolt style. I knew at the time I’d need to source the cam sprocket bolts, but then it slipped my mind. Good old Amazon to the rescue! I’ll have ARP bolts here Sunday. In the meantime I installed some 8mm bolts I had lying around just to hold the sprocket in place in the meantime. Once I get the correct bolts I’ll swap them out.

8F97BF18-958C-4837-B701-D38670EAEEAB.jpeg

Tomorrow I’ll start the day by modifying some stock lifters to be solid and then degree the cam....
 
Ok, weekend update time. Let’s see....

So first off, I lied. I wasn’t going to be starting with the cam, I needed to get back to painting the bottoms of the doors. Last week I called KBS about the thick paint. The guy on the phone said the white is thicker because it has a lot of pigment in it. He said it could be safely thinned with a cap full of their thinner or xylene. I thought I had some of their thinner still, but I couldn’t find it, so I used xylene. I put 1.5 cap fulls from the gallon container of xylene in the 8 ounce can of Rust Seal. It still wasn’t quite as runny as the black I’ve used before, but I didn’t want to get too crazy. It must have been enough because it flowed out like it was supposed to and you couldn’t see the brush strokes when it dried. I applied 2 coats of Rust Seal and then 1 coat of their Top Coater. I didn’t thin the Top Coater.

Here’s after the first coat of Rust Seal dried.

3E318C4A-20AE-48F7-B294-EAA0E2216AD2.jpeg
B75265B0-6732-496E-B36D-0C49A776D7C0.jpeg

After the second coat of Rust Seal dried.

107CA6F6-BF8E-4323-A5B4-7D3AC51B957C.jpegB0A3DD7D-45A6-45C1-9634-D66E2203E53F.jpeg

After the one coat of Top Coater dried.

C91A3A08-CF2E-4367-9C2A-2437D10AD944.jpeg8664202B-65E0-4DAE-8689-0625CC946642.jpeg5329628A-FAAE-41A3-8D62-B1AFF5012D65.jpeg

I should have been more strategic with my masking placement. I’ll go back with touch up paint at some point to make the door all one color. Hopefully this paint holds up well. Later I’ll be spraying Noxodol cavity wax in the doors to sea them from the inside out.
 
Next I degreed the cam. Finding TDC was the easy part.

1F645822-1F33-40A7-8E17-913039AC4C13.jpegCA85164C-8AA6-45CD-8FD9-0AD9E790767A.jpegEB926CFA-6475-4032-84B6-DCBF0302C4EE.jpeg

The first tricky part was making the solid lifters for checking pushrod length and piston-to-valve clearance. I really struggled getting a couple of the old lifters apart due to a varnish being built up inside. Soaking in lacquer thinner and some penetrating oil finally got them apart.

205D4007-4479-429A-B7E5-6C5FBF50C53D.jpeg

To make it a solid lifter I got ride of the spring and the disc under the upper cup. In the ones I’ve done before I just flipped the inner piston and that was the perfect height.....this one was just a touch too tall so I had to grind a little off the nub to make it the right height.

597C66C1-94CF-4846-8635-2FFCAD928DBD.jpegB814C52B-4D7C-41D8-9EC9-BEBD00C5C2EC.jpeg

The next little struggle was that my dial indicator wasn’t long enough to reach the lifter so I could read it directly. To remedy this I had to bolt a head on and install the valvetrain for cylinder number one. Then I had to improvise a steel platform for the magnetic base to attach to.

B240E776-4D07-4BED-A862-8E9D2D593A41.jpeg

The cam was spot on with a 110 degree intake love centerline.

21B15BBA-9FFF-4F7E-91A4-956903243E60.jpeg

Next I used length-checking pushrods to determine the correct oushrod length after having the heads and block milled and the custom cam. Stock pushrods are 7.400, my setup spec’d out to 7.350 with .075 preload.

143CFF66-DF53-41C3-84A5-E9A7FF80CAC8.jpeg
 
Next was checking piston-to-valve clearance. I used light weight springs and the length checking pushrods to do the clay method of checking clearance. I got everything together, turned the engine over a couple times and took it apart to inspect it. Uhhhhhh, Houston, we have a problem. In the 12 o’clock position of the valve heads I had enough clearance, but at the edge of the dish in the piston I had a lot less...a LOT less. I double checked everything and still had the same results. Yikes. Good thing I checked!

6560597A-A5EB-4CC6-AA24-371976C6F020.jpegDC71A528-E954-48E5-AD07-D959A3039801.jpeg05839975-433D-49DF-9A8F-746ECA076E26.jpeg0AA8827E-26EE-4C80-A6EA-E9D6F365C107.jpegE1091E83-C37F-4C0D-92FA-A2084CC451C1.jpeg

Well then I had to decide what to do. I figured I could probably grind that small spot in the pistons with a die grinder and not really affect the balance, but I wasn’t 100% sure on that. I sent a message to the guy that spec’d the cam to get his thoughts since he builds engines and does balancing, too.

While I was waiting for a response from the guy I did some more research.......first to see if it was feasible to grind the valve notches myself and then I started reading more about measuring PTV clearance. And that’s when I found my error...... I set my pushrods to 7.350” for checking clearance because I thought you wanted to use full length along with solid lifters so you could see your clearances if the lifters pumped up. Wrong. My mistake is that you’re supposed to do it with pushrods set to zero lash. Oops. So I had about .075” less clearance than I was supposed to.

That was last night. This morning I got a message from the guy confirming this to be true. So I went out to the barn this morning and reset the pushrods to zero lash. Voila!! We haz clearance. Yay!! Now I can move on with the build.

D0441291-E925-4223-B19B-B63258334694.jpegB41064A2-3D75-4169-AB7A-0BB8283343CA.jpeg6FE2890B-26CF-4460-82FA-234F60364605.jpegFA1BF168-0B8F-4F69-9F0E-98ED1FE4EF11.jpegAA058767-834C-4DC2-AB5B-CF4AF9B62BB0.jpeg
 
I didn’t get a lot of time to work on it today so there wasn’t a ton more progress. I got the lifters installed. Then flipped the engine over for the next steps. I installed the oil pump and then the windage tray and oil pump pickup. Next was the rear block cover and then the front cover. Without the special locating tool I needed to use the harmonic balancer to locate the cover. Unfortunately my balancer installation tool was too short to work on an LS. So I had to come up with an adapter. I cut the head off the old balancer bolt. Then I needed to find a 5/8-18 bolt. I couldn’t find one, but I did find another balancer installation tool I didn’t know I had. So I took one of the adapters from that tool and welded it to the bolt. This was the adapter I needed.

DAD98103-A414-4B7F-8436-4C2C63A00969.jpeg

I got the hub for my balancer installed and then I was able to tighten the front cover down. This was where I ended today. Tomorrow I’ll start with oil pan installation.

103B42A4-8AEF-4A3F-BAC5-AA8EF3A5692D.jpeg
 
Well this was a new one..... last night I went to put the oil pan on and as I was getting the bolts started by hand I couldn’t get one to go in. I took the bolt out of the pan hole and I couldn’t see a hole. Great, a bolt broken off in the block. So I pull the pan back off......uh......there isn’t a hole there in the block at all!!

C077B8D9-8918-4B66-9EFB-FBC0BACFD458.jpeg0A71E50C-6ADF-4AA0-BA69-0B4F4874FF42.jpeg

Then I look at the oil pan original to that block and sure enough it didn’t have a hole in that location either, but as you can see the factory gasket had a hole there. Weird!!

5B7F8DF6-A45D-4FA5-9B6B-ED63B9EA7B00.jpeg

So I start Googling.....some blocks have a hole missing and some don’t. Some older LS1s and some trucks I’m finding. I know people have swapped the iron LQ4 into Trailblazer SS’s before so there must be info. Nope....can’t find anything. I keep searching throughout the night on the interwebs and in Facebook TBSS groups and no info. Ok, I’ll ask on TBSSowners.com and the Facebook groups in the morning to see what others have done.

Then I look at it again - screw that, I don’t care what OTHERS have done, I know what I am going to do! I wasn’t happy with it not having that bolt there for two reasons: 1. Looks like a good place for a future oil leak and 2. Since the front diff is bolted to the pan there has to be a good amount of stress on the pan in that area.

Luckily the holes are outside of the outer wall of the block, so there wasn’t any fear of really screwing up the block. So I decide I am going to drill and tap it. As I thought about it more I thought it would be easy to make it nearly foolproof: I’m going to make a drill bushing. So that’s what I did tonight after work.

First I bolted the pan to the block so I could use a transfer punch to mark where the hole should be.

25FE6B90-DA62-4C8E-8DAF-582262C7E3C1.jpeg

Then I go drill a 1/8” hole in a nice square block of steel I got from work. I then use the drill bit and the center punched divot to locate the bushing. I then clamped it to the block with vice grips.

9C767647-10F6-446F-A44B-2F57656FB88A.jpeg

Then I drilled the hole, being sure to stay nice and straight.

E02121A1-246B-4D93-8448-BD7A9B0855DE.jpeg

Next I drilled the bushing out to the size I needed for the tap: 17/64. Again I used the drill bit to locate the bushing and clamped it in place.

534669FE-5160-423B-94BB-2F3332F4BED5.jpeg

Now the hole is 17/64s, straight and chamfered.

A0AD1DE2-6C92-4BDB-841B-216AA346D564.jpeg

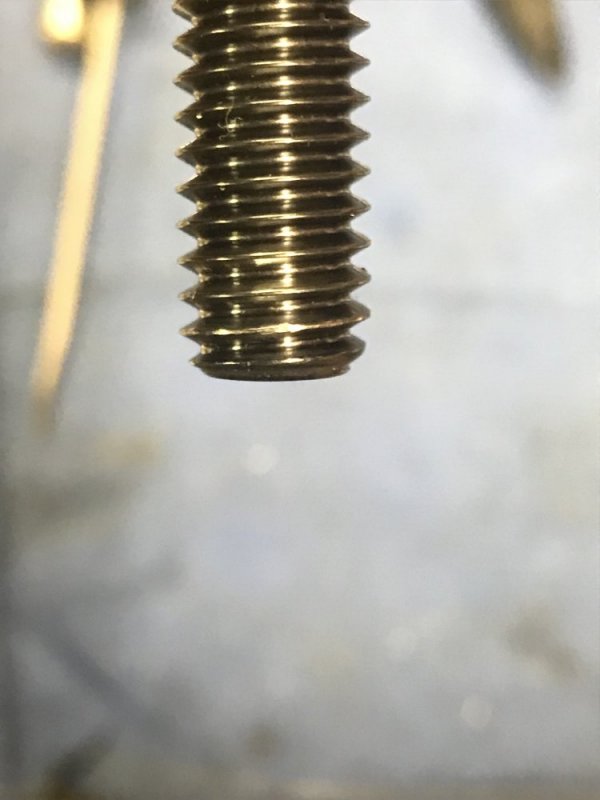
I then hand tapped the hole with an M8x1.25 tap. No sweat.

0BD7C1C3-A8C6-4D3C-A128-1261B6098AC7.jpeg

Note that I masked the entire engine off with plastic sheeting and duct tape to keep any and all shavings out of the engine. This project was a 100% success. On to tackle the next hurdles.
 
Update from the build that doesn’t want to cooperate......

Bolting the heads on tonight. I got one bolted on. Moved to the other side and one of the bolts didn't want to thread in past a turn or so. I drop another bolt in that hole and it goes in no sweat. Try the first bolt in another hole and it still won’t go in. Grrrrr. So I call ARP and they’re sending me a new bolt, but I’ll have to wait for it off course. Now I’m debating on what more to do. I should be able to torque the bolts with the engine installed, so I could keep going and just leave this head untorqued. Or I can basically stop here. I do have to do some external tweaking and verification on things like knock sensors since I’m installing the Gen 3 block in a Gen 4 application, but that’s not going to take that long. I’ll figure it out I guess.....

Here are some close up of the threads. Nothing grossly wrong, but you can see some inconsistent shininess on the threads.

14E9D1ED-9718-45A6-BBB2-1C9F0046F8B3.jpeg2317C33E-D348-440D-8237-58D9F7E00454.jpeg694EBDF9-629C-4415-BCCC-5B310C471B3F.jpeg694EBDF9-629C-4415-BCCC-5B310C471B3F.jpegCDC61AA5-462C-4213-B336-ACE03EC939C3.jpeg

Oh here’s one of the neato .040 thick Cometic MLS gasket pre head install.

B9994868-8BDB-4E9F-A62E-5F3C94B4DD25.jpeg
 

Attachments

  • 57644825-2067-4969-BADD-D35713496C6E.jpeg
    57644825-2067-4969-BADD-D35713496C6E.jpeg
    65 KB · Views: 2
Back
Top