• Welcome to The Truck Stop! We see you haven't REGISTERED yet.

    Your truck knowledge is missing!
    • Registration is FREE , all we need is your birthday and email. (We don't share ANY data with ANYONE)
    • We have tons of knowledge here for your diesel truck!
    • Post your own topics and reply to existing threads to help others out!
    • NO ADS! The site is fully functional and ad free!
    CLICK HERE TO REGISTER!

    Problems registering? Click here to contact us!

    Already registered, but need a PASSWORD RESET? CLICK HERE TO RESET YOUR PASSWORD!

Wear marks on crankshaft snout

floyd400

Member
Messages
181
Reaction score
19
Location
Northern Indiana
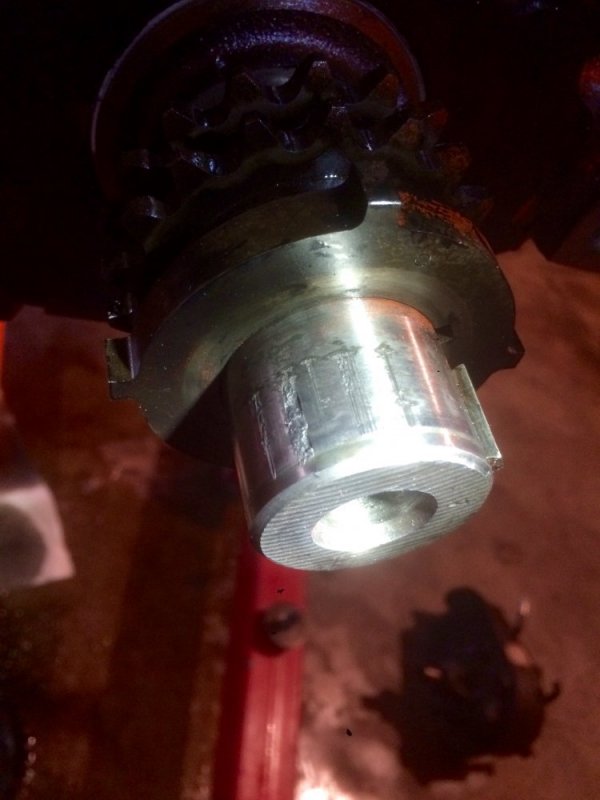
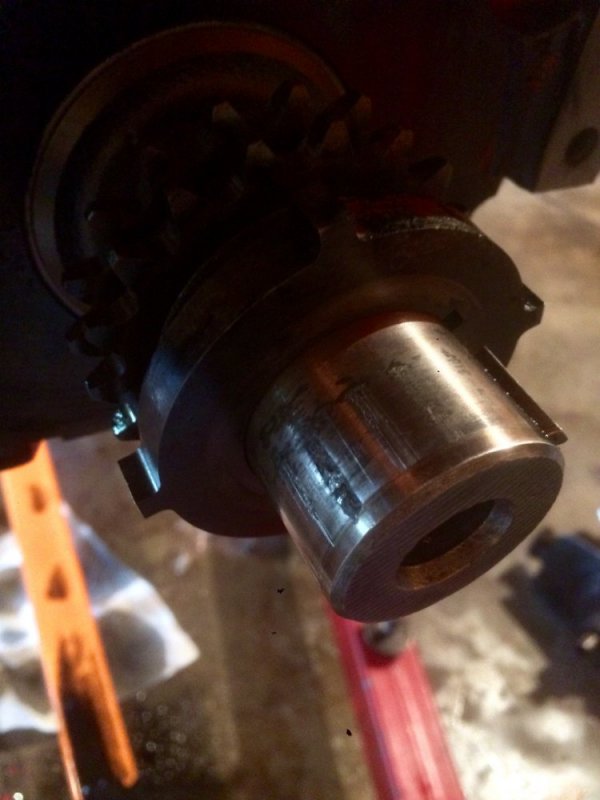
Guys, I'm working on my buddies mechanical 6.5 turbo diesel and noticed some odd wear marks all around the front of the crank where the harmonic balancer slides on. Anyone know what might have caused this and if it's serious or not?

The motor is out of the truck and I'm replacing the timing chain, water pump, balancer and pulley and resealing the timing cover plus a bunch of other stuff while I'm in there lol. It's a mechanical motor but for some reason it has a crank sensor in the timing cover and a reluctor wheel on the crank gear. Oh and the orange stuff in the pictures is just orange paint overspray.
 

Attachments

  • image.jpeg
    image.jpeg
    75.3 KB · Views: 25
Basically it means someone has been in it before and it's originally a electronic motor.. more than likely a motor swap..

And someone didn't take care when installing & removing stuff in the past looking at the snout....
 
Looks to me like someone installed a balancer with a hammer and it went on crooked scaring it up.

I would polish it up with some emery cloth and then get a speedy sleeve on it. You'll need a long one then use a dremel to cut the keyway slot in it. Then cut down to length.

Replace the balancer. Dollar to a donut says it is chewed up worse than the crank.

Dont sweat the pickup ring on there. Doesnt hurt anything having it. If you get a fluid damper balancer from Leroy, just let him know you have it.
 
Some of those marks look pretty deep. One even looks like a broken keyway but it's in the wrong spot
Some of them are fairly deep and I thought the same thing that one or more of the marks look like a sheared keyway but it is still intact in the proper spot.

Balancer and pulley look fine but are being replaced anyway. Timing chain and gear set are being replaced also with a mechanical set (no reluctor wheel). Any tips on how to drive the new crank gear on the crankshaft? It has to be pulled off so I'm not sure how easy the new one will go back on.
 
Crank shaft pulley gets installed. Then once it is on all the way, then you put on the chain and cam pulley. If the crank pulley is not able to be put on by hand with a thin coat of oil on the shaft, go buy some emory cloth and clean it up.
 
The gears do slide on with some resistance. But I can't seem to get the assembly on, seems like the chain is too tight. Any tips for a newbie?

Yeah, return the chain and get this:
http://leroydiesel.com/products/timekeeper-ds4-timing-gear-set/

They go on tight and in 30K miles are sloppy. Simply can't handle the IP pulses that well. Run a long time being sloppy, yes. The spec is 0.8" of slop. IMO any more and it would jump time...

Tools for the job of removing and installing the Harmonic Damper are something like this and usually for rent at the local parts place:

https://www.summitracing.com/search/part-type/harmonic-balancer-puller-and-installation-tools
 
Crank shaft pulley gets installed. Then once it is on all the way, then you put on the chain and cam pulley. If the crank pulley is not able to be put on by hand with a thin coat of oil on the shaft, go buy some emory cloth and clean it up.

@Will L. that makes no sense?

Timing chain housing (and there is an alignment tool/seal driver out there for this.), Timing set, aka chain, goes on as lower sprocket, chain and upper sprocket all at once, timing cover that has water pump on it, harmonic balancer with tool, and then serpentine pulley is bolted on.

The two sprockets with chain already on IMO is the only way a new virgin chain will go on. Never put a sloppy one back on for seconds so I have no idea how else it could be installed.
Thanks for the catch, i went back and reread how I sadi that. I guess I didn't describe it well, infact quite horribly described. I set the crank gear onto the crank before the cam gear gets attactched. I have seen someone placing the cam gear first, and the angle it puts the chain at wont allow the crank gear to be installed. The crank gear will slide into position pretty much all the way before you add tension on the chain placing the cam gear in place.

With the damage to his crankshaft he should test fit the crank gear with nothing else involved to ensure there is no problems with it going on. Also when I said by hand it won't just slide on like butter, i use a plastic hammer to tap it on. TAP not smash. Takes 1-2 light taps

Defiantely need the tool for harmonic balancer install. Do not use the bolt to force it on. War wagon, are you using the harmonic installer for this? I seriously never considered doing it, if not can you show a pic of the install tool? I've never seen one, this old dog loves new (to me i guess) tricks.

I apologize for describing it they way I did, I am much more a let me show you guy than trying to talk through it. Not an E.O.D. instructional guy- haha
 
Should slide on,if not I'd file/sand until it does
Negative, the balancer and crank gear should be an interference fit of roughly .0005-.001". You do not want it to just slide on. Looks to me like somebody put it on dry. You normally put some RTV on the crank snout for 2 reasons, first is to seal the fit, and 2nd to allow the balancer to go on easier without galling. As to the crank pickup, it's no big deal. You can leave it on and use a 94+ balancer, or remove it and use a 93- balancer. All the fluidampers are the same I believe, the earlier mechanical ones have a spacer sleeve that goes on before the balancer to keep everything in alignment. As to the crank gear, you used to be able to buy an aluminum sleeve that slid down over the crank snout to allow pressing it on with a balancer tool. I've always just used a block of wood myself and a hammer with careful applications of force.
 
The install tool for the balancer that O'Reilly has does not have the center "bolt" with the correct threads for the GM crank. It seems like the other auto parts stores around here that rent tools also had the same install kit. I don't remember the size/thread, but I went down to the local bolt shop (McDonalds Supply) and got a bolt there. Since McDonalds didn't have a long enough bolt I got two, cut off the heads, ground a heavy V on the "head" end of each bolt, and welded them together.

So, find out what size/thread the center bolt is, then check whatever install kit you are looking at to make sure that it has the correct center "bolt".

Don
 
I soaked the crank and gears in fresh Rotella before installing and everything went on smoothly, thanks guys! It wasn't a loose fit by any means but light tapping with a rubber mallet got the crank gear on easy. Chain is nice and tight, very happy with it.

The timing gear drive set looks sexy but this is my buddies motor and we decided that brand new gears and chain was the way to go for now. The bill on this motor is already pretty high lol He's ordering rebuilt Bosch injectors and I'm looking for a mechanical 6.5 turbo DB2 4911 IP for him at the moment. Any suggestions on good places to check out? looking for a quality rebuild with a new head and rotor, no junk.
 
@Will L. that makes no sense?

Timing chain housing (and there is an alignment tool/seal driver out there for this.), Timing set, aka chain, goes on as lower sprocket, chain and upper sprocket all at once, timing cover that has water pump on it, harmonic balancer with tool, and then serpentine pulley is bolted on.

The two sprockets with chain already on IMO is the only way a new virgin chain will go on. Never put a sloppy one back on for seconds so I have no idea how else it could be installed.
Do you know the part number for the alignment tool? I haven't seen any mention of it in my manuals.
 
Last edited:
I go by the factory service service manual and install balancers with a mallet and block of wood. Worked great on my 6.5 and my 6.2

Local AutoZone doesn't have the correct adapter which I think is m16-1.5 an odd thread. I haven't checked anywhere else because I don't usually go to the other stores and the mallet method works pretty good if you're careful.
 
Do you know the part number for the alignment tool? I haven't seen any mention of it in my manuals.

I use a bolt and washer to get the harmonic damper on. I only hammer on things I am going to replace... And maybe a few things in striking distance as well. @THEFERMANATOR good tip on RTV. No room to hammer things with engine in truck.

Blame @GM Guy for that tool know how. "Kent Moore J-22102, its other purpose is front cover alignment as well as driving that seal home in 3 wacks."
http://www.thetruckstop.us/forum/threads/changing-1994-6-5-for-1990-6-2.44473/page-6#post-507709

http://www.thetruckstop.us/forum/threads/kent-moore-j-22102-front-crank-seal-installer.44576/
 
Back
Top