• Welcome to The Truck Stop! We see you haven't REGISTERED yet.

    Your truck knowledge is missing!
    • Registration is FREE , all we need is your birthday and email. (We don't share ANY data with ANYONE)
    • We have tons of knowledge here for your diesel truck!
    • Post your own topics and reply to existing threads to help others out!
    • NO ADS! The site is fully functional and ad free!
    CLICK HERE TO REGISTER!

    Problems registering? Click here to contact us!

    Already registered, but need a PASSWORD RESET? CLICK HERE TO RESET YOUR PASSWORD!

93 K2500 Mechanical with an ATT ?

oooh, 3.42 gears! let me know if you ever want to switch to 4.10s :)

good looking truck, and a great project!

Thanks for the encouraging words! I've noticed that 3.42's seem to be the gear of choice here. Personally, I think I would prefer 3.73's myself, considering the 4L80E only has a 2.48 1st gear. My 96 G30 has 3.73's, and it runs down the highway very well. Now, I had a 87 C30 with the 6.2, SM465 granny gear 4 speed, and 4.56's. That truck was miserable on the highway, and had a top speed of around 60, and I hated even doing that, as it sounded like it was going to blow up!:lol:

Matt
 
give her a try, if you need the extra leverage, 4 Low can hack it to get rolling. I dream of 3.42s. I found a rear end with 3.42s and the G80 for 375 bucks, but it was in Utah and I was not going to be through for a few months.

my dream setup is a Eaton e-locker in a 3.42 geared rear end, with a 6.34 first gear (early year ratio) equipped NV4500, all in a 2wd of course. :)

keep us posted, I bet with a vaccum and scrub job that interior would be awesome.

and its Leroy's favorite color too! :)
 
I'm headed out to the shop to pull the engine this morning. I'll perform an autopsy, and decide whether this engine will live again, or its time for a replacement. I'll try to post pics later today.

Matt
 
The only time I was too lazy to remove the injection lines when pulling a valve cover was when I had a couple of surplus line sets in a box. Wound up pulling the engine. Those bent lines with the intake removed makes no sense.

The rust will clean up quick with a hone. You should put new rings in anyway. How does the valve train look for rust?

I have to agree, its sad when people would rather bend the lines, than take a little extra time to remove them properly! No rust on the valve train. You are right about the rust in the cylinder, as you can see by the pics in the next post. Thanks

Matt
 
I got the engine out, and started disassembley on the engine. I pulled the head off to find visible cracks in it as you can see in the picture below, so it will need both heads replaced. Before I got much further, I wanted to see how the rust in the cylinders would look after a hone, so I pulled piston #4 which was the worst of the rusted cylinders, and gave it a quick hone. Wow, the rust came off immediately with no evidence of pitting. There is no wear ridge in the cylinders, and you can still see the original crosshatch plainly on the side that still had the head on it.
The block is a 599 casting, and I believe its a good one, but I haven't pulled the crank yet to check the main webs for cracking. I'll try to do that tomorrow after church. I would have done it today, but its my youngest son Danny's 9th birthday today, and I'm BBQ ing for the party, so I had to stop on the engine.
With this engine needing both heads, rings, bearing, etc, I've decided to pull the engine out of my van, and put it in the truck temporarily, until I can afford to build this one properly. Once I've finished this one, I'll put the engine back in my van. Anyway, here are some pics. Thanks

Matt
 

Attachments

  • P5240164 (1024x768).jpg
    P5240164 (1024x768).jpg
    36.7 KB · Views: 15
  • P5240156 (1024x768).jpg
    P5240156 (1024x768).jpg
    92.6 KB · Views: 15
  • P5240160 (1024x768).jpg
    P5240160 (1024x768).jpg
    83.9 KB · Views: 15
  • P5240161 (1024x768).jpg
    P5240161 (1024x768).jpg
    80.5 KB · Views: 14
  • P5240168 (1024x768).jpg
    P5240168 (1024x768).jpg
    62.9 KB · Views: 14
  • P5240170 (1024x768).jpg
    P5240170 (1024x768).jpg
    48.6 KB · Views: 14
  • P5240176 (1024x768).jpg
    P5240176 (1024x768).jpg
    52.4 KB · Views: 15
  • P5240181 (1024x768).jpg
    P5240181 (1024x768).jpg
    69.2 KB · Views: 15
  • P5240183 (1024x768).jpg
    P5240183 (1024x768).jpg
    66.4 KB · Views: 15
  • P5240184 (1024x768).jpg
    P5240184 (1024x768).jpg
    89.4 KB · Views: 16
  • P5240185 (1024x768).jpg
    P5240185 (1024x768).jpg
    94.5 KB · Views: 15
  • P5240186 (1024x768).jpg
    P5240186 (1024x768).jpg
    93.4 KB · Views: 16
  • P5240188 (1024x768).jpg
    P5240188 (1024x768).jpg
    91.6 KB · Views: 15
  • P5240189 (1024x768).jpg
    P5240189 (1024x768).jpg
    91 KB · Views: 15
  • P5240191 (1024x768).jpg
    P5240191 (1024x768).jpg
    93 KB · Views: 15
You don't need to pull the crank to check for cracks as they will be pretty visible , right inline with the main bolts.

Sent from my Studio 5.0s using Tapatalk
 
I would not be afraid to run those heads. The crack is between the valves, there is no coolalnt/oil passages there. Is pic# 1 the worst of it?
 
Leave the engine upside down with the crank in. Clean the block around the mains by wiping it off. Cracks will show up as oil lines overnight.

It's an uncomfortable feeling, but, 'check the main webs for cracking' and finding cracks on mine was done 40K ago and it still had gapless rings put in it and was stuffed back in the truck. I didn't touch the mains bolts. AAA for when it does let go is cheaper than another block.

The head cracks if they go deep enough in the heads do hit coolant. You can get a kit to fix the heads or replace them. More or less sleeve the coolant passage the crack hits.

Does it for sure need bearings? Otherwise you can get a ring set and call it a day. I wouldn't even touch the main bearing bolts for fear of more cracks.

Heads repaired/replaced, ARP head studs, rings, gaskets and you should be on the road.
 
You don't need to pull the crank to check for cracks as they will be pretty visible , right inline with the main bolts.

Sent from my Studio 5.0s using Tapatalk

Thanks, I'll check them tomorrow.:thumbsup:

I would not be afraid to run those heads. The crack is between the valves, there is no coolalnt/oil passages there. Is pic# 1 the worst of it?

Yes Leroy, those were the worst. There are several other smaller ones though. The truck was missing one of the heads when I got it, and since I have to replace one, I think I'll try to get a pair, rather than reusing this one. Thanks:thumbsup:

Leave the engine upside down with the crank in. Clean the block around the mains by wiping it off. Cracks will show up as oil lines overnight.

It's an uncomfortable feeling, but, 'check the main webs for cracking' and finding cracks on mine was done 40K ago and it still had gapless rings put in it and was stuffed back in the truck. I didn't touch the mains bolts. AAA for when it does let go is cheaper than another block.

The head cracks if they go deep enough in the heads do hit coolant. You can get a kit to fix the heads or replace them. More or less sleeve the coolant passage the crack hits.

Does it for sure need bearings? Otherwise you can get a ring set and call it a day. I wouldn't even touch the main bearing bolts for fear of more cracks.

Heads repaired/replaced, ARP head studs, rings, gaskets and you should be on the road.

Actually, I'm hoping for no cracks.:hihi: The main bearing are probably still decent, as the rod bearings I saw today looked really good for 150k. There is a pic of the rod bearing below. However, I'll probably replace the mains anyway. Hopefully there won't be cracks, but if there are, I'll decide how bad I think they are, and I'll post pics, so you guys can help me decide. Thanks

Matt
 

Attachments

  • P5240169 (1024x768).jpg
    P5240169 (1024x768).jpg
    43.6 KB · Views: 7
If the mains are in good shape leave them as the factory select fit them. You be hard pressed to get them back in spec.

Sent from my Studio 5.0s using Tapatalk
 
Well, I do have one crack!:banghead: 
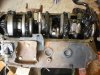
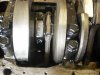
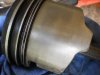
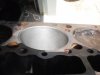
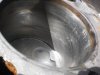
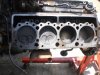
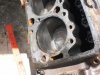
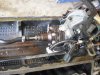
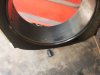
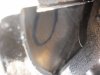
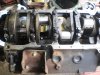
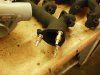
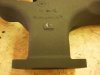
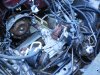
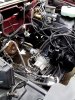
I used the method WarWagon was talking about. I wiped all the mains clean, and then sprayed them with carb cleaner to dry them off. All was looking good until I got to Main #4. Under the short main bolt on the right side there is a small crack about 5/8 long. In the first pic below the crack is very obvious because of the oil coming out of the crack. In the second pic I wiped the oil off, and its harder to see, but definitely there. I used this method, and a magnify glass to inspect all the mains, and this is the only crack I could find. What do you guys think? Thanks

Matt
 

Attachments

  • P5250193 (1024x768).jpg
    P5250193 (1024x768).jpg
    44.8 KB · Views: 22
  • P5250194 (1024x768).jpg
    P5250194 (1024x768).jpg
    56.7 KB · Views: 18
  • P5250197 (1024x768).jpg
    P5250197 (1024x768).jpg
    91.5 KB · Views: 17
  • P5250198 (1024x768).jpg
    P5250198 (1024x768).jpg
    86.5 KB · Views: 17
Read this: http://www.thetruckstop.us/forum/sh...x-for-bottom-end-issues&highlight=Lock+stitch

With only the one lil crack, and your not trying to build a high torque monster, that's what I would do. Put on a fluid damper balancer if you can afford it, if not put on a new AC Delco. I have yet to see a cracked lower end with a good hb.

Then you can keep making $ wih the van.
Best option but more $ is post #4.
 
Will summed it up. What was your goal with this truck? The cracked main without repair is just a matter of time and miles.

I have 2 or 3 mains cracks in my engine. Your van engine likely isn't any better.

X3 Post #4...

Or

Likely I am the only one cheap enough to do this: Put used or new cheap heads on, ring set off fleabay, ARP's, ATT, 1/2 turn on the IP fuel screw, and see how long it lasts. I would not touch the main cap bolts and hopefully prevent any new stresses from making more cracks. But, I am gambling on a lot of miles and already running 15W-50 oil due to low hot summer oil pressure.

Less back pressure with the ATT can only help engine life.
 
If the whole block is riddled with cracks I see it failing- metal fatigue is a bad thing. Just a couple small cracks-I wouldn't think twice.
 
Thanks for all the great advice guys! I'm going to rebuild this engine when money permits, but in the meantime I'm going to put the engine from my van in it. I'll start pulling the engine from my van tomorrow.
I have started cleaning up some of the parts that I will be installing on my van engine. I cleaned up the GM turbo, and the bearings still feel good and tight, so it should be ok for awhile. I also drilled, and tapped the exhaust manifold for an EGT gauge. I gave everything a coat of VHT ceramic header paint. I also cleaned up the engine bay on the truck. Its amzing how nice the metal looks when its been covered in grease for most of its life!:rofl: After a good degrease, and pressure wash, the frame is just nice clean raw steel. I'll have to get some paint on it asap, as it will rust quickly now. Here are a few pics. Thanks

Matt
 

Attachments

  • P5300200 (1024x768).jpg
    P5300200 (1024x768).jpg
    80.6 KB · Views: 11
  • P5300201 (1024x768).jpg
    P5300201 (1024x768).jpg
    57.4 KB · Views: 11
  • P5300203 (1024x768).jpg
    P5300203 (1024x768).jpg
    68.7 KB · Views: 11
  • P5300205 (1024x768).jpg
    P5300205 (1024x768).jpg
    74.4 KB · Views: 11
  • P5300206 (1024x768).jpg
    P5300206 (1024x768).jpg
    48.9 KB · Views: 10
  • P5300208 (1024x768).jpg
    P5300208 (1024x768).jpg
    82.2 KB · Views: 10
  • P5300213 (1024x768).jpg
    P5300213 (1024x768).jpg
    64.3 KB · Views: 10
  • P5300209 (1024x768).jpg
    P5300209 (1024x768).jpg
    94.6 KB · Views: 12
  • P5300210 (1024x768).jpg
    P5300210 (1024x768).jpg
    93.8 KB · Views: 11
  • P5300211 (1024x768).jpg
    P5300211 (1024x768).jpg
    95.1 KB · Views: 11
Amazing how good everything looks when it's clean and has a fresh coat of paint! I don't think I have ever seen a set of 6.5 manifolds and stock turbo look so good...

Sent from my ST26a using Tapatalk
 
Amazing how good everything looks when it's clean and has a fresh coat of paint! I don't think I have ever seen a set of 6.5 manifolds and stock turbo look so good...

Sent from my ST26a using Tapatalk

Thanks. It is amazing what a little time spent cleaning, and some paint can do for some old crusty parts. I intend to put an ATT on it, but I haven't even driven the truck yet, and would like to make sure the transmission, as well as the rest of the drivetrain is solid before I spend all my extra money on upgrades. I spent some time cleaning, and painting the engine compartment as well. Next I have alot of cleanup to do on the wiring. Here are a few pics. Thanks

Matt
 

Attachments

  • IMG_20140531_162003 (768x1024).jpg
    IMG_20140531_162003 (768x1024).jpg
    79.1 KB · Views: 13
  • IMG_20140531_162015 (768x1024).jpg
    IMG_20140531_162015 (768x1024).jpg
    85.5 KB · Views: 13
  • IMG_20140531_162021 (768x1024).jpg
    IMG_20140531_162021 (768x1024).jpg
    76.8 KB · Views: 13
  • IMG_20140531_162033 (768x1024).jpg
    IMG_20140531_162033 (768x1024).jpg
    66.3 KB · Views: 12
  • IMG_20140531_162044 (768x1024).jpg
    IMG_20140531_162044 (768x1024).jpg
    76.9 KB · Views: 13
Back
Top