• Welcome to The Truck Stop! We see you haven't REGISTERED yet.

    Your truck knowledge is missing!
    • Registration is FREE , all we need is your birthday and email. (We don't share ANY data with ANYONE)
    • We have tons of knowledge here for your diesel truck!
    • Post your own topics and reply to existing threads to help others out!
    • NO ADS! The site is fully functional and ad free!
    CLICK HERE TO REGISTER!

    Problems registering? Click here to contact us!

    Already registered, but need a PASSWORD RESET? CLICK HERE TO RESET YOUR PASSWORD!

Rebuilding a GM8 turbo,show and tell

bison

Well-Known Member
Messages
5,701
Reaction score
144
Location
Near Peace River-Alberta
I rebuild my GM8 turbo today.
I figured i may as well take some pics of how i done it and share it with you

Here we go.

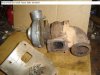
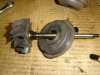
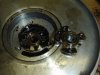
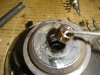
Pic # 1 shows heat shield and snail house/exhoust elbow bolts removed.

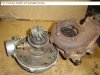
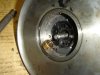
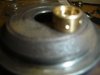
#2 , shows the exhaust wheel ( note the 12 point nut on the end) where it fits in the elbow.

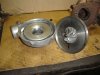
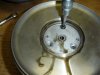
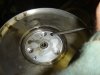
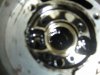
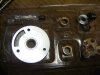
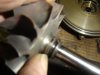
#3 the snailshell and the intake impeller side

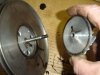
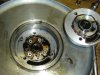
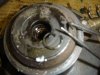
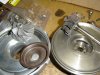
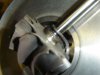
#4 hold the 12 point nut (13 mm)on the exhaust wheel and turn the nut on the impeller wheel off(Left handed tread) and pull the impeller off,if it is stuck,use a plasic mallet or screw driver handle and tap the shaft out trough the rear.Be carefull not to damage the wheel or impeller or bend the shaft as balance is very important here.

More later
 

Attachments

  • GM8 turbo rebuild 001.jpg
    GM8 turbo rebuild 001.jpg
    51.4 KB · Views: 240
  • GM8 turbo rebuild 002.jpg
    GM8 turbo rebuild 002.jpg
    52.6 KB · Views: 264
  • GM8 turbo rebuild 003.jpg
    GM8 turbo rebuild 003.jpg
    49.5 KB · Views: 236
  • GM8 turbo rebuild 005.jpg
    GM8 turbo rebuild 005.jpg
    41.3 KB · Views: 229
Here's some more.

Pics L to R

shaft removed

aluminum end cap/seal support 3 torqs screws

clamp the unit in the vice and use a punch and hammer and turn it in the bore to break the hold.This critter is a somewhat close fit.There are 2 blind holes provided for a puller,but the factory conveniently forgot to tap treads,so it took a little wriggeling to get it out.It can not be punched out from the other side either.It dont matter if it gets damaged,there is a new one in the kit.
Remove the 4 torqs screws in the brass trust plate and punch it out trough the shaft bore from the opposite side.

If the little bolts feel a bit to tight,give them a rap with punch and hammer square on the head and try again.
 

Attachments

  • GM8 turbo rebuild 006.jpg
    GM8 turbo rebuild 006.jpg
    54.1 KB · Views: 201
  • GM8 turbo rebuild 007.jpg
    GM8 turbo rebuild 007.jpg
    40.4 KB · Views: 187
  • GM8 turbo rebuild 008.jpg
    GM8 turbo rebuild 008.jpg
    49.7 KB · Views: 194
  • GM8 turbo rebuild 009.jpg
    GM8 turbo rebuild 009.jpg
    55.5 KB · Views: 204
What was the problem, that inspired this rebuild?
Where did you get the build kit?
Are all kits created equal...Price/Parts/Quality?
Have you ever rebuilt a turbo before?

Thanks,
 
I rebuilt mine twice and parts quaility seemed poor to me especially the screws but so were the originals.
 
By looking at pics 3&4 in post #1, looks like oil was getting through to the compressor side.

Watching this thread closely. And learning.
 
About a year I was told a plugged cat probably contributed to it's early demise. It's really a simple rebuild especially compared to most turbos. So I'm told.
 
I suspect my shaft has some wear thats not readily visible as well. I'll probably seriously consider an A Team next time I do something. If you have to replace shaft or center section it gets rather spendy.
 
next bunch Pics L to R.

1) trust plate out.

2) Brass brg pushed right out, found out they are floating bushings, they spin in the housing as well as on the shaft.

3)see the snap ring in the bore, leave it be.

4) Exhaust side brg has a clip to lock it in in place, that critter proved a little stubborn to get out as it needs a pliers with only 0.35 dia tips.mine broke a tip on the first attempt:mad2:,i had just bought it(china junk).A pointy pick is made of better stuff as you can see.

5) and the other brg,again leave the sec clip in place,its enough trouble to get the first one out and there aint no need to fix what aint broke.
 

Attachments

  • GM8 turbo rebuild 011.jpg
    GM8 turbo rebuild 011.jpg
    41.6 KB · Views: 174
  • GM8 turbo rebuild 012.jpg
    GM8 turbo rebuild 012.jpg
    45.3 KB · Views: 170
  • GM8 turbo rebuild 013.jpg
    GM8 turbo rebuild 013.jpg
    45.7 KB · Views: 167
  • GM8 turbo rebuild 014.jpg
    GM8 turbo rebuild 014.jpg
    43.4 KB · Views: 175
  • GM8 turbo rebuild 015.jpg
    GM8 turbo rebuild 015.jpg
    50.8 KB · Views: 164
What was the problem, that inspired this rebuild?
Where did you get the build kit?
Are all kits created equal...Price/Parts/Quality?
Have you ever rebuilt a turbo before?

Thanks,
This turbo came off the fried engine out of my 98 and was stuck,i chucked it on the pile of things to do later,later became now.Its gonna go back on the 98

I got the kit via my local Bumper to bumper store, $140 wich is a bit pricy for what one gets but the quality is good.I dont know what else is out there.

I rebuild a GM3 or 5 some yrs ago,quite similair to this one.GM turbo's are actually quite simple in construction.

I aint scared to rip anything apart,the DS4 is on the blocks:smile5:
 
Yea,was kinda rude i realize:smile5:
thats why i came back to tell ye sorry i did.nt mean it that way,should've put this smily behind it:D

lol, no problem, I was just playing the victim.:thumbsup:
 
ignore first pic,mistake:eek:

Pic 2 the kit. Sorry bad pic

This kit contained all parts needed to rebuild my turbo.
Aluminum cover/seal support + screws
Brass trust plate + screws
Spacer bushing,seal bushing,2 brass brg bushings.
3 mechanical seals,3 snap rings

3, All parts cleaned and inspected,pay special attention to end of the bore where the exhaust seal seats and the seal groove on the shaft,clean all the carbon off.Measure the shaft along the lenght,should be the same dia and without scoring where the brgs ride.Inspect the housing brg bores as well for scoring and wear.If either one or both bores and the shaft show any scoring or wear you're better of to get a rebuild turbo as parts are rather pricy.

4, the mechanical seal rings, much like small piston rings.

5 and 6, Start one end of the right size seal in the groove and work it in carefully around the shaft till it is seated.

7 and 8 Oil the bushing and drop it in the exh side bore.should turn smooth with no tight spots.


More later
 

Attachments

  • GM8 turbo rebuild 015.jpg
    GM8 turbo rebuild 015.jpg
    50.8 KB · Views: 127
  • GM8 turbo rebuild 016.jpg
    GM8 turbo rebuild 016.jpg
    43.1 KB · Views: 137
  • GM8 turbo rebuild 017.jpg
    GM8 turbo rebuild 017.jpg
    56.7 KB · Views: 129
  • GM8 turbo rebuild 018.jpg
    GM8 turbo rebuild 018.jpg
    40 KB · Views: 119
  • GM8 turbo rebuild 019.jpg
    GM8 turbo rebuild 019.jpg
    44.8 KB · Views: 138
  • GM8 turbo rebuild 020.jpg
    GM8 turbo rebuild 020.jpg
    45.5 KB · Views: 135
  • GM8 turbo rebuild 021.jpg
    GM8 turbo rebuild 021.jpg
    32.7 KB · Views: 122
  • GM8 turbo rebuild 022.jpg
    GM8 turbo rebuild 022.jpg
    46.5 KB · Views: 123
Last edited:
Back
Top