• Welcome to The Truck Stop! We see you haven't REGISTERED yet.

    Your truck knowledge is missing!
    • Registration is FREE , all we need is your birthday and email. (We don't share ANY data with ANYONE)
    • We have tons of knowledge here for your diesel truck!
    • Post your own topics and reply to existing threads to help others out!
    • NO ADS! The site is fully functional and ad free!
    CLICK HERE TO REGISTER!

    Problems registering? Click here to contact us!

    Already registered, but need a PASSWORD RESET? CLICK HERE TO RESET YOUR PASSWORD!

Rebuilding a GM8 turbo,show and tell

bison said:
I aint scared to rip anything apart,the DS4 is on the blocks:smile5:

I agree. It was broke when you started... what's the worst that's gonna happen? :D

Good pics and write-up, Simon - thanks. This is going into the 6.5 Technical Library when you're done.
 
Excellent post i will be rebuilding one shortly out a 98 burban very timely!
Thank-you
 
next bunch.

Pic 1, clip in place, a good snapring pliers makes life easy,without it is gonna be a bear to get that little thingy in :mad2:

2 and 3 , Intake side brg in,check again for free spinning, put the new spacer(shiny thingy) on top, flat side on the brg,then the new trustplate and torq the screws down(sorry no specs,i use common sense).Stock had tread locker on the screws,i did not use it there,but feel free to do so.

4 and 5, Seal holder,put the remaining 2 seal rings in their respective grooves,check for turning freely with no sideplay,Actually goes for the exh seal ring too.close side play and easy turning.

6, oil it up and work the thingy straight in the endplate,if it wont go, polish the taper edges somewhat so they dont cause a hang up as the rings have to compress to get seated,be carefull not to apply to much pressure or your lookin for another kit to finnish the job.

7, apply a little high heat red RTV to the edge and around the screw holes. a little means a little dont clobber it on.
Put it in place,make sure you line up the big slot in the plate with the slot in the unit and torq it down(again no specs)
 

Attachments

  • GM8 turbo rebuild 023.jpg
    GM8 turbo rebuild 023.jpg
    30.2 KB · Views: 95
  • GM8 turbo rebuild 024.jpg
    GM8 turbo rebuild 024.jpg
    40.7 KB · Views: 99
  • GM8 turbo rebuild 025.jpg
    GM8 turbo rebuild 025.jpg
    39.6 KB · Views: 91
  • GM8 turbo rebuild 026.jpg
    GM8 turbo rebuild 026.jpg
    49.9 KB · Views: 97
  • GM8 turbo rebuild 028.jpg
    GM8 turbo rebuild 028.jpg
    43.6 KB · Views: 95
  • GM8 turbo rebuild 029.jpg
    GM8 turbo rebuild 029.jpg
    45.2 KB · Views: 98
  • GM8 turbo rebuild 030.jpg
    GM8 turbo rebuild 030.jpg
    45 KB · Views: 97
  • GM8 turbo rebuild 031.jpg
    GM8 turbo rebuild 031.jpg
    38.1 KB · Views: 94
Perhaps you could elaborate on what parts failed, and if anything could be done to prevent? Would add to the thread.

Plus I'm curious.

Main thing by far was the screws. Had to be really careful not to strip the heads. The originals were locktited as Bison said. Even on my 2nd rebuild with no locktite they were hard to get out. Also seemed like the piston ring type seals were kinda chincy. I've seen prices from $55 on ebay to $150 on line, and it looked like $30 should have covered it. JMO
 
last bunch

1 and 2, Place the heat shield over the end and insert the oiled up shaft trough,work it gently in till it bottoms out.

3 and 4, hold the shaft in on the back and place the impeller on the shaft and push it home,apply a drop of tread locker and run the nut snug.
Tap alternately both ends with a nylon mallet or screwdriver handle to seat the seal rings,check for free spinning and torq the nut down,check free spinning again.
repeat the taps till it turns smootly.

5,Check the side play, should be less then half the gap between the edge of the impeller and the edge of the recess.One can measure with a micro meter too,i did'nt bother cause i dont know what spec is supposed to be anyway,i relied on my experience.

6,Give the edge of the housing a lick of RTV or copperkote and bolt the snail house to it and check if the impeller clears the snail shell with room to spare.

7,cleaned up elbow,check for cracks and clean all treaded holes with a tap or use W40 and run the bolts in and out.blow clean with the airgun.

8, 9, and 10,

a peek at the waste gate,if the arm moves freely without excessive play and the seating area of the gate shows no carbon build up i would leave it be.

The finnished turbo,ready for an other couple hundred k.

After install on the engine fill the turbo with oil before hooking up the oil line.

If some one happens to know specs and torque values,feel free to add them on:thumbsup:
 

Attachments

  • GM8 turbo rebuild 032.jpg
    GM8 turbo rebuild 032.jpg
    41.5 KB · Views: 89
  • GM8 turbo rebuild 033.jpg
    GM8 turbo rebuild 033.jpg
    48.2 KB · Views: 92
  • GM8 turbo rebuild 034.jpg
    GM8 turbo rebuild 034.jpg
    49.9 KB · Views: 90
  • GM8 turbo rebuild 035.jpg
    GM8 turbo rebuild 035.jpg
    24.7 KB · Views: 84
  • GM8 turbo rebuild 037.jpg
    GM8 turbo rebuild 037.jpg
    37.6 KB · Views: 92
  • GM8 turbo rebuild 041.jpg
    GM8 turbo rebuild 041.jpg
    60.3 KB · Views: 90
  • GM8 turbo rebuild 042.jpg
    GM8 turbo rebuild 042.jpg
    43.9 KB · Views: 91
  • GM8 turbo rebuild 043.jpg
    GM8 turbo rebuild 043.jpg
    35.2 KB · Views: 88
  • GM8 turbo rebuild 046.jpg
    GM8 turbo rebuild 046.jpg
    51.7 KB · Views: 91
A pic of the kit manufactorer.This one is pretty good quality,made in italy(I hope):h)

and while i was at it,i cut up a perfect waste gate vac pot and build a turbo master from it.:D
 

Attachments

  • GM8 turbo rebuild 036.jpg
    GM8 turbo rebuild 036.jpg
    49.9 KB · Views: 77
  • GM8 turbo master 001.jpg
    GM8 turbo master 001.jpg
    44.7 KB · Views: 65
  • GM8 turbo master 002.jpg
    GM8 turbo master 002.jpg
    46.4 KB · Views: 60
  • GM8 turbo master 003.jpg
    GM8 turbo master 003.jpg
    38.1 KB · Views: 57
Thanks again, Simon! Your thread here has been added to the 6.5 Technical Reference Library under T (for Turbo, GM-8).. I learned a lot in this thread, myself!

Thanks for taking the time to do this... Show-and-Tell rulez, as usual!

Jim
 
This particulair turbo was just stuck cause of carbon build up in the exhaust seal and under the heat shield,all parts exept the one sealring where in exelent shape,Had 268 k on it.
 
Very good.:thumbsup::thumbsup: I'm licking my chops waiting for the DS4 rebuild thread.:D
 
nice writeup Simon, If you use a heat gun on those screws with the loctite they will come right out.
 
I rebuild turbo's, good writeup but I have a few things to add, :thumbsup:

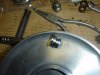
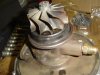
Use a punch and mark all the housings so you can put it all back together in the same relationship, makes reclocking unneccessary.

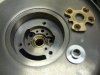
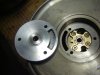
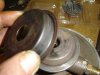
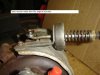
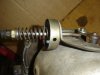
I highly recommend getting it balanced, they do go out over time, like a car tire, its cheap insurance, if your not, then MARK the compressor wheel in relation to the shaft so it goes back on the same spot. When putting it back together, the compressor wheel moves when being tightened so take that into account.

I like to use anerobic sealer, RTV can get stuck in the turbo or places it shouldn't, the excess anerobic will simply melt and no do any damage.

I like to use ARP Moly lube on the bolts, makes them tighten up alot easier and come apart alot easier too.

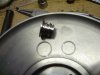
Buy a small set of circlip pliers, makes the job 10 times easier.

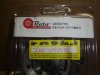
Measure the bearings, sometimes they send the wrong ones in the kit. The last GM6 I did needed .005" oversize bearings.

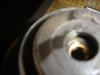
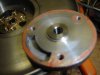
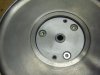
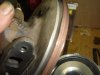
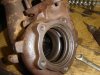
Pay close attention to the turbine seal area on the cartridge, this area can get damaged and if it is, the seal will never seal and you'll blow oil into the exhaust. They can bore this larger and if the turbine shaft seal area is damaged, they can also machine that larger.

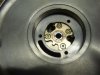
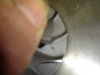
As mentioned, be very careful putting the rings on, if you over expand them, it can make putting the turbo back together difficult and you can damaged the rings or the hard parts. I've folded over the turbine ring before, :(
 
Back
Top