Agree with all the above but if you are only doing the one side and have not removed the glows on the opposite side , you will not get full cranking RPM . Sorta like a gas engine without removing all the plugs and having full throttle . Still , the numbers do seem low .

Navigation
Install the app
How to install the app on iOS
Follow along with the video below to see how to install our site as a web app on your home screen.
Note: This feature may not be available in some browsers.
More options
-
Welcome to The Truck Stop! We see you haven't REGISTERED yet.
Your truck knowledge is missing!
- Registration is FREE , all we need is your birthday and email. (We don't share ANY data with ANYONE)
- We have tons of knowledge here for your diesel truck!
- Post your own topics and reply to existing threads to help others out!
- NO ADS! The site is fully functional and ad free!
Problems registering? Click here to contact us!
Already registered, but need a PASSWORD RESET? CLICK HERE TO RESET YOUR PASSWORD!
You are using an out of date browser. It may not display this or other websites correctly.
You should upgrade or use an alternative browser.
You should upgrade or use an alternative browser.
Rebuild about done
- Thread starter Rodd
- Start date
Rodd
Recruit
The first time my son did the compression test it was 400 psi. He didn't count the cranks. he just cranked until it the gauge stopped climbing. After that, he read somewhere online to just crank it 8 times and record the number.
Rodd
Recruit
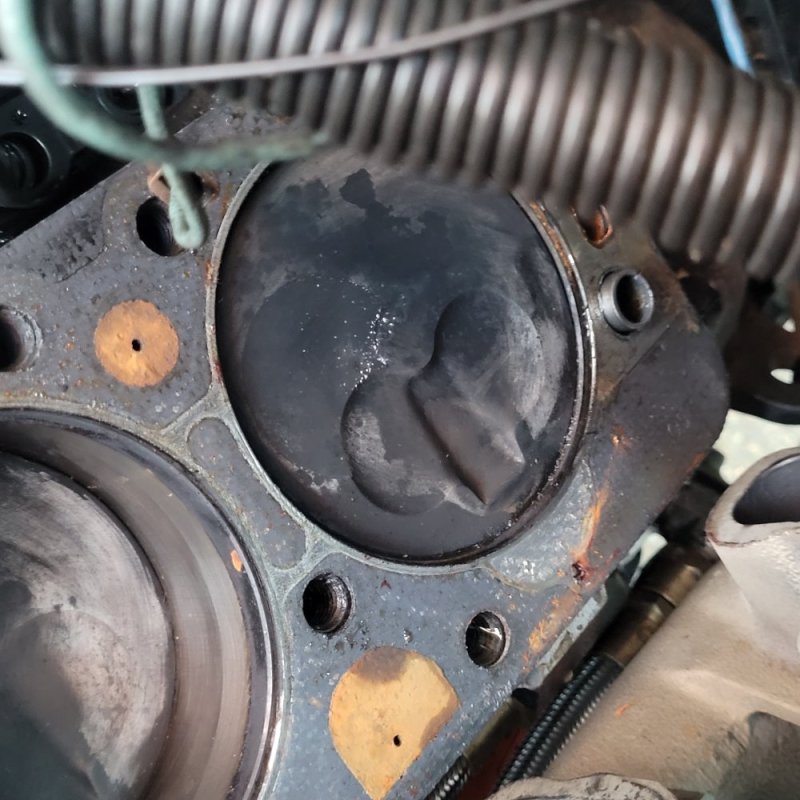
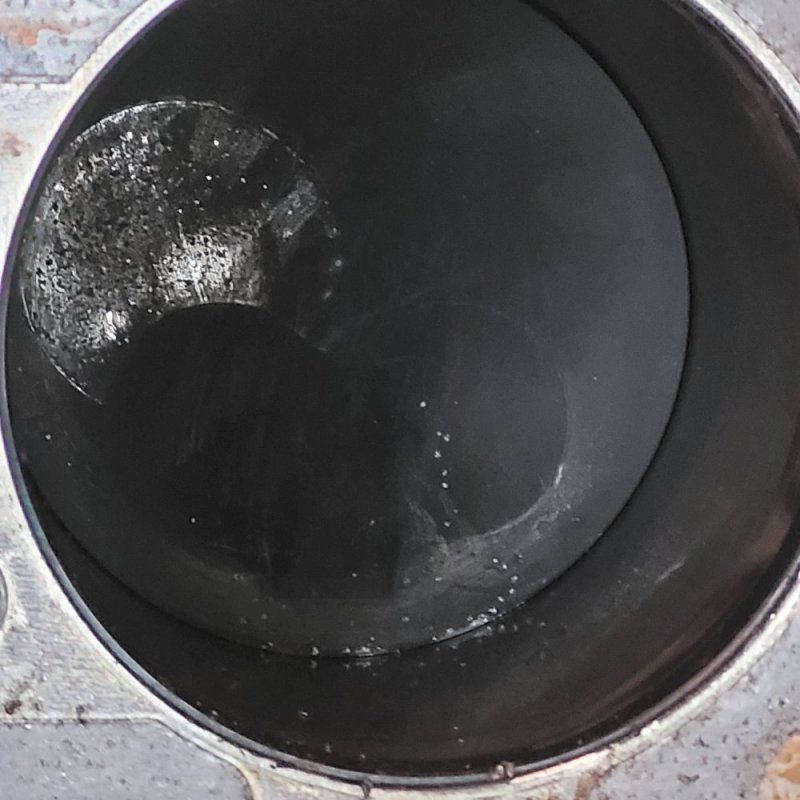
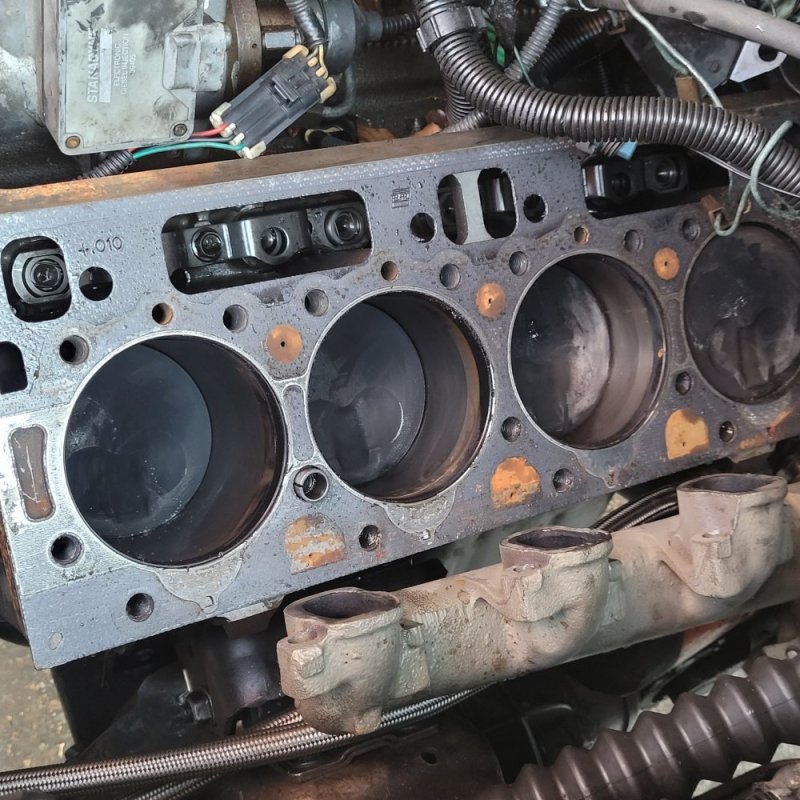
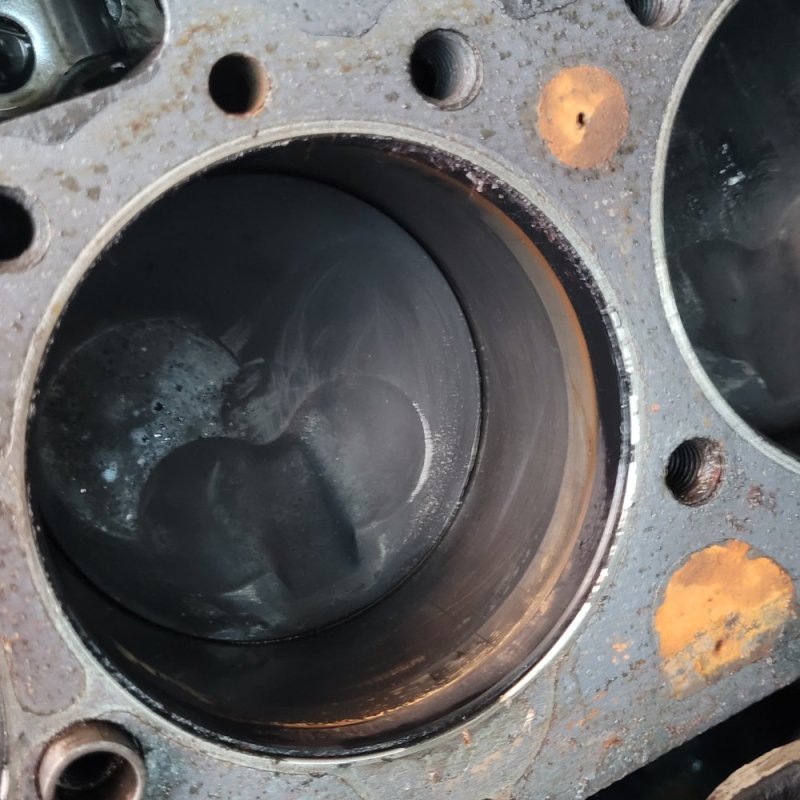
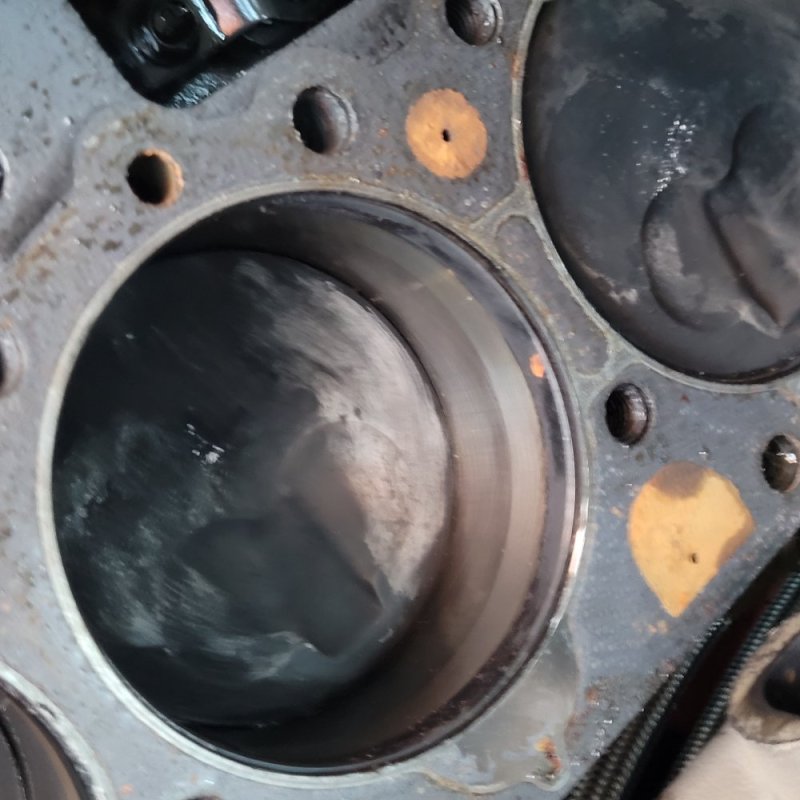
My son took off the driver side head. The larger valve touched the cylinders 1, 3, 5, and 7. 1 is the worst getting less severe in succession. I ceramic coated the pistons and the #1 has a very slight indentation. It's hardly noticeable to the touch. It's probably a thousandth if that. the others you can't feel the indentation just a slight color change.
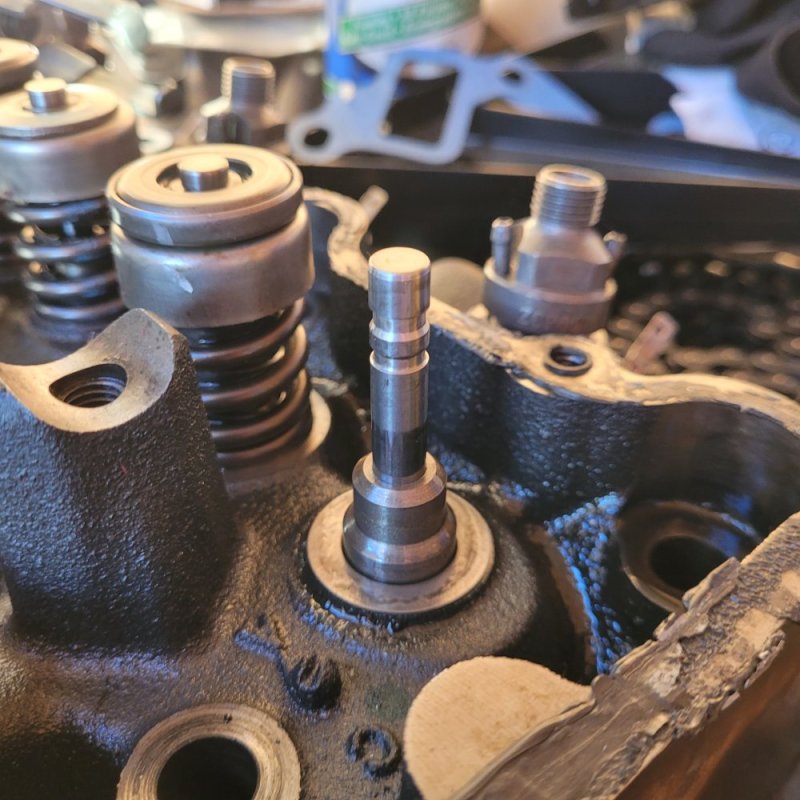
The valves aren't bent. I noticed on the valves there are 2 different grooves. One on the end and one a little lower. All of the valves are on the groove closest to the end. So there is about 1/8 inch sticking above the spring. If I use the lower groove, the end sticks out about 3/8 of an inch from the spring.
The valves aren't bent. I noticed on the valves there are 2 different grooves. One on the end and one a little lower. All of the valves are on the groove closest to the end. So there is about 1/8 inch sticking above the spring. If I use the lower groove, the end sticks out about 3/8 of an inch from the spring.
Rodd
Recruit
Rodd
Recruit
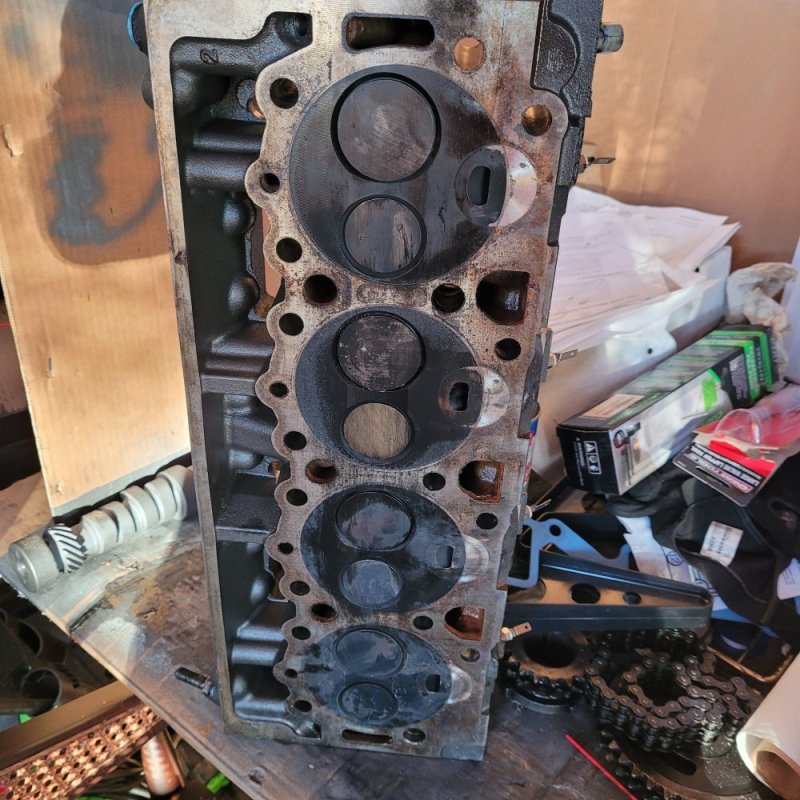
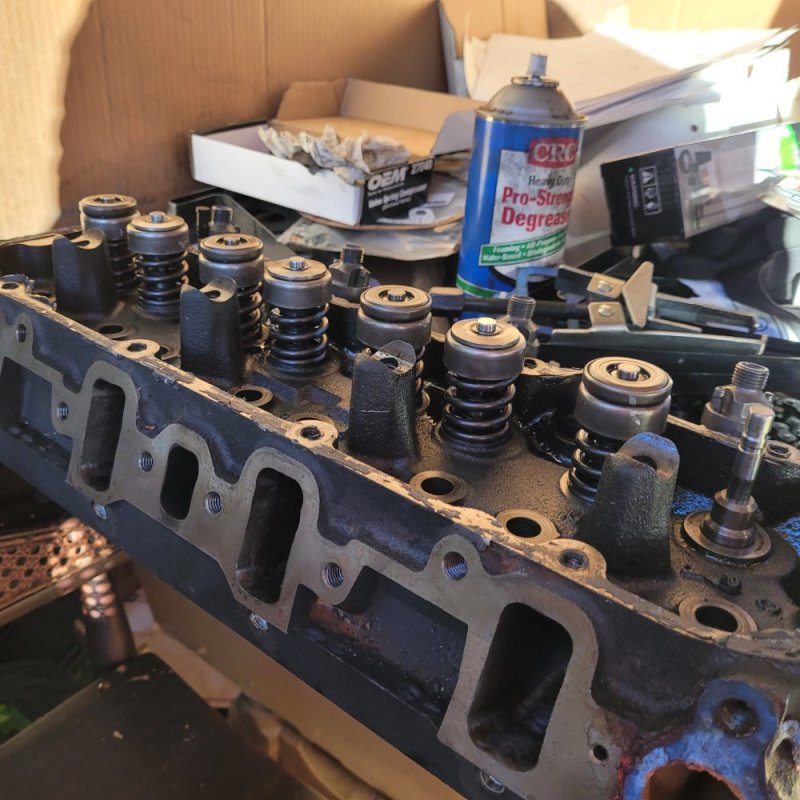
Here are the pictures
Attachments
Will L.
Well-Known Member
Go on and pull the other head. They will have hit also.
I’m gonna go back and reread the thread to see what went on here.
I’m gonna go back and reread the thread to see what went on here.
Rodd
Recruit
The timing dot was off on the time keeper. We used the old timing gear and chain to get it corrected, then replaced the chain w/ the time keeper.
Will L.
Well-Known Member
Ok- reread it all to get my mind clear on this guy.
Yes it hit when the gear was off. This also explains your ds4 timing issue you were fighting. The other head comes off at a minimum.
I know you dont wanna hear this-
But I would just pull the engine.
Inspect everything for damage. Measure rods.etc
Shy of that pull the other head and inspect all valves.
Dial indicator to read pistons are reaching full top, and full bottom. This will ensure rod length at least.
Absolutely nothing hits me as to why 1 cylinder is lower than the others on same bank.
Your never posted compression on the other bank. Is it written down somewhere I hope?
Rodd
Recruit
We didn't check the compression on the passenger side yet. We wanted to figure out the easy side first.
ak diesel driver
6.5 driver
Before dismissing the valves aren't bent pull one and try lapping it in.
If I use the lower groove, the end sticks out about 3/8 of an inch from the spring.
HE** NO.... the keepers ONLY go in the top grove NEVER in the lower grove period.....
The lower grove is for the square rubber o-ring they call a seal....
When a valve touches a piston several things can happen, bent valve, bent pushrod, lifter gets jammed from bottoming out, rockers bent, etc
Unless you like removing the heads I'd have a valve job done and let the pros decide if a valve is bent, it doesn't take much to bend them so they don't seal...
I see you used a .010 thicker gasket, and the valves still touched, more towards one end of the block, that is a sign the deck is not square. The intake valve chases the piston so it's no surprise that valve touched.
Another example of why valve reliefs in pistons are a good idea...
Remind us what rockers you used and if rollers what ratio ?
Another example of why valve reliefs in pistons are a good idea...
Remind us what rockers you used and if rollers what ratio ?
Besides, the keeper won't stay in the lower grove, if you look closely it's a square cut grove, not like the top grove is...
Will L.
Well-Known Member
Ok- in the future, people should always remove all 8 glow pugs to do a compression test. Sounds like you only removed 4 - I can’t imagine removing all 8 then only taking readings on one side. Unbalanced rotation speed of the engine will skew your numbers.
In class and training people always argue if it theoretically should or shouldn’t. Theoretically to me is shouldn’t- but each time I have seen it turn into a bet and in the shop when tested in real life- it does somehow wreck the numbers.
so given that - imo at this point don’t bother with the compression test or leakdown test in the other side.
You can have a piston hit valves and not damage things- but it is really rare.
The two hit each other and the lifter range of motion saves the damage and only oil not coming out of the lifters fast enough causes the dents but nothing else gets hurt is the concept.
Chris’s point about the deck being out of square- that would account for the front cylinders hitting worse. If the root cause was the timing gear being out of time- that is clear.
18726543 is the firing order. Your cylinder we know that hit worst to least is
1 3 5 7. This tells us it wasn’t high rpm hit that as the engine slowed down less damage done or as it sped up more damage done that are things you see from a valve float issue- or else the worst damage starts at a random cylinder then gets progressively worse or progressively better following the firing order. Like 1 worse, 7 next, 5 less then almost nothing on 3.
Yours is clearly front to back. This means one of four things. (Or combo of them) ((on edit #5 is below but insanely odd in theory))
Your block deck is not square.
Your head is not square.
You didn’t follow proper torque sequence/spec.
Your head gasket was built with a severe taper.
I listed them in order of probability.
Regardless- the other head has to come off. You have to check everything out.
Depending how big the dent is in the piston- you could see a lower compression in the respective cylinder. Think about Chris’s piston with the valve relief. His regulator reduced compression piston is 18.5:1. The valve relief lowers it to 18:1. So valve relief for both valves looses 0.5:1 ratio. Only Chris knows the exact numbers- they could be 18.5999:1 and he rounds it down or 18.4 rounded up just calling it 18.5 because that is a standard form of measurement. However as precise as he is with things, I suspect he would give the most accurate ratio available. Anyways- the slighty lower compression of the piston with bigger dent in it will loose some psi on the test compared to the ones without it.
Ok- something else just hit me. Your camshaft angle could be ever so slightly off from th crankshaft angle. Imagine during manufacturing the cam holes were bored slighty to low in the rear of the engine. This would angle the camshaft allowing more valve lift on front cylinders vs rear cylinders. Measuring crank to cam bore front and rear would identify this. But that is some oddball and elaborate scenario. Now that it is in my mind I will have to measure mine to calm the ocd. Dang it. This is weird thinking btw- I don’t suggest this being done by most builders- this is usually a one time check on custom made blocks.
Back to reality.
You have to decide how much gamble of labor vs knowing it is ok becomes worth it to you.
Definitely you HAVE TO set up a dial indicator and measure every piston coming to the top properly now. Keeping the pistons even becomes a question. The valve striking the pistons each a few times at minimum means future stress fractures are a possibility. So it’s the money gamble. I have seen 6.5 pistons ran long life after valve strikes similar.
Money dictates following AK dd advice of diy valve lapping to ensure not bent vs paying machine shop. Obviously a full workup from a machine shop will eliminate any issues.
Bent rocker arms arms a serious possibility. There are several guys that sold/selling brand new rocker arm sets off p400 or optimizer who went to rollers. Absolutely I would buy a set from someone and throw away the ones you have now if you can afford it.
Otherwise you are in for some tedious measuring. Dial indicator to every rocker arm with
Having the oil pressure ran up using the actual tool to fully pump up lifters.
I would be pulling and full disassembly of all lifters for inspection or replacement of them depending on the time vs money scale. All pushrods need to be verified perfectly straight or replaced.
No damage should have happened to valve springs but considering if you run these pistons, damage already present- so would running the risk of floating old springs be worth it vs the springs Chris found with proper tension for a turbo engine instead of tired old springs. If you already bought new springs, even if stock, then stay with them. But not if they have 200,000 miles on them- not worth the risk imo just because your pistons have already taken some hits.
Rodd
Recruit
Stock lifters and rodsI see you used a .010 thicker gasket, and the valves still touched, more towards one end of the block, that is a sign the deck is not square. The intake valve chases the piston so it's no surprise that valve touched.
Another example of why valve reliefs in pistons are a good idea...
Remind us what rockers you used and if rollers what ratio ?
Rodd
Recruit
Thanks for all the info. The Investigation continues
Rodd
Recruit
I am having my son reinstall the head to do a compression test on all the cylinders. He told me he used the injector hole so I am having him use the glow plug hole instead.
I think the block should be square. The shop I took it to is used by all the local diesel shops in Sacramento and I haven't heard any complaints. How would I check it for square without taking out the engine?
I am thinking that it may be a torque issue with either the sequence, the torque of the studs, torque of the nuts, or the torque wrench itself. He pulled the sequence and how much to torque them to off the ARP website. The torque wrench is a harbor freight one I have. That may be the issue. I am then going to take the heads in and have them check out after he does the compression check.
MrMarty51
Well-Known Member
Try to find a Snap On torque wrench. The one with the rectangular bar looking handle and ratchet head that pivots.I am having my son reinstall the head to do a compression test on all the cylinders. He told me he used the injector hole so I am having him use the glow plug hole instead.
I think the block should be square. The shop I took it to is used by all the local diesel shops in Sacramento and I haven't heard any complaints. How would I check it for square without taking out the engine?
I am thinking that it may be a torque issue with either the sequence, the torque of the studs, torque of the nuts, or the torque wrench itself. He pulled the sequence and how much to torque them to off the ARP website. The torque wrench is a harbor freight one I have. That may be the issue. I am then going to take the heads in and have them check out after he does the compression check.
Those are the most accurate and if left on an upper torque setting is does not depreciate the accuracy of the torque.
If You dont know anyone that might have such a device let me know and I will mail mine over to You when You are getting close to doing the final head bolt torque.
IDK what the head bolt torque is so the torque on this 1/2” drive unit goes up to 200 ft lbs or possibly 250.
MrMarty51
Well-Known Member
A pic like the one I have. Goes up to 250 ft lbs.
I removed the swivel head pin and installed a bolt that has the shank all the way through the pivot.
That way the bolt can be removed, the ratcheting head flipped around and then anything with a left hand torque setting can be torqued down without messing up the torque wrench.
Never torque left hand with the head on the factory way. That will break the wrench.
Rodd
Recruit
Thanks for the offer. My son has one at work that he'll bring home when it is time to reinstall. He has been using what I have instead of his own tools.Try to find a Snap On torque wrench. The one with the rectangular bar looking handle and ratchet head that pivots.
Those are the most accurate and if left on an upper torque setting is does not depreciate the accuracy of the torque.
If You dont know anyone that might have such a device let me know and I will mail mine over to You when You are getting close to doing the final head bolt torque.
IDK what the head bolt torque is so the torque on this 1/2” drive unit goes up to 200 ft lbs or possibly 250.