• Welcome to The Truck Stop! We see you haven't REGISTERED yet.

    Your truck knowledge is missing!
    • Registration is FREE , all we need is your birthday and email. (We don't share ANY data with ANYONE)
    • We have tons of knowledge here for your diesel truck!
    • Post your own topics and reply to existing threads to help others out!
    • NO ADS! The site is fully functional and ad free!
    CLICK HERE TO REGISTER!

    Problems registering? Click here to contact us!

    Already registered, but need a PASSWORD RESET? CLICK HERE TO RESET YOUR PASSWORD!

Powermaster Starters

Finally getting back to this.

The stud for the brace was missing out of the starter on the 94 K3500 CC SRW

I've never had that happen before. It wasn't broke off. It was completely missing.

I haven't looked closely at the brace to see what it looks like.

The holes in the block looked slightly abused. There was noticable lip around both holes.
More so on the outside hole.

I wonder how long it was that way.

I have new GM starter bolts and washers. I also have 3/8 nordlock washers.

Which would be recommended?

I have the torque spec written down as 35' lbs. Is that correct?

I did a search to double check and found 33, 34, 35, 37 & 40' lbs.

I'm going to run a M10 x 1.5 tap into the block to clean the threads.

Should the starter bolts go in dry or with a coating of light oil. I generally use Amsoil MP

 
IDk about the threads needing to be oiled or not. post some pics of the mount point on the block for all to see.

as for the bracket and the rear stud, I had the stud on my old starter break off. when I caught it, I pulled the starter and got the stud out and used a grade 8 bolt as a replacement stud. was this the powermaster starter rear stud that sheared off?

if the block mount point is at any question for cracks, replace that bracket with a longer section of angle iron, match up the holes to drill on the angle with the bracket, but the angle iron longer extending down to just above where the oil pan meets the block. it should rest up against the block there when it's bolted down. if not you can heat and slightly bend the lower end so that it will rest on the block (or lay a weld bead to take up the space) this will provide some extra support for the starter if the block holes are worn or cracked.

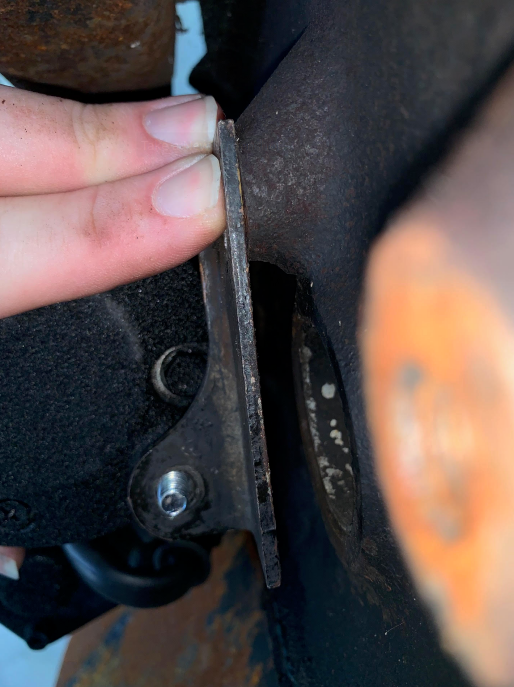
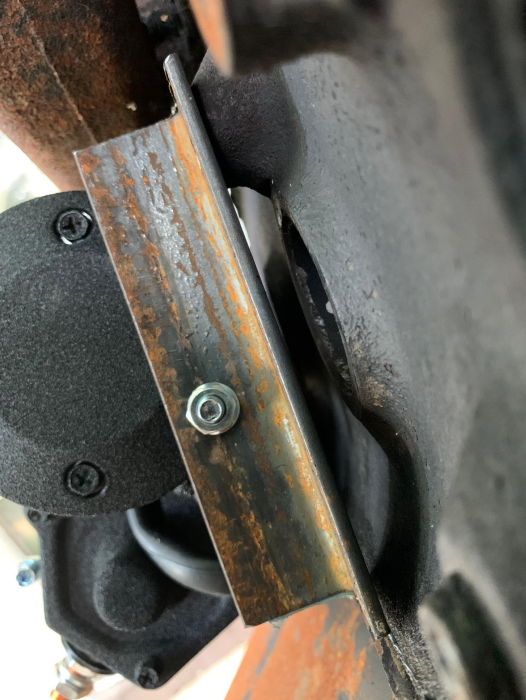
Here is two photos, one of the normal bracket, look at the area where the starter rear stud is and the weak point on the bracket where it bolts to the block, there is no support. Mine bent due to the issues I have with the block.

The second pic is the piece of angle iron I used to re-create the bracket, extending it down to just above the oil pan. much stronger than the factory bracket. This is to help when there are issues with the starter bolts and the block.

Screenshot_20231120_191757.png
Screenshot_20231120_191900.png
 
The starter brace stud never sheared. It must have loosened up and fell out. There were no remnants of the stud in the starter.

I want to check the brace for marks that indicated movement.

I'll try to get pics. The whole job is a challenge. Lately I've taken to getting dizzy.

There's not much to see. I cleaned the starter mating surface. I did want to get a pic of the front of the NV400. There was something I noticed last trip that didn't look quite right to me.

Any opinions on the washers on the starter bolts?

Just use the factory washers?
Use the nord lock washers?
 
Last edited:
I used nord locks on mine, but the bolt heads were flanged head so a washer wasn't needed. the last set of GM bolts I bought were this way, lately I have seen the same GM starter bolt that was not flanged.
 
I used nord locks on mine, but the bolt heads were flanged head so a washer wasn't needed. the last set of GM bolts I bought were this way, lately I have seen the same GM starter bolt that was not flanged.
Not flanged is what I have.
I've only seen a couple pair of washer head.
If I knew the GM part number I would order some.

The washer heads I have are about 3/16" longer and the hex is near double the height.
 
Chris has it right on threads- medium strength (no heat required) liquid loctite.

The factory bolts should NOT have a shoulder on them (built in washer).
It uses a separate flat washer.
Yes I would swap the factory flat washer for the nordlocks. Remember one nordlock washer is comprised of two pieces and direction they fit together is critical.
Some factory bolts had washerhead or the dealership was selling repackaged bolts many years ago.
 
Is 35' lbs the proper torque for a 1994?

On the exciter wire to the relay I'm going to install - would I be better to leave it where it is and run up and down to the relay?

Or fish it up to the relay as I originally planned?

The whole vertigo thing sucks butt for this project. It's a little late to install a lift and furnace now.

I never used loctite on the starter bolts before. I will now.

The washer head bolts also had the washer. The washer head and the washers were about the same diameter.
These could date back to the first time I changed the starter on the 1989. Maybe 1992 or so.

Thank you all very much
 
I think you guys are missing one important detail about the bolts . Earlier this year I got some from RA and they were not the gold color that is normally on the GM bolts . Dealer got me a couple , along with some washers , and they were the same as the RA bolts . The washers were at least double thickness as normal washers of that size . The shank of the bolts are knurled above the threads . When you install the bolts , the block has a recess above the threaded portion of the block . As the bolts get installed , the knurled portion of the bolts compress or deform to the hole size . You can see this in used bolts when looking above the threads . Maybe this is why the bolts should not be reused . There is no flange on the bolts hence the need for the washers .
 
the bolts I had bought from my local GM dealer were not gold ether. they were nickle plated silver and had a flange head, no washer and knurled behind the threads. might have been GM old stock since they had to be ordered. came in the usual GM box one bolt per box. I guess it would depend on where they were made as I have heard a lot of folks are saying delco parts are now made in china.
 
the bolts I had bought from my local GM dealer were not gold ether. they were nickle plated silver and had a flange head, no washer and knurled behind the threads. might have been GM old stock since they had to be ordered. came in the usual GM box one bolt per box. I guess it would depend on where they were made as I have heard a lot of folks are saying delco parts are now made in china.
The flanged bolts I have are old. They've been around a long time. Might be from when I be first changed the starter on the 1989.

I still have at least one in the starter bolt bag. I keep a few used bolts in the bag.

My guess on the washers, was to protect the aluminum starter end. That's just a guess.
 
Here... I found one that uses the 4 pin, put if using a 5 pin just don't connect anything to the center pin.

View attachment 84485
Should I install an inline fuse ahead of the relay on the incoming power wire?

If so. Would 30 amp be appropriate?

I found a prewired 70 amp relay in my relay box. It's a relay mount, but I'll have to live with that.
 
You can, it never hurts anything to have some safety in there! if you have the relay mounted up by the power distro block on the firewall, you can get away with a simple inline fuse holder just crimp the eyelet right to one end of the fuse holder and solder/heatshrink the other end to the main lead going into the relay.
 
You can, it never hurts anything to have some safety in there! if you have the relay mounted up by the power distro block on the firewall, you can get away with a simple inline fuse holder just crimp the eyelet right to one end of the fuse holder and solder/heatshrink the other end to the main lead going into the relay.
Thanks

If I can find the right crimpers - I looked for 30 seconds and didn't see them before I came in the house -
I have the proper connector to install into the relay. Already popped the wire out.
I plan to just use the inline fuse from relay to load center. The relay is only 2" away.

Some good relay and fuse info in this thread.

 
Are all wires supposed to have corrugated tubing?

My tubing has crumbles and fell off.

I'm trying to figure out how the wires are supposed to be with the corrugated tubing

I didn't take the starter off so I didn't see how things came apart.
 
Back
Top