HMF
Member
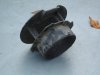
Looks factory. Is the inlet goona get too much blockage courtesy of the headlight?

Follow along with the video below to see how to install our site as a web app on your home screen.
Note: This feature may not be available in some browsers.
")
"gully washer", frog strangler, loblolly, or in your case, the regular afternoon thunderstorms; people who haven't lived in the Houston area won't understand.
IMHO, the intake pipe is mostly protected from direct rain entry by the headlight. Worst case scenario; the half of the filter facing the opening gets soaked.
That leaves the other half to 'breathe' through. In a downpour, you probably won't be running with the pedal to the metal.
Gravity will tend to settle the water to the bottom of the filter housing.
Just don't try do drive accross a bayou without a bridge!
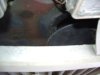
Have you ever seen the intake setup from the early 6.2 NA motors? It's very similar to what you have except the filter isn't directly behind the core support.
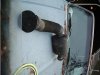
I've got an 83 and the intake is in the radiator core support, between the rt headlights and the radiator. It has a 4" tube on the motor side and a flat plate that the air has to go around (kind of like the headlight like Dave talked about) before entering the intake tube. I'll have to get pics of this and post them. I'll probably have time this afternoon.
Don


Yep, the headlight and grill will take the brunt of any impact's, but dragon flys and leaves will still find their way in. Rain will mostly be blocked. Im going to cut some reliefs in the parking light also to let more air get back into that area.
I wont be fording any rivers, atleast not more than 1.5' deep.
I think I have seen that and can picture it in my head. Some pics would be great.
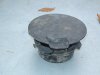
Basicaly its just the air inlet that go's to grill area and filter is in the big round canister on intake right?


where did you get the flanges? look nice..............
All is 100% stainless. ........