• Welcome to The Truck Stop! We see you haven't REGISTERED yet.

    Your truck knowledge is missing!
    • Registration is FREE , all we need is your birthday and email. (We don't share ANY data with ANYONE)
    • We have tons of knowledge here for your diesel truck!
    • Post your own topics and reply to existing threads to help others out!
    • NO ADS! The site is fully functional and ad free!
    CLICK HERE TO REGISTER!

    Problems registering? Click here to contact us!

    Already registered, but need a PASSWORD RESET? CLICK HERE TO RESET YOUR PASSWORD!

Hungry IP Feed it!

Pruittx2

Been around a bit
Messages
739
Reaction score
136
Location
Lake Odessa, Mi
Tonight the work began on the Feed the Beast Mod,,,

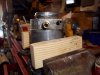
I like to put a piece of wood and a few towels here to protect my woodshed :hihi:
101_1311.jpg

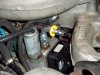
132000 miles looks like this?? :mad2: Also NO top hat filter :(
101_1300.jpg

all cleaned out
101_1305.jpg

Proper work station, ready to get at it!
101_1312.jpg

Walking J kit, I bought 2 yrs ago.
101_1307.jpg

New output side to IP 2 times the flow! :cool:
101_1304.jpg

Got all new hose, clamps, and a filter. Had to run over to dad's to grab the tap and die set,,, In the early morning b4 it gets to hot,, I'm gonna try to get it done, and buttoned up. Of coarse pic's will be added Sunday when done. any pic request while I'm in there?


Ok here we go,,, Done by noon,, would of been faster if I wern't always second guessing my self. But too many times, I've had to take things back apart to finish a job.

So This morning,, I cut the out side nipple off flush with the FF manager. then drilled the hole out,,, talking about scary,, I went in once with a bit 3 sizes smaller then 5/16. If you go to deep your screwed. So time was taken to drill then check, then drill. Got down to the depth,, and then drilled with the 5/16 bit. then I touch it with a bit 3 sizes bigger, to taper the edge, hoping that maybe that would help the tap start easier and straight.


Hard to see the hole as it's being drilled,,
101_1315.jpg


finished and installed 1/8 out fitting
101_1318.jpg

Ip fitting adapter
101_1320.jpg

all finished up,,
101_1322.jpg*
Notice that the now the fitting is pointing forward, and down to make sure of no kinks and I also moved the extension cable for the Remote PMD and ran it thru the manifold runner. I did this to get more room to feed the fuel lines thru. My T-valve for the drain, had been leaking and wasn't bolted to the t-stat housing.

So now it's all buttoned up, and running with no leaks. :arms:


This is a mod, I've had the parts to for a few years,, but was always kinda scared to dig in to it. Don't know why,, fear of the unknown I guess. But it needed to be done. the 1/4 fuel line was almost crumbling at the drain valve,, So I knew the rest was bad.

Now just waiting for the new Chip to come,, and then see If I can go do a run and starve it for fuel!
 

Attachments

  • 101_1317.jpg
    101_1317.jpg
    72.1 KB · Views: 31
  • 101_1321.jpg
    101_1321.jpg
    92.7 KB · Views: 34
Opps spoke too soon. Dripping in the driveway, after a 20 min drive, :mad2: probably the orings in the bottom,, :mad2: I didn't have new ones. Chit, it's like 92 outside. :(
 
took a peak, and it seems it's leaking around the filter hold down ring. the area just below that, is wet.

SO Where the hell do I get a new retainer ring??
 
Try the new style filter that has the threads on it already, no ring. I use the napa gold series with no problems
 
Looks good....Nice Job. Did you feel any seat of the pants difference....Butt Dyno?

The FFM O-rings didn't come with the kit from Walking J?.....I know you said it's leaking from the top where the threaded ring seats the filter, sometimes the rubber and metal ring attached to the filter becomes unseated.

Or sometimes the old O-Ring falls off the filter and you end up with 2 O-Rings trying to seal the top......Which I doubt, because you had the whole FFM out and it would be pretty hard to miss that.
 
I also did this mod this wknd, fairly straight forward, but ran into deal with the top of the ffm where I had the hat style but the new filter I bought (stanadyne) just took the ring style top. Luckily I had another ffm around with the ring to use... So I completed the mod. Also installing kennedy hi pop injectors and a few other tid bits at the same time .... Excited to get it all wrapped up and back on the road next Saturday. Will take some pics
 
I also did this mod this wknd, fairly straight forward, but ran into deal with the top of the ffm where I had the hat style but the new filter I bought (stanadyne) just took the ring style top. Luckily I had another ffm around with the ring to use... So I completed the mod. Also installing kennedy hi pop injectors and a few other tid bits at the same time .... Excited to get it all wrapped up and back on the road next Saturday. Will take some pics

First off, WELCOME to TTS 2DRTURBO......Sounds like you took care of some important maintenance and mods....Looking forward to pics of your rig.

Please fill out your sig so we know the details, Year, Model, Mods, etc....Here's the link

http://www.thetruckstop.us/forum/profile.php?do=editsignature
 
Ok here we go,,, Done by noon,, would of been faster if I wern't always second guessing my self. But too many times, I've had to take things back apart to finish a job.

So This morning,, I cut the out side nipple off flush with the FF manager. then drilled the hole out,,, talking about scary,, I went in once with a bit 3 sizes smaller then 5/16. If you go to deep your screwed. So time was taken to drill then check, then drill. Got down to the depth,, and then drilled with the 5/16 bit. then I touch it with a bit 3 sizes bigger, to taper the edge, hoping that maybe that would help the tap start easier and straight.


Hard to see the hole as it's being drilled,,
View attachment 34113


finished and installed 1/8 out fitting
View attachment 34117

Ip fitting adapter
View attachment 34116

all finished up,,
View attachment 34114*
Notice that the now the fitting is pointing forward, and down to make sure of no kinks and I also moved the extension cable for the Remote PMD and ran it thru the manifold runner. I did this to get more room to feed the fuel lines thru. My T-valve for the drain, had been leaking and wasn't bolted to the t-stat housing.

So now it's all buttoned up, and running with no leaks. :arms:


This is a mod, I've had the parts to for a few years,, but was always kinda scared to dig in to it. Don't know why,, fear of the unknown I guess. But it needed to be done. the 1/4 fuel line was almost crumbling at the drain valve,, So I knew the rest was bad.

Now just waiting for the new Chip to come,, and then see If I can go do a run and starve it for fuel!
I don't see no T for the fuel press gauge at the IP inlet,....much more important than the FTB mod IMO.
 
Hey Pru here is how I monitor mine with a simple tee setup one side is a vac switch that lets me know the filter needs changing and other side it to mechanical gauge in cab to monitor fuel pressure.

I guess some would say a fuel leak potential, over the years there I've never had a fuel leak issue, plus using copper gauge line it can't become brittle from heat like nylon gauge tubing can. Some also say the use of brass tees & tubing risky, possibly iron pipe would be better, but my temporary setup has more or less become semi-permanent after 7 years of being there (man where has the time gone).

Who would have thunk my FTB idea would have lasted this long even Bill Heath now running it on Bonneville racer doubted the need for it back in the day when I thunk it up.

Also for most fuel to the IP a better lift pump and you'll want to open up the (4) inlet fitting holes under the screen in the IP inlet fitting that threads into the IP see in the 6.2/6.5 TRL for pictures of that. http://www.thetruckstop.us/forum/showthread.php?572-Feed-The-Beast-Part-I-amp-Part-II

DCP01128.JPG
 
TD's setup looks pretty good altough i can't see the need for the vac switch.
I did it it a bit less elaborate.
i installed a brass 3/8" T with a hose barb on either end in the fuel hose just before entering the IP,i screwed an 3/8 to 1/4" adaptor,than a snubber( to prevent needle flutter) and a 1/4" hose barb in the remaining leg of the T,from there i ran a 1/4 hose trough a hole in the firewall (with grommet)into the cab to a $15 'winters' full sweep 15 PSI mech gauge.

Don't expect to see an improvement in fuel supply with the stock LP,..i didn't see any on my truck.
My Wife's truck has better pressures(all stock) than mine with FTB mod.( we both have the stock 93 LP)
 
Yup, thanks for the welcome. Been lurking around the forum but finally decided to join and see if there is something i can offer. If not, I guess I get the benefit of seeing the posted pics in the threads now that I am a member! :) I will update my profile soon with pics , etc when I get the truck back on the road after these upgrades/improvements. its a 2 door tahoe/blazer that I am setting up much like the rest of yall are doing with your 6.5's. So far having a lot of fun- I really like this platform and enjoy the simple, cost efficient nature of working with these trucks.
 
welcome aboard Turbo,, and Good to see ya Doc! Yeah i've been up all in that thread, getting ready to do it,, now that's it's done, I don't know why I waited.
Now just gotta get that fuel leak fixed. Gonna wipe it all down, in the morning,, then look while it's running, to see where it's coming from. I'm gonna see if I can locate a oring, Monday local dealer can get it 3 days though.
 
Also,, I did however find that my final ditch screen is intact on the fuel tower,,, I had thought that it sat on top like a hat,, but they are more like a ring, and slid down that inner tube to cover the outlet feed towards the IP.
 
TD's setup looks pretty good altough i can't see the need for the vac switch.


Yes optional overkill but since I have both a pre-filter and an on engine filter I put in 2 switches connected to a red LED that lets me know real time when I'm having issues with either filter rather than a summary drop in the gauge indicated pressure.

I also have 2 green LEDs in series with each lift pump to let me know that fuel delivery issues isn't due to a loss of power to the (2) lift pumps or let me know which one of the 2 pumps or both pumps if pulling hard/heavily loaded I have energized. Again overkill expense for some but I'm a bell & whistle guy :)
 
welcome aboard Turbo,, and Good to see ya Doc! Yeah i've been up all in that thread, getting ready to do it,, now that's it's done, I don't know why I waited.
Now just gotta get that fuel leak fixed. Gonna wipe it all down, in the morning,, then look while it's running, to see where it's coming from. I'm gonna see if I can locate a oring, Monday local dealer can get it 3 days though.


Did you replace the spring clamps with worm gear clamps, or replace the orings, the spring clamps get weak over time, as far as the orings go, if you reused them once you break the original seal/set there is a good chance the will leak, new replacement is best IIRC Leroy has them for sale in Viton better than the OEM Buna ones, in a pinch I have in some cases been able to soften orings for reuse by soaking in PB blaster until I could get replacements.
 
Yes optional overkill but since I have both a pre-filter and an on engine filter I put in 2 switches connected to a red LED that lets me know real time when I'm having issues with either filter rather than a summary drop in the gauge indicated pressure.

I also have 2 green LEDs in series with each lift pump to let me know that fuel delivery issues isn't due to a loss of power to the (2) lift pumps or let me know which one of the 2 pumps or both pumps if pulling hard/heavily loaded I have energized. Again overkill expense for some but I'm a bell & whistle guy :)
I hear ye,in theory all good.
I worked on a lot of older militairy gen sets,most things that failed and caused havoc were the miriad of safety sensors and switches:D
 
Back
Top