• Welcome to The Truck Stop! We see you haven't REGISTERED yet.

    Your truck knowledge is missing!
    • Registration is FREE , all we need is your birthday and email. (We don't share ANY data with ANYONE)
    • We have tons of knowledge here for your diesel truck!
    • Post your own topics and reply to existing threads to help others out!
    • NO ADS! The site is fully functional and ad free!
    CLICK HERE TO REGISTER!

    Problems registering? Click here to contact us!

    Already registered, but need a PASSWORD RESET? CLICK HERE TO RESET YOUR PASSWORD!

Help a Brother Out #2

Thanks. I gotta get someone to come try to jump start me. Although we tried that yesterday and it didn't try to start any better than without them hooked up. I'm leaning towards thinking that the starter wore out... Like I said before for a couple of weeks maybe it was the truck was starting hard.. kind of like the starter wasn't getting enough juice or it was going bad.. it would crank over real slow but it would start. Battery gauge it was showing 13 yesterday but it still wouldn't turn over . I would think 13 would be enough to turn it over.. but it turned her really slow and then it just quit turning over at all... And like I said that was with the other diesel truck hooked to it.. had one of their batteries hooked to my battery, and their jumper box on my other battery.. and it still would not turn over
Do you have a battery charger at home? Even a low amp charger to leave on overnight. Maybe someone can take you to the local auto parts store to charge and test you batteries.
 
No ,no charger..out of my budget.. lol..
Hopefully I got a ride to AutoZone tomorrow. At least get the batteries tested.. starter is 207 for a duralast one.. yeah I know it's junk.. but my check tomorrow is only 255 so it'll have to do if that's the problem. If it's the batteries then I can hopefully buy one one week and other the next week.. but gotta figure the problem out first before I worry about cost.. I'm pretty sure the alternator is under warranty. So if by chance it's that then it's a free fix..lol
 
I honestly can't see it being the alternator because when the truck was running even when it started really hard once it was running the voltage up where it's supposed to be... So I'm assuming that meant the alternator was working properly and that's what the meter was reading even though the batteries were low.
 
Update.. starter is looking more probable..my neighbor brought over his lithium jump box..it charged the battery in litery seconds up to 14 volts..we turned ignition... NOTHING... Got under truck and beat on starter while turning key, and it tried cranking a little..not a bunch but it tried for a second real slow and since I was under there I could hear it Maki a grinding sound... So I'm optimistic that at least I THINK I know where to fire the parts cannon... However if any of y'all can debunk this theory please do before I throw away money
 
@Stoney if you want ship me the starter and I can take it to the shop in Penn Yan, probably cheaper to ship than the cost of your time and diesel fuel. I have to run up that way soon anyways to get an air compressor repaired. I have a neighbor with a collection of 6.5 parts as well, can see if he'd sell a starter for cheap, send me a p.m. if either avenue sounds helpful, no worries either way
 
I can't recall having issues with the side posts after using stainless 1-1/4" Allen screws for the battery bolt mod.
Upgraded battery cables have never been a bad idea on 6.5's.
Upgraded wiring anywhere on most vehicles is not a bad idea.
Most vehicle wiring is of minimal size
That's because you are now able to use the backing nut to keep the two Positive lugs in tight contact with each other, with or without the lead spacer. With the stock set up, the terminal bolt eventually bottoms out and the lead spacer squishes out enough that the two cable lug ends don't make good contact with each other/the battery Positive side terminal, even though the bolt is "tight" (bottomed out).

The 1¼" Allen bolt mod is very similar to the bottomed out longer bolt and the double nuts ran down and torqued to replace the stud and nut that would work loose on Shovel Head exhaust pipes (especially AMF built Shovels) due to heat/cool cycles and vibration.
 
Update.. starter is looking more probable..my neighbor brought over his lithium jump box..it charged the battery in litery seconds up to 14 volts..we turned ignition... NOTHING... Got under truck and beat on starter while turning key, and it tried cranking a little..not a bunch but it tried for a second real slow and since I was under there I could hear it Maki a grinding sound... So I'm optimistic that at least I THINK I know where to fire the parts cannon... However if any of y'all can debunk this theory please do before I throw away money
Have you (with the Positive cables at the Passenger battery disconnected first) tried disconnecting the battery cable at the starter, cleaning/burnishing the lug end with some ElectroCut, emory paper or 200 grit sandpaper, as well as the base of the stud on the starter and the underside of the nut that holds the cable to the starter, then reassembling it and hooking the two Positive battery cables back up to the Passenger battery and seeing if that helps with cranking voltage/amperage?

Also, have you bothered to check the lead washer between the two Positive cable lugs on the Passenger battery to see if it has squashed out and is making poor contact? The terminal bolt being "tight" is meaningless to check, you MUST take the two cables off and LOOK at the lead washer in between the cable lugs! It must be at least ⅛" to ¼" thick to make good contact between the lugs and ensure good contact of the bottom lug to the battery terminal. O'Reilly's has the lead washer in their computer, if the counter person knows what to look for, and the last time I bought one for my '94 it was like $1.09 (back in 2001!).

That washer being too squished out does cause all sorts of starting/voltage issues, as does a dirty/corroded Positive cable to starter connection.

Before firing the parts cannon, DO ALL the EASY, FREE things, like CLEANING all battery/cable/starter connections AND the ground straps, on BOTH ends, between the block and frame, body and frame, and body and block, too.

It is amazing how much headache dirty/bad connections, especially grounds, make when it comes to the electrical systems on these critters.
 
@Stoney I see what looks like corrosion on this pic. look at the dis-colorization on the copper wire going into the battery lug.
also look at the bolt on the post terminal has the terminal pinched to the max as if it's stretched out. is it loose enough on the battery post where you can turn it or move it without loosening the bolt? if so it needs to be replaced. in a pinch you can pull it all apart, clean all the cable connections and file away a small amount of material where it gets pinched on the post so that it can tighten slightly more until you can replace the terminal.


16559516111981326627633.jpg
 
That style connection where it has a set screw clamping down on braided wire isn't ideal ether. the set screw will cut the cable and cause a loose and weak connection. as a shade tree electrician I have learned to incase the braded wire in a copper tube or just heat and melt solder in the braids of the wire so when you tighten the set screw down it has something more solid to bite into and not cut the wire.
 
That style connection where it has a set screw clamping down on braided wire isn't ideal ether. the set screw will cut the cable and cause a loose and weak connection. as a shade tree electrician I have learned to incase the braided wire in a copper tube or just heat and melt solder in the braids of the wire so when you tighten the set screw down it has something more solid to bite into and not cut the wire.
I've used similar for solder connections x2 on wrapping in copper foil or copper tubing
 
Any time I have a set screw situation into a multi strand wire, I have always soldered the ends of the wire. A little smear of anti corrosion grease and clamp it on down.
In @Stoney situation with these clamping devices.
I think a person is better to shop for a battery terminal that would crimp onto the cables, get it big enough on the cable bore that both cables would fit within, then, have the parts store crimp it on down.
After getting the cable home, use a propane torch and fill the voids with solder.
Just be sure the cables are plenty long enough to be able to trim out any corrosion if there is any once the ends are stripped of insulation.
Can even get some large battery cable heat shrink to slide over the crimp and on to the cable. It comes in red and black for specific purposes.
 
Seriously High voltage connections are made like this all the time. When it is a fine strand wire, you simply wrap it in copper foil (as mentioned) or install a crimp on sleeve. Soldering (tinning) the wire is a good solution as well.

Stoney, take 1 cup of white vinegar and a sprinkle of table salt, stir it up. Salt isn’t required, it just speeds it up. Then soak the wire in that for 10 minutes. Use a small brush (prefer metal brush) to wipe down the wire, like brushing hair. Depending how bad it is, you might soak it longer.
Once the wire looks like normal copper- and this is CRUCIAL, mix up water with a tsp of baking soda. Soak the wire in that for 10 minutes. Make sure the container you use is more ‘full’ so more of the cable is under water than was in the vinegar.

The vinegar is an acid, just weaker than battery acid. Use the baking soda/water to neutralize the acid. The baking soda/water is what you should clean your battery with if acid gets on outside of battery or on your skin. Just make sure none of it goes inside the battery if your battery is not a sealed unit. A rag that is damp is a good option for cleaning the battery top, then throw away the rag.

Remake the connection and use either the spray can of battery terminal sealer (parts store sells it) all over any exposed wire and connectors after they are installed. You can also use and anti oxident sealer like nolox available from home depot type stores. The battery acid getting on the wires is obviously bad. Oxygen getting to it is also bad. Copper turning green is the same thing as steel rusting.

Remember water travels inside pipes. But electricity travels on the outside of the wire. Thats why same gauge but finer strand wire carries a higher load. That green corrosion on the outside of wire is the same as water pipes plugging up with rust.
654B4B76-743C-44B8-BDC1-CEBDFF54467A.png1515B97A-F9CB-43CD-A4D3-944A47F293F9.png
 
Oh, that vinegar salt inna spray bottle is how to clean bare copper or bare aluminum radiators also. Just be sure to rinse with the baking soda/ water mix, then with a ton of regular water since the cores are so thin- that acid can do damage if you forget.
 
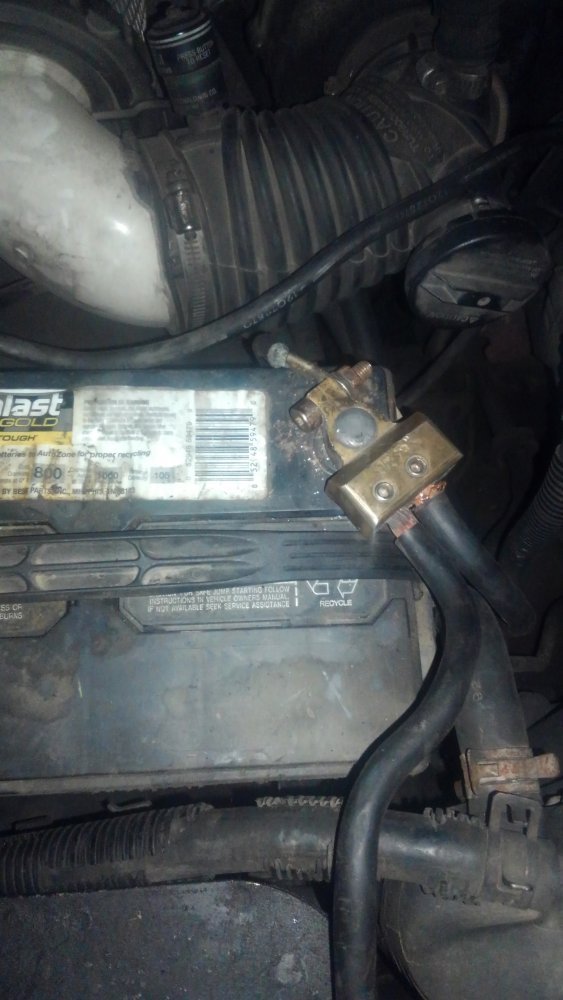
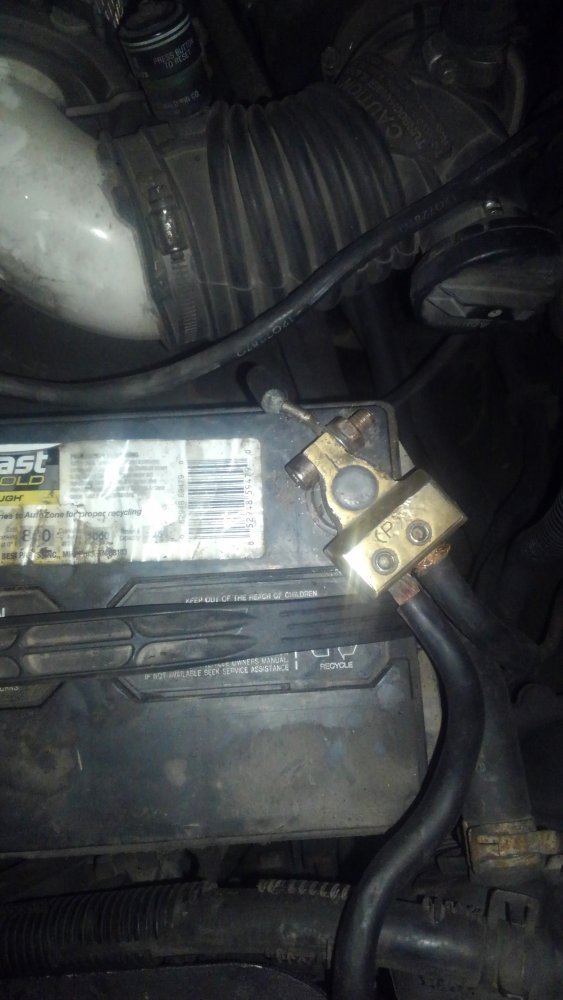
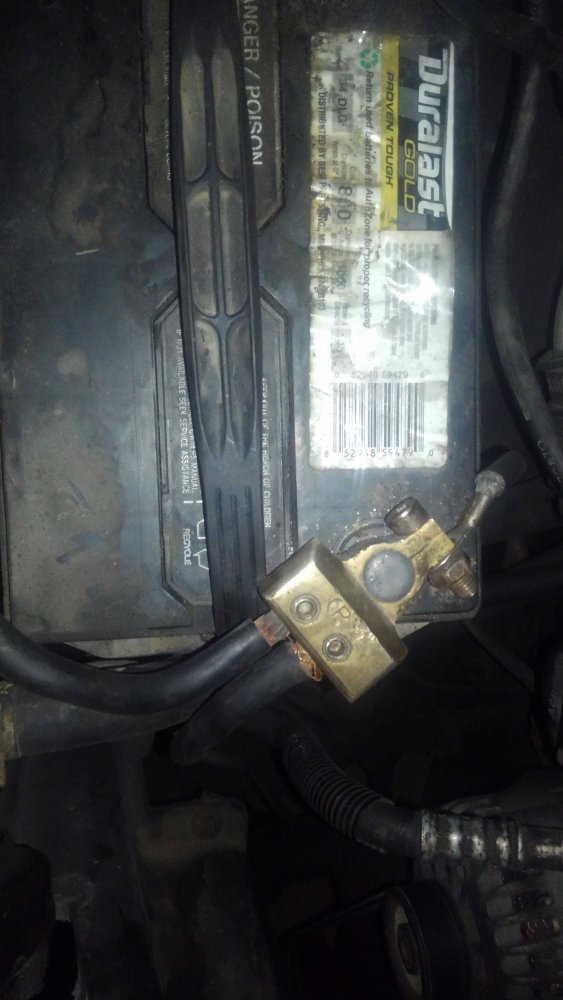
Those battery terminals look like they're more for somebody's competition sound system than for carrying a thousand amp surge of a starter. The single cable terminal shows cable corrosion as well as corrosion on the terminal itself in that picture. Are those brass (or gold plated brass) terminals you're using, @Stoney ? If so, ditch them. Clean those cable ends like @Will L. said, then get some ⅜" copper cable lugs of the proper gauge and properly crimp them on, then solder them and put marine-grade heat shrink tubing over the lug's collar and the first inch of cable insulation and shrink it to make the connection water/battery acid resistant (the small end of the lug collar by the terminal hole should be full of solder, to keep acid from creeping up the copper strands). Get two of the heaviest duty MARINE battery terminals you can find (O'Reilly's and NAPA both sell really good ones that are corrosion-resistant epoxy coated). Throw away the wingnut for the top stud. Take a file and file the bulge around the base of the top stud down so it's flush with the terminal top. Now, take some ElectroCut, emory cloth or 200 grit and LIGHTLY polish the battery post and the inside of the marine terminal. Do NOT use those metal, angled finger, post/terminal scraper-type cleaners - they take WAY too much metal off the post and inside the terminal - making the post too small and the terminal too big and resulting in the terminal ends bottoming out when the bolt is tightened and thus a poor electrical/mechanical connection/loose terminal. Don't use those steel wire brush post/terminal cleaners either, for the same reason.

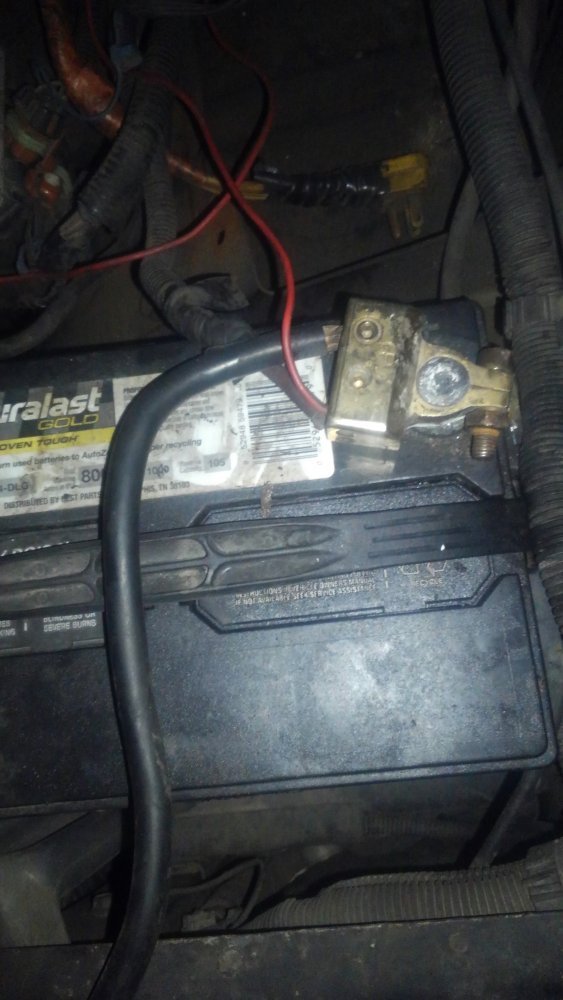
Push the loose terminal all the way down on the post (those green and red felt anti-corrosion washers are ok) until it bottoms, then tighten the terminal's clamping bolt until the terminal can't rotate either way when twisting with your hand. The ends of the terminal should be ⅛" to 1/16" minimum apart and NOT touching when the terminal won't twist. If they're touching and the terminal still moves, then the post has been "cleaned" too small in diameter and the terminal legs tips need to be filed to gain more clearance for proper clamping.

Once the terminal is tight, take some ElectroCut, emory cloth, etc and polish BOTH sides of each copper lug until bright, then place them over the terminal's top stud and using a Stainless Steel split washer and nut, tighten the nut to about 20 lb/ft torque. You now have a secure, highly conductive, battery/terminal/cable connection. Next, spray the assembly thoroughly and completely with battery anti-corrosion compound as @Will L. suggested. Repeat for the other (Driver's) battery single cable Positive.

Also, @Stoney, do your Negative cable ends still have the Side Terminal ends on them? If so, how did you adapt the terminal connection to your top post batteries? Marine terminals are perfect for the OEM side post cable ends to connect to. Just use Stainless Steel nut and split lock washer to fasten with. You can also ditch the black plastic around the factory lug end, if you want.

If you jerry-rigged the Negative cable ends like the Positives in the pictures are, well, you just doubled your electrical/starting issues, as those electrons need an as UNinterrupted path BACK to the batteries as they do TO the device to be powered (starter, auxillary lights, heater blower, aftermarket stereo, etc.) in order to flow and power properly
 
Idk- most of the aftermarket stereo connectors like that outperform stock units.
A simple test with a megger would show it for sure. If not a megger then try with a normal ohm meter. With the battery disconnected, just put one side on the wire, the other on the connector. You could also do a voltage drop test, but by far a megger or dlro tester would be optimum.
 
It also depends on if they're high quality units, or cheap Chinesium look-alike knock offs with a bare breath of gold elctroplating on them over a brass body as far as the stereo battery distribution blocks go. I only commented about that because in that one photo of the single battery cable connector. Not only does the cable end appear to be corroded, but so does the side of the terminal block adjacent to it. It also begs how does the inside of those connectors look as far as corrosion goes if the cables are corroding, too? Sticking nice, prepped cable ends back into bad sockets, well you know the eventual outcome down the road.
 
Back
Top