REPLACING THE DURAMAX FUEL FILTER
The first time I replaced the fuel filter in my truck, I wrestled with if for about 90 minutes due to the fact that I couldn't get a wrench to slide onto the filter. I eventually had to remove the battery on the passenger side after removing the air cleaner intake tube. But it was still a total pain due to the filter being pressed hard against the wiring harness that runs alongside the valve cover. Putting the new filter on was not very easy either because I didn't have room to get good leverage to push it on with the new "O" rings.
Later I installed a 3/8" thick aluminum
filter head spacer I got from Merchant Automotive, which alleviated the problem of getting the wrench onto the filter. But removing the battery was still a pain and it was still very awkward to screw the new filter onto the filter head.
Then, the next time, I decided to do it by removing the two filter-head attaching screws. this made the job MUCH EASIER. You do NOT need to remove the battery. The fuel lines have enough slack so that you can bring the whole assembly up to where you have much better room to work. You can also visually inspect the "O" Ring surfaces to make sure there is no debris that would cause the filter to leak after installation.
- I simply remove the air cleaner tube,
- Disconnect the WIF sensor wire connector sitting just below the filter
- Slide a filter wrench onto the filter and loosen the filter
- Then I remove the two filter-head attaching screws which allows me to bring the whole assembly up, (Make sure you put the two screws in a safe place where they won't fall and get lost)
- Then I remove the old filter by hand.
- Remove the WIF sensor from the old filter and install it on the new filter (Be careful NOT to damage the WIF sensor if you use pliers to remove it - I use the WIF wrench I purchased from Merchant Automotive, which works GREAT for this.)
- I then thoroughly clean the "O" ring surfaces, and dip my finger in a little diesel fuel and rub it on the "O" ring surfaces to lubricate them.
- I then install the new filter and tighten it by hand, turning it an additional 3/4+ turn after it's seated to make sure it seals.
- I then re-attach the filter head with the two screws.
- Connect the WIF sensor wiring connector
- Loosen the black priming screw
- Press down on the priming button about 50 times or so, until fuel comes out from around the screw.
- Tighten the priming screw - NOT very tight (Be careful 'cause the screw is made out of plastic - if you break it you'll be SOL until you get a new screw)
- Pump the priming button a few more times until it gets hard to push down.
- Start the truck and look for any leaks.
- Then re-install the air cleaner tube.
This method allows me to change the fuel filter in less than 10 minutes.
I no longer need to remove the battery or the fender liner to change the fuel filter.
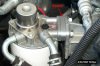
Picture of filter head mounting screws.
Picture of filter head with spacer.