• Welcome to The Truck Stop! We see you haven't REGISTERED yet.

    Your truck knowledge is missing!
    • Registration is FREE , all we need is your birthday and email. (We don't share ANY data with ANYONE)
    • We have tons of knowledge here for your diesel truck!
    • Post your own topics and reply to existing threads to help others out!
    • NO ADS! The site is fully functional and ad free!
    CLICK HERE TO REGISTER!

    Problems registering? Click here to contact us!

    Already registered, but need a PASSWORD RESET? CLICK HERE TO RESET YOUR PASSWORD!

So, is your AC lacking? Radiator and condenser coil

knkreb

The Bus Driver is here!
Messages
179
Reaction score
1
Location
Delaware
It's been very warm... okay down right HOT in the northeast here as of late.

Yesterday, after suffering a blow out of an o ring on the new lines I installed two months ago, I recharged the system. Name plate charge in the system, and off we go.

We were operating in large family time, aka, running behind schedule. I had just fixed the line, left it in high idle to cool it down and then we left.

It was not cool. Drove for a while, still not cool. It was blowing "cool" air, but not the COLD air that you need to keep comfortable.

So, I tore into it last night.

I didn't have a high side fitting to check the head pressure of the system, but I knew that the suction pressure and it was HIGH. This is a new compressor less than a year old and pumps well. Suction pressure was around 50-55psi. I checked the liquid line temp coming off of the condenser. Now, it was about 85° last night when I was working on this. The liquid line temp was 130°F!!! This means one thing... the condenser is not giving up it's heat.

Now, in the HVAC trade, one of the ways we quickly check air flow on condenser fan motors (propeller blade style) is too see if the air comes directly out the back of the fan, or comes of the outer tips of the blades. If it's the tips of the blades (in our trucks, that would be blowing upward off the fan, and not blowing backward toward the engine) this means that the fan is struggling to get air flow through the radiator, condenser, etc.

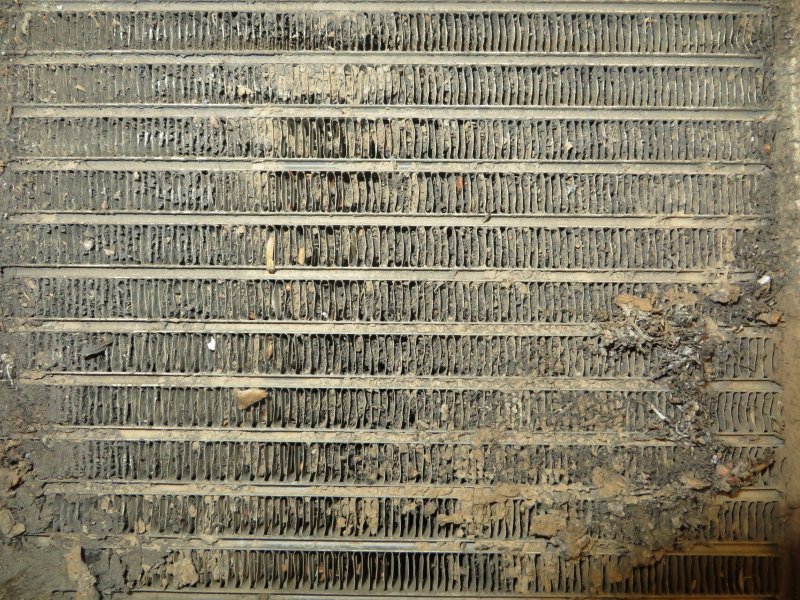
I pulled as much as I could apart, and cleaned it carefully with my condenser coil cleaners. There was no "mat" of bugs and dirt. The dirt was buried within the fins themselves. A blast of water with the garden hose backward (engine side) of the radiator will help push some dirt out, but you really should have some type of detergent to help clear and clean the coil.

After reassembly, the liquid temperature (dry not still wet, 'cause that would be cheating) was 85°F. That's nearly 45° improvement over what I started with. The condenser coil itself was relatively okay, but since the radiator stood between it and the fan, air flow lacked.

I brag now, but we will see what the day brings with the heat again and recheck performance.

So, for those who may be struggling with some temperature problems, either AC or engine.... things to consider about air flow. Check to see if the air flow is coming off the tips of the blades or blowing backward toward the engine.
 
The parallel flow condenser is almost the primary filter in the system and can't be flushed. You could easy have 1/3 of it plugged up internally. Compressor failures will dump all kinds of debris in it that will not be removed. Unless it gets hot in use and trashes the next compressor.
 
Yes indeed WarWagon... you bring up a good point about junk. My previous compressor had not actually died outright. Performance was lacking, it was a little low on charge, and I decided at 180k miles, to install a new (not reman) unit with proper charge etc, (before having a total outright failure). We are still in a heat wave here in the northeast. Performance was much better yesterday. It's hard sometimes to compare to the 6.5 service truck with only front AC. It cools much better and faster with only one evaporator rather than two. (That is a byproduct of a one evaporator system - one compressor can get the one evaporator really cold rather than dividing capacity between a front and rear evaporator).

The method I used was let the detergent do the work. Use the hose to force water backward through the radiator. I did this at dark. You can use a flash light to shine through the coils to see how clean you are start to finish.

The core under the dash is not as easy to get to. If you have poor air flow, you might have an issue with a dirty evaporator inside. It will hurt some of the heat transfer ability too if it's dirty.
 
Yep, the inside evap is NOT fun to clean, but is doable. I just did mine about a month ago and a few others here lately as well. What I found works well is I bought a piece of windshield washer hose(the smallest size they had), put a regular aerosol can tip with a straw on it on the coil cleaner, and then put the windshield washer hose onto the straw to act as an extension. Go in through the fan hole and use a telescoping mirror in through the fan hole to see and use the hose to spray it down. Let it sit for 10 minutes and then I use a 1 gallon pump up sprayer to wash it down. Do this 2 or 3 times and you can get about 85-90% of it out this way and gets some good airflow again. I couldn't believe teh difference it made in mine. I always wondered why it didn't want to take a full charge, but after cleaning teh evap it took a full charge and teh head pressures were better than it was with a partial charge in it.
 
Yep, the inside evap is NOT fun to clean, but is doable. I just did mine about a month ago and a few others here lately as well. What I found works well is I bought a piece of windshield washer hose(the smallest size they had), put a regular aerosol can tip with a straw on it on the coil cleaner, and then put the windshield washer hose onto the straw to act as an extension. Go in through the fan hole and use a telescoping mirror in through the fan hole to see and use the hose to spray it down. Let it sit for 10 minutes and then I use a 1 gallon pump up sprayer to wash it down. Do this 2 or 3 times and you can get about 85-90% of it out this way and gets some good airflow again. I couldn't believe teh difference it made in mine. I always wondered why it didn't want to take a full charge, but after cleaning teh evap it took a full charge and teh head pressures were better than it was with a partial charge in it.

So what do you do just pull the carpet back and let all the crud run down to the floor?

Also, does the fan or evap or anything down there have a drain tube/hole or anything for water/condesation to escape........If so, do they get clogged up?
 
So what do you do just pull the carpet back and let all the crud run down to the floor?

Also, does the fan or evap or anything down there have a drain tube/hole or anything for water/condesation to escape........If so, do they get clogged up?

The evap housing has a drain that goes outside. It is a TIGHT fit to get in there, so nothing gets on the floor when you do it.
 
How do you access the drain.....Whats the easiest way to get to it?......Can you see it from, the outside, inside, firewall, floor pan?.....How do you "UNclog" it?

Got a Pic/Diagram?
 
The drain comes out through the firewall just about directly underneath the accumulator on the firewall. It shouldn't be clogged up unless you drive in areas with ALOT fo leaves and it has become plugged from them. It is about a 1/2" drain hole, so most stuff just passes through it.
 
I use scrubbing bubbles and a garden hose sprayer on short bursts to clean the evaporator out. I also put a floor mat and towel down as it usually leaks some if I spray too much.

Hadn't thought of the small 1 gal sprayer...

All compressors wear. Just because it isn't knocking doesn't mean the AC system is clean. Always flush it. With the 1995 and older compressor odds are that it isn't original anymore. So who knows how the old one died.

Had one leaking via the body orings and the new replacement lasted 1 year before knocking and trashed the system. Didn't think I needed to flush the system for a leaking compressor. Know better now.
 
Thats what I did, took the blower motor out & worked through it, it is tight but works good, mine was REALLY clogged up..... the drain hole is on the firewall below where my heater hoses are.
 
My evaporator was plugged near solid with dog hair from the PO's Chocolate Lab.

With no other choice, I removed the fan and then cut open the bottom of the heater box on the fan outlet side. I DO NOT recommend this method to anyone as teh evap core is right there and easily holed, but the only other choice I had was tearing it all down to the point of evap core replacement.

Once I was at this point, I was able to work a dental pick to remove the hair mat that covered the whole core. It was not fun.

then I hit the core a couple times with spray nine and a stiff spray from the garden hose. I worked a tarp up under the box and draped it out the door. Between the case drain and the hole I had made, the water flowed almost black with dirt.

Once it was all dried, I glued the cut out piece back into place.

It would actually make cold air again and my fan went from barely a popcorn fart breeze to a beer and beans fart blast.

Well, minus the smells of course......;)

next up is to straighten all the "smushed" condenser fins again.

Damned gravel haulers and construction trucks......:angryfire:
 
I'm in the middle of replacing compressor, orifice tube, condenser, accumulator, etc. Had planned to try clean/flush evap core as described above. Turned out the evaporator fitting was seized onto the accumulator & while I got it apart, there was enough gauling I decided to replace the evaporator. Thought I'd post a pic of the dirt in what I think is the truck's original, 20 year old evap.

Got the dash out (since I'm in this deep - anybody have a non-cracked, in good shape 95-96 dash?) & HVAC box out. If there are any HVAC box pics, etc. you might want, let me know as it's good time to get pics.

Anybody have any thoughts on how to avoid these fitting connections growing together again? Anti-seize outside the o-rings? Maybe just PAG 150 oil on the threads?
 

Attachments

  • IMG_1021.JPG
    IMG_1021.JPG
    172.4 KB · Views: 11
PAG 150 is what causes them to seize together. I used the silver anti-seize when I did mine. Just made sure to ONLY get it on the threads, and not anywhere where it can get into the system. Also using some mineral oil instead of PAG on the o-rings is a good idea. Just a dab on the o-rings is all you need as you do NOT want to mix PAG and mineral oil in the presence of R-134A.
 
PAG 150 is what causes them to seize together. I used the silver anti-seize when I did mine. Just made sure to ONLY get it on the threads, and not anywhere where it can get into the system. Also using some mineral oil instead of PAG on the o-rings is a good idea. Just a dab on the o-rings is all you need as you do NOT want to mix PAG and mineral oil in the presence of R-134A.

Thanks Ferm. Will carefully anti-seize just the threads & get a little A/C system mineral oil for the O-rings. Gonna also replace a couple of the HVAC box air control doors while in there as they're deteriorated & fairly inexpensive.
 
A picture is worth a thousands words. Its a bit amazing how much dust and crud sticks to AC coils, electric motors, and ceiling fans even when surroundings aren't that bad.

Thanks for sharing. Its one of those things we should all probably try to clean.
 
Back
Top