handcannon
Well-Known Member
We were going camping Memorial weekend. On our way over Santiam Pass, late in the evening, I went to switch to high beam and got nothing but a black "curtain". Definitely disconcerting when on a mountainous, crooked highway.
Fortunately I was able to switch back to low beams. I played around with the switch and for a short time was able to get highs to work by working the switch, but eventually I was unable to get any high beams.
After the weekend was over and we were home I went down to Carquest in Albany and got a new dimmer switch, part #53-16983. Since I have to do any of this kind of work outside in the weather I didn't get the switch changed right away due to a lot of rain.
Then jrsavoie posted with the same problem and questions about it. I happened to get a dry time today so I changed the switch and documented it.
Checking Rockauto I found that this switch is used on numerous vehicles, American Motors, Cadillac, Chevy, GMC, and Jeep, so it should be easily found at most any auto parts store.
Tools used: #2 philips screwdriver, flat blade screwdriver, 13mm and 15mm 3/8ths" or 1/2" drive sockets, a 3/8ths" socket and ratchet in 1/4" drive, and 8mm ratcheting box end wrench.
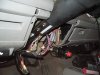
First Two Pics: Using the phillips screwdriver remove the front panel under the steering column. I found this provides better access than having to stand on your head while working under the dash. Once this panel is removed use the 13mm and 15mm sockets and remove the U shaped bracket that supports the steering column.
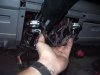
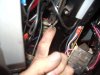
Third Pic: Once the bracket is removed the dimmer switch can be accessed much easier. Note the location of the nut that is welded to the steering column. This is one of four nuts that the column support bracket bolts to. Also, notice the actuator rod that connects the dimmer switch to the turn signal stalk.
The upper hex head screw can just barely be seen. Use the 8mm ratcheting box wrench to remove the hex head screw. There is a nut on a stud holding the back end of the switch. Use the 3/8ths" socket and ratchet to remove the nut.
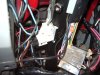
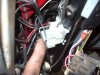
Fourth pic: The old switch is removed and hanging from the electrical wiring. Now remove the electrical connector. Squeeze the two tabs and use the flat blade screwdriver to gently pry up the connector.
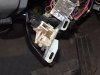
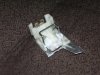
Fifth Pic: The new switch. The bright colored wire loop is removeable, but must remain in place until the switch is in place and adjusted. Notice the cylindrical protrusion on the end of the switch. This is where the actuator rod must set into.
My little camera doesn't like to take close-ups. The next two pics are fuzzy, but you can see enough.
Seventh Pic: The new switch is now mounted on the column. The actuator rod is set into the cylindrical protrusion on the end of the switch. To adjust the switch the two hold down screws must be just slightly loose. Push the switch and actuator rod up towards the steering wheel until there is no slack, but do not apply any hard pressure, and finish tightening the switch hold down screws. The wire loop can now be removed.
Now you can test the headlights for both high and low beams. As long as you have both high and low beams you are ready to put everything back together.
Fortunately I was able to switch back to low beams. I played around with the switch and for a short time was able to get highs to work by working the switch, but eventually I was unable to get any high beams.
After the weekend was over and we were home I went down to Carquest in Albany and got a new dimmer switch, part #53-16983. Since I have to do any of this kind of work outside in the weather I didn't get the switch changed right away due to a lot of rain.
Then jrsavoie posted with the same problem and questions about it. I happened to get a dry time today so I changed the switch and documented it.
Checking Rockauto I found that this switch is used on numerous vehicles, American Motors, Cadillac, Chevy, GMC, and Jeep, so it should be easily found at most any auto parts store.
Tools used: #2 philips screwdriver, flat blade screwdriver, 13mm and 15mm 3/8ths" or 1/2" drive sockets, a 3/8ths" socket and ratchet in 1/4" drive, and 8mm ratcheting box end wrench.
First Two Pics: Using the phillips screwdriver remove the front panel under the steering column. I found this provides better access than having to stand on your head while working under the dash. Once this panel is removed use the 13mm and 15mm sockets and remove the U shaped bracket that supports the steering column.
Third Pic: Once the bracket is removed the dimmer switch can be accessed much easier. Note the location of the nut that is welded to the steering column. This is one of four nuts that the column support bracket bolts to. Also, notice the actuator rod that connects the dimmer switch to the turn signal stalk.
The upper hex head screw can just barely be seen. Use the 8mm ratcheting box wrench to remove the hex head screw. There is a nut on a stud holding the back end of the switch. Use the 3/8ths" socket and ratchet to remove the nut.
Fourth pic: The old switch is removed and hanging from the electrical wiring. Now remove the electrical connector. Squeeze the two tabs and use the flat blade screwdriver to gently pry up the connector.
Fifth Pic: The new switch. The bright colored wire loop is removeable, but must remain in place until the switch is in place and adjusted. Notice the cylindrical protrusion on the end of the switch. This is where the actuator rod must set into.
My little camera doesn't like to take close-ups. The next two pics are fuzzy, but you can see enough.
Seventh Pic: The new switch is now mounted on the column. The actuator rod is set into the cylindrical protrusion on the end of the switch. To adjust the switch the two hold down screws must be just slightly loose. Push the switch and actuator rod up towards the steering wheel until there is no slack, but do not apply any hard pressure, and finish tightening the switch hold down screws. The wire loop can now be removed.
Now you can test the headlights for both high and low beams. As long as you have both high and low beams you are ready to put everything back together.