• Welcome to The Truck Stop! We see you haven't REGISTERED yet.

    Your truck knowledge is missing!
    • Registration is FREE , all we need is your birthday and email. (We don't share ANY data with ANYONE)
    • We have tons of knowledge here for your diesel truck!
    • Post your own topics and reply to existing threads to help others out!
    • NO ADS! The site is fully functional and ad free!
    CLICK HERE TO REGISTER!

    Problems registering? Click here to contact us!

    Already registered, but need a PASSWORD RESET? CLICK HERE TO RESET YOUR PASSWORD!

Replacing Rocker Buttons

Long Brown Train

New Member
Messages
11
Reaction score
22
Location
Midwest
My rocker buttons were all holding up just fine, but with nearly 300K miles on this engine, I just couldn’t bring myself to put the rocker shafts back on with the nylon buttons still in place.
I did some searching to see what other options were out there. Just replacing the buttons with bolts and thick washers looked like the easiest plan, but I wasn’t comfortable with the steel on steel contact between the rocker and the washer. Yes, I know the rocker and shaft interface is steel on steel – but they were designed to work that way. I suspect the washer would never cause a problem, but I was just more comfortable with bronze bushing material.
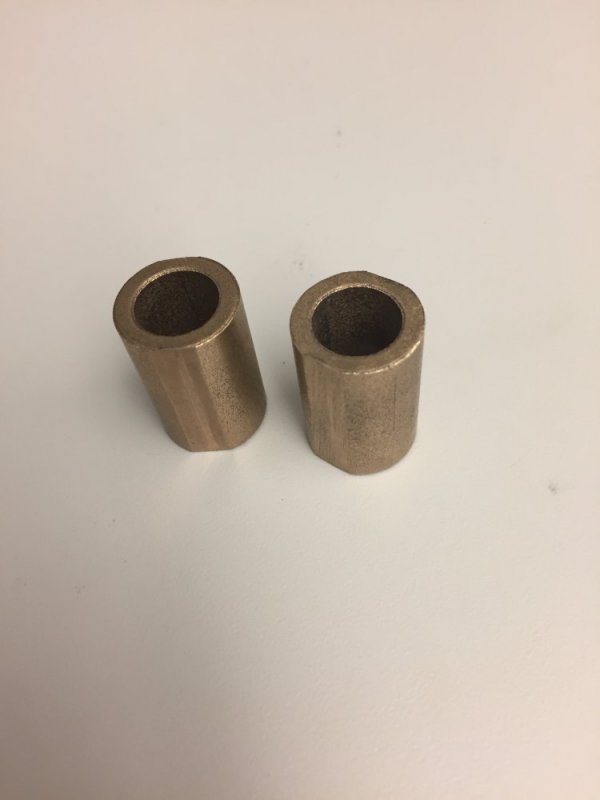
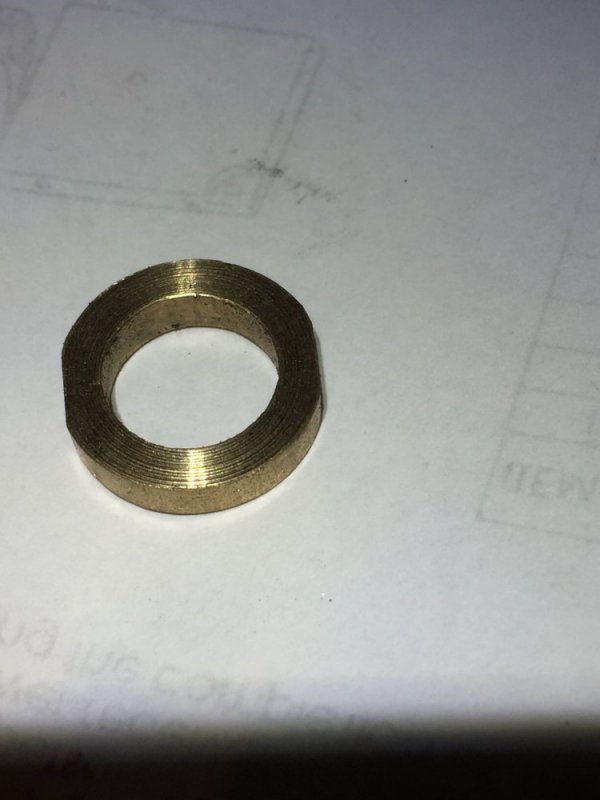
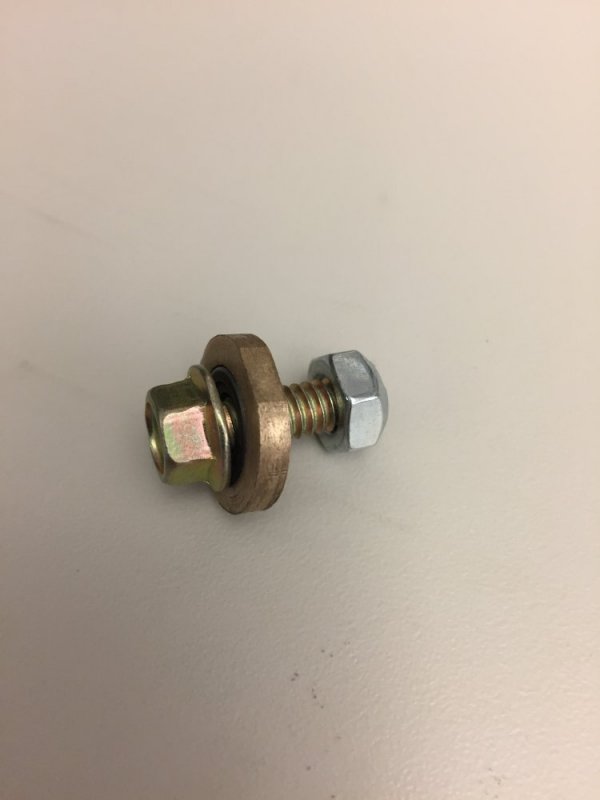
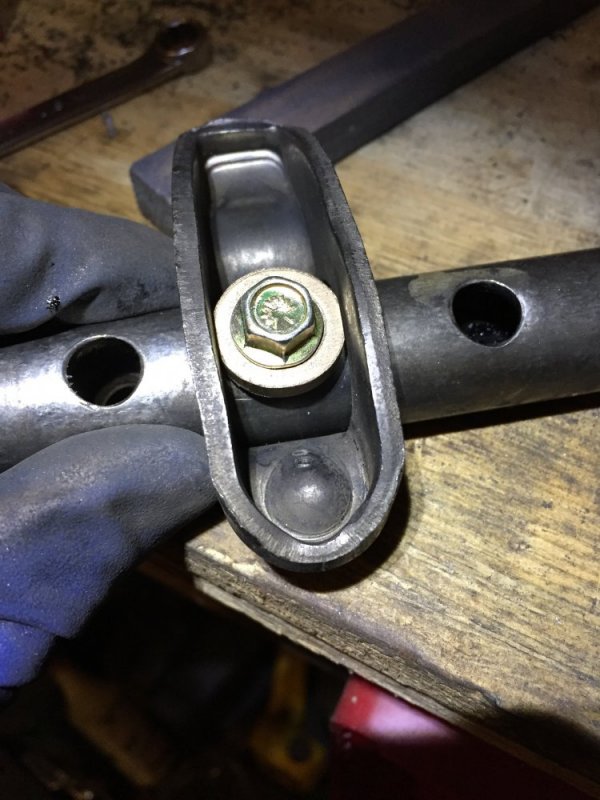
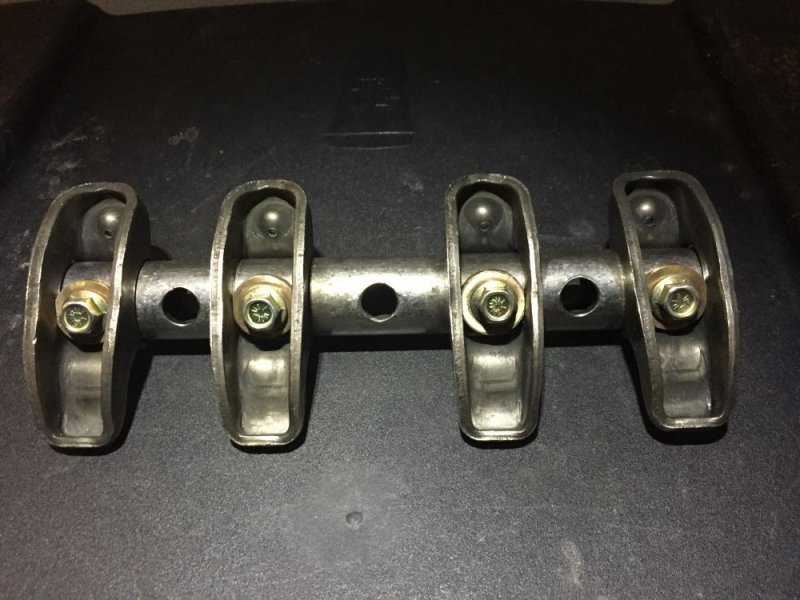
I found some bushings that were just a touch larger than the rocker opening, milled some flats so that the bushing would drop down in the rockers, and cut a spacer to locate the bushing on the ¼” bolt. The spacers are long enough that the bushings don’t get clamped down tight. This prevents them from turning and binding at all when tightening the bolts. The bolts are ¾” long, ¼-20 flange head with lock nuts. I went with the distorted thread lock nuts instead of nyloc. Again, I’m sure the nylon would have held up fine, but I felt better with the distorted threads. To my simple mind, they seem more permanent.
Though y’all might enjoy.
 

Attachments

  • IMG_4057.JPG
    IMG_4057.JPG
    39.9 KB · Views: 23
  • IMG_4046.JPG
    IMG_4046.JPG
    59 KB · Views: 25
  • IMG_4054.JPG
    IMG_4054.JPG
    43.8 KB · Views: 27
  • IMG_4048.JPG
    IMG_4048.JPG
    120.2 KB · Views: 29
  • IMG_4056.JPG
    IMG_4056.JPG
    134.9 KB · Views: 29
Yes, but they are supposed to have a flat surface on both sides to operate. Hummer’s use them on the cv axle shaft (called half shaft) where it bolts through the inboard disk brake to the differential axle.

What they do is bind the head of the bolt, nut etc to whatever surface it is in contact with. But this being a through bolt, and separate flat washers on both sides, the nut would stay solid to the flat washer, but the flat washer could spin against the rocker arm shaft.

WhileTyping that i figured- if I made the brass washers as a saddle washer and put one on each side- yes then the nordlock is perfect.

Thank you, i had dismissed them cuz ofthe pipe shape at first, usually look for places that need them. Now typing it out slowed me down a minute—That’s the plan. Still gonna get some loctite on the threads also. No kill like overkill.

Now, wonder is it better to through bolt and nut, or thread the hole and just bolt.

Way more threading area in the shaft than a nut, so way more thread contact area for loctite. When I can get into the garage today, have to see examine the rockers and shaft close...

A plastic push in button works for years and many for 300,000 miles. But I have seen some fail just over 100,000 miles.
 
I had to go look up nord locks. Interesting product, but probably would not have worked well here. It would take 3 sets for rack rocker. One between the head of the bolt and the spacer, one between the spacer and the rocker shaft, and one between the rocker shaft and the nut. Plus the bottom one may not get a good bite due to the curve of the shaft.
I didn’t mention it before, but the inner 2 lock nuts on each shaft were really a pain to install. Very difficult to keep them from spinning while snugging things up. When I do this again I’ll make a special tool to hold the nuts.
 
86B987A4-CDA9-4BA4-999C-0FB7EBEFFAA0.png
This is a saddle washer. Make (if I cant buy the right size) out of bronze or brass. It can’t spin on the shaft, and the nordlock washer has full surface to bite on. Then just one set (it takes 2 together and how they are sold) under the nut is used.

I don’t understand the special tool needed. Install the rockers on the shaft using sockets on bolt and nut. Then install the shaft with rockers already on.
 
View attachment 56555
This is a saddle washer. Make (if I cant buy the right size) out of bronze or brass. It can’t spin on the shaft, and the nordlock washer has full surface to bite on. Then just one set (it takes 2 together and how they are sold) under the nut is used.
Sure, I understand the saddle washer. If I'm understanding correctly, though - this would take you down to 2 sets instead of 3. Your going to need one set between the nut and the rocker shaft and another set between the head of the bolt and the saddle washer. Either place is subject to backing off due to vibration, right? Lock the nut in place and the bolt can still spin. Unless you are planning to tap the rocker shaft as was mentioned - then you wouldn't need a nut and wouldn't need the second set of nord locks.
When I referred to 3 sets, I was referring to the way I put this together with a spacer. To make the nord locks work in my setup, it would take 3 sets. One to lock the nut in place. One to lock the head of the bolt to the spacer. And one to lock the spacer to the shaft.
I don’t understand the special tool needed. Install the rockers on the shaft using sockets on bolt and nut. Then install the shaft with rockers already on.
I struggled quite a bit holding the nuts from spinning while tightening the bolts. The distorted thread lock washers had a lot of resistance. Shoving a screwdriver down the shaft would keep them from spinning for a while, but as the nut sucked up into the curved area of the shaft, screwdrivers would not longer fit in well and the nut kept slipping. My wrenches would not fit down the center of the shaft. There just isn't enough clearance. I got the job done, but there was bleeding and cursing and other fun stuff involved.
When I do this again, I'll make a cylindrical tool that will slip inside the rocker shaft. I'll mill a slot in the tool that will just fit the flats of the nut. Basically just a special wrench. I'm probably not explaining this very well. I can probably go whip one up and get some photos if you are interested.
To be honest, I'm not sure if I'll do this again or not. I'd prefer to switch to roller rockers if I can come up with a reasonable way to get it done. Off the shelf RR's for this application are far from what I would consider reasonable.
 
Ok, reread yours. Nut inside the shaft. Yeah, that would be hard.

Put a mic to the shaft. Did a little bolt & thread reading.
Figures change based on supplier/ mfr of bolt. So I compared ones near me. But also used the lowest rated ones too. Grade 8 bolt. Metal of shaft unknown, but basic hardness check put it in a ballpark for me.
Big question is will tapping one side of shaft work, or is through bolting required?

Rocker button/ bolt:
Drill for 5/16-24 tpi bolt (currently 1/4” hole, so slightly larger)
0.160-0.170 variable wall thickness of shaft.
0.208 is standard rated thickness of nut.

This is About 70% contact area of optimum force.
3.84 to 4.08 bolt threads in contact with shaft on linear fit, slightly more because of radial cross section. 4.992 would be maximum.

5/16 shear 6902 psi X .16= 1104psi shear
the 5th and 6th threads wont have contact, but force is lost less in deeper threads- only 16-20% pull strength loss in example, so figure 3/4 safely? Compared to pull strength of plastic push button- haha.

Minimum torque is normally 1/2 to achieve max vibration yield. Above that increases clamping force, but does not increase much gain in vibration halting, like under 2% clear up to 1” bolts.

Shaft dia 0.97 so 1” saddle washer w/ 5/16” hole
Button OD is 0.685 Shoot for same, definitely not larger.


So yes, if the button hole is drilled at 60% fit to tap for 5/16-24 tpi gr8 bolt will definitely hold. No need for through bolting.

Thread strip or pull out strength can not be accurately determined, but common sense says, a 8” prybar on the plastic button and they pop out for replacement.
Prybar out a 5/16 bolt? Haha. BIG prybar! I may grab an old shaft and experiment for the fun and reassurance.

After all that-
Using 3/8 bolt would be more convenient on the fact that I have extra nordlocks on hand in that size. Same tpi, and The shear strength is higher, strip strength is higher, only disadvantage is getting larger head size. Honestly I did all the math figuring how small of bolt could I do with existing hole. I won’t bother with the math on 3/8” 24tpi but that is likely what I will use. However the 3/8 bolt should have more material to thread into. I might do a little more math before spending $.

Noting lower torque is only real concern for my kids working on it when I am gone. Stamped instructions torque plate under valve cover?

Now to search al gores invention of the internets for brass saddle pricing. Ace/ true value are local, but 16 on hand is not likely...
I suspect your right on the money there!
 
Adding a video found by dbrannon79.
Cool of Avery to make a good how to video and share part numbers he used.

I have done nothing with this yet. Idk what I was thinking about through bolting above- that is not an option.

If the saddle washer on top is used and nordlocks at that location , @Long Brown Train is correct- it would trap the bolt and the nut could still come loose. Because there is no flat surface inside the pipe- nordlocks won’t work there.

Seems to me the difference Long Brown Train had in fighting his and Avery Bryant doing his easier is probably the size of the screwdriver used.

I took a screenshot from Avery’s video. The answer to me is- use bronze saddle washer with nordlock, and modify the Stover lock nuts Avery used in the video. Simply grind the flat side round to fit inside the shaft so they can not turn. Like an inverted saddle nut.
The bolt length Avery used would be too short when adding the nordlocks plus if the saddle is a hair thicker. If using Avery’s part numbers, I would suggest adding medium loctite also- but I don’t like Avery’s use of steel washers with that much freeplay.

Anyways rounded nut inside the shaft, bronze saddle washer with nordlocks on them then the longer bolt and it would solve all the issues.
0E55A9CA-4FC4-4543-B336-3E8C1BDF4FE4.png

These are nordlocks for those unfamiliar.
 
Last edited:
@Will L. on the lock nuts inside the tube, I wonder if they can be threaded on to the bolt upside down where the nut is shaped with a bevel that may have more bite on the tube vs the flat side. with that though, one would need to grind the flange shoulder to have flats on it so that it can be held in place while tightening.
 
Stover nuts can be bought with or without flange.
Idea of rounding nut is only round two sides so the flat would help hold in position.

Tapping a piece of round stock in with all 4 holes could work also in place of the 4 nuts.
 
Yeah- the screen shot shows he did the solid rod in the middle like I was saying- but doesn’t look like he beveled the bronze where it mates to the factory shaft. Then it is a question of how did he lock the bolt from vibrating loose. That is where I would add the nordlock.

For someone to spend all the time to gather parts, make whats needed, package and sell-probably cost enough to make some avoid and how many people really want to make that jump if it is say $125? Roller rockers are like $650 iirc...
Yeah, I dunno. If it was for the threaded rod and all the necessary components to do both sides, I think $125.00 would be very reasonable. 🤷‍♂️ I dont know though, maybe that figure would be way out of line.
I think if it was offered for that price from one of our vendors, I’d have to go for it.
I have a lot of time that I could build the rods, drill, thread and tap them, then fashion the washers, except, it seems whenever I get Myself involved in such projects as that, something goes wrong, put a dent in a finger or some such, then, it all seems worth it if I can just order it in, install it and be done. Whatever the item might be.
 
I do have a question on the valve to rocker clearance. I am thinking about the wear point on the steel pipe and the rocker it's self. how often has one had to replace the rockers or the assemble due to sloppy clearance issue and valve train noise? only reason I ask is I do remember when I replaced my valve cover gaskets I had looked at the rockers and kinda wiggled them noticing a few were sloppier that I would prefer. not that it's a problem in diesels, I just don't know how they are supposed to be.

this thought just came to me due to the fact that I know my engine is quite a bit louder that other 6.5's I have been around. mine has more clatter noise which is fine, it's a diesel. it's not quite as loud as a Cummins, but I do have to shut it down while in the drive through windows lol
 
Back
Top