• Welcome to The Truck Stop! We see you haven't REGISTERED yet.

    Your truck knowledge is missing!
    • Registration is FREE , all we need is your birthday and email. (We don't share ANY data with ANYONE)
    • We have tons of knowledge here for your diesel truck!
    • Post your own topics and reply to existing threads to help others out!
    • NO ADS! The site is fully functional and ad free!
    CLICK HERE TO REGISTER!

    Problems registering? Click here to contact us!

    Already registered, but need a PASSWORD RESET? CLICK HERE TO RESET YOUR PASSWORD!

Removing the dash, trying to get to the defrost door in my '95 Sierra k2500

konstan

Diesel junkie
Messages
85
Reaction score
4
Location
Omaha, NE
The final goal is getting the defrost door fixed. The a/c blows out of the defrost vents which is a waste and also covers the windshield with condensation in the mornings, can't have that!

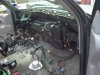
So I decided to take the dash out and then see if I can fix the defrost door without taking the hvac distribution box out.

So far, I did the following:

- took out the center console and the driver seat. I love having enough room to work.
- removed the knee panel under the steering
- removed the metal plates under the steering column
- removed the 4 nuts holding the steering column in place

Now I am supposed to be able to "drop it to the floor" but there is a large tube across the whole dash... so, how does the steering column drop to the floor??

- removed the dash rattle stop screws (top of dash, where the defrost vent is)
- removed the two dash pivot bolts on the far ends of the dash

What else am I missing before I can remove the dash, or at least pivot it? Ideally, I would like to remove it all the way, because its not like there is going to be room to spare working with the hvac box...
 
Are you shure it's not just the actuator motor or the control? The 95 controls are very failure prone. They are a 1 year only control. Other years look the same and even plug in but don't work.[guess how I know that]
If you disconnect the wiring from the column[main connector is bolted together] ,there is a bolt that goes through the steering shaft that will allow you to remove the whole column from the truck.
Be shure to disarm the air bag[if it has one] first. Pull the fuse for it and unplug yellow sleeved wire from column.
I had the linkage rod fall off the defrost flap on my 95LD. It's a crappy set-up in there.
 
No, it's not the actuator motor, I already removed it and looked there. The rod that the defrost door is attached to is loose, it's like it came out of the hole on the opposite side of the air box that it is supposed to pivot in... and it also looks kind of bent... thanks for the tip on the column, I'm gonna go try that now!
 
Ok I got the steering column removed, the dash rotated, and found my broken door. It is all gross and melted... Off to the stealership looking for parts now. Will post the rest of the pics tonight, hopefully it will help someone else to do this job...
 
You will need part# 52467204, it is a upper case with the two doors in it. The doors are not available without the case.
I have the same problem and have the new part already.
 
Here is the step by step with pictures.

Step 1. Initial preparation. Disconnect the "-" battery terminals on both batteries. Remove the Air Bag Fuse (#10, 10 AMP). Then remove the center console and the driver's seat. These are fairly easy so I did not bother photographing this step. The two rear nuts that hold the console to the floor are a pain but you can get 'em with a wrench, it just takes forever.

Step 2. Remove the dash bezel. Disconnect the headlight switch, the cargo light switch and the 4x4 switch if equipped. Remove the knee panel in front of the driver's seat. There are three screws along the bottom of this panel that are holding it in place, and several more metal snap things along its top, just gently pry them out.

Step 3. Remove metal plate #1 under the steering column:

dash_plate_under_steering1.jpg


Remove metal plate #2:

dash_plate_under_steering2.jpg
 
Step 4. Remove all steering column nuts. There are 4 of them, in two pairs.

Upper (further away from the firewall):

steering_column_nuts1.jpg


Lower (closer to the firewall):

steering_column_nuts2.jpg


Step 5. Finish removing the steering column. Remove the air bag fuse (this should probably have been done way earlier).
Disconnect the yellow air bag wire (it is labeled in big letters, you won't miss it)

steering_column_and_airbag_connector.jpg


Step 6. Remove the bolt that holds the steering column wiring harness to its plug. When you unbolt the bolt, the harness should come out easily. Sorry about the crappy picture on this one

remove_bolt_wiring_harness_steering_column.jpg


Step 7. Remove the cross bolt at the base of the steering column. Its just one bolt. and for some reason I can't find the picture of it that I am pretty sure I took.

Step 8. My truck has auto transmission, so I also had to disconnect the transmission shifter linkage. There are two parts that need to be disconnected:

This cable needs to come out of its holder:

transmission_shifter_cable.jpg


This ball linkage needs to be unsnapped (carefully with a flat blade screwdriver):

transmission_shifter_linkage.jpg


Linkage taken apart:

transmission_shifter_linkage2.jpg


The steering column should come out now. Pull it out gently, it does not take any force at all, and it will come out:

steering_column_is_out.jpg
 
Step 9. Let's get the dash out of the way now.

Dash rattle stop screws. There are three of those screws. They are right in the middle of the defroster vent. You can't possibly miss them. Take out all three.

dash_rattle_stop_screws.jpg


Step 10. Dash pivot bolts. they prevent the dash from rotating. There are two of them, one on the driver side and one on the passenger side:

dash_pivot_bolt.jpg


I also had to take this lone screw out. It holds the dash to some kind of a mounting bracket with some sort of an electronic device on it.

dash_remove_this_bolt_too.jpg


The dash will rotate towards you and down now:

dash_rotated.jpg


As you take all this stuff apart, bag and label the screws and bolts so you remember where they go:

all_bolts_hardware_packaged.jpg
 
Step 11. You can now get to the hvac box and replace the infamous part 52467204 with the two doors in it. I was able to see the problem right away. My defrost door fell out of the pivot hole, its rubber outer gasket is all melted, not a pretty sight:

broken_defrost_door_valve.jpg


old_defrost_door.jpg


diesel65 is right, the door does not come by itself as a part, you have to buy the valve box that has two of the doors in it. $69 bucks. So, your step 10 is

Step 12. Obtain the replacement door from the boneyard or the valve box from the stealership.

hvac_box_old_and_new.jpg
 
Step 13. Taking the valve box out is somewhat nontrivial. There are four metal clips that hold it in place, plus its flange is fitted inside the rest of the hvac box. This pic actually shows my new valve box in place, but you get the idea.

new_valve_box_in_place.jpg


The two clips in the front are easy. The left rear one is hard to get to. The right rear one is a bear. After you take the first three clips off, carefully pry the rear part of the box toward you so you can stick a flat blade screwdriver in there and get rid of that clip. No, you won't be reinstalling the fourth clip. I dont see how, without completely removing the entire hvac box.

Before you put the new valve box in, I recommend a slight modification which will make it easier (possible?) to install it. Your new box has a round flange that should fit into the hvac box. The fit is tight, so what I did is trimmed part of that flange:

hvac_box_where_to_trim.jpg


Trimmed so, it allows you to install the box starting with the part closest to you, then the rear part of the flange will snap into place.
 
Step 14. Install your new valve box. Here is the hvac box without the valve box:

this_is_where_new_doors_go.jpg


Install the valve box. Starting with the side closest to you, then the rear part of the flange will snap into place. Use the three metal clips to affix the valve box in place. I am sure three clips are sufficient, and besides, I could not see a way to get the fourth clip on. and transfer the foamy seal from the old valve box on to the new one.

new_valve_box_in_place.jpg
 
Step 15. Put everything back together:

Rotate the dash into place and bolt in.
Reinstall the steering column and metal plates.
Reinstall the knee panel.
Reinstall the dash bezel.
Reinstall the seat and the center console.

A few notes on reassembly:

- When rotating the dash into place, keep track of where your auto transmission shift cable is (if truck equipped with auto transmission). Make sure it does not get jammed because if it does you have to unbolt the dash again.

- "The dash rattle stop bolts" hold a significant load. When installed, they pull the dash about another inch towards the windshield. When tightening them, please gently push the dash up and forward, then tighten these bolts. DO NOT RELY on the bolts themselves to just pull the dash up. They might, or you may crack the dash where these bolts go though it.

- Steering column needs to be completely bolted into place before attempting to start truck. Well, some of you may think that's obvious.

- Use loctite on the dash pivot bolts and steering column bolts.
 
I had forgotten about the shifter linkage and the brake rod. The brake rod can be left out. It will work without it. Great write up:thumbsup:
 
Great write up. I having a similar issue with my 95 k2500 suburban but the air is coming out majority through the floor vent.
 
I just junked a 97. Both doors had fallen out of the hole on the back end. There really is nothing to prevent this from happening. The next one I have to take apart to fix will have a hose clamp or something, on the shaft inside to prevent it from falling out of the case again.
 
This thread was helpful recently, just finished this up last week on the k1500 gasser. Put in a new vent box and evaporator, compr, condensor, lines , heater core, everything.

Epoxied up some cracks in the dash, so now its cracking somewhere else :rolleyes5:

I guess I need to fiberglass over the entire dash and maybe it will be strong enough then.
 

Attachments

  • downsized_0723111841.jpg
    downsized_0723111841.jpg
    38.5 KB · Views: 16
Back
Top