• Welcome to The Truck Stop! We see you haven't REGISTERED yet.

    Your truck knowledge is missing!
    • Registration is FREE , all we need is your birthday and email. (We don't share ANY data with ANYONE)
    • We have tons of knowledge here for your diesel truck!
    • Post your own topics and reply to existing threads to help others out!
    • NO ADS! The site is fully functional and ad free!
    CLICK HERE TO REGISTER!

    Problems registering? Click here to contact us!

    Already registered, but need a PASSWORD RESET? CLICK HERE TO RESET YOUR PASSWORD!

Removing Lower ball joint rivets

Rodd

Recruit
Messages
1,705
Reaction score
978
Location
Antelope, CA
I am trying to replace the lower ball joints on the 1995 k3500. I took my grinder and ground a + in the head then used my air chisel to remove the head. I then tried using my hammer attachment on my chisel to press out the rivets and no go. The truck has 195k miles and they are the originals. I tried a punch and a sledge hammer with no luck either. I tried drilling a hole in them to try and used the air hammer and no luck. I thought they would pop out fairly easily with the air chisel/hammer but no luck. The other thing is I didn't center the holes I drilled so I need to be careful drilling anymore. The holes are down to the middle part of the rivet where the bottom half is harder than the upper part that I drilled out. I got a cobalt bit to see if I can drill through the harder lower half.

Anyone have any advise?
 
A buddy of mine has a shop and I asked him how they do them. He said "air hammer". I said I beat on mine with an air hammer for a LONG time and they still needed drilled out. He said "big air hammer".

They suck, but don't give up. We've drilled out, then torched out from the centers, before, too. Just be careful to not get into the parent metal.
 
Beware the BMR. Base metal reduction. Just did the 1994. The rivets are not smooth on the sides. Which looked to me, why they are not easy to beat out.

If I had saved one, I could take a picture. I center punched the tops of the rivots and drilled as close to center as I could. I tried to be careful to not drill below the head of the rivet.

Use good quality drill bits. Fastenal gold or equivalent or better - they are not completely Gold in color and it may depend on what area you are from.

I like to start with a 5/32. I drilled away most of the rivet head and chiseled the rest off.

Then starting with the 5/32 bit again. I drilled most of the way through the rivet - I wanted to leave enough of the bottom head of the rivet for something to pound on.

I kept upping the size of the drill bit until I was a size or 2 under 1/2". Then they drove out rather easliy with the air chisel.

I had one rivet that I messed up. I had an 1/*' bit in the drill, so I went with it. I got drilled down to the depth I wanted and instead of pulling it out, I tried just bending it over. That didn't work so good. I could not get the little piece of drill bit out and broke several more in the ensueing chaos.

I finally drilled a little at an angle until I hit the bit, got the head chiseled off, ruined several bit trying to drill the rivet. I thought about giving up and coming from the bottom, but drill shavings in the face seemed way over rated.

Finally got it drill like the others and it popped loose rather easily also
 
I grind off the heads, then the ball joints usually pry and beat right out. If the rivet heads are on the ball joint side, I grind the head of the rivet and down into the ball joint flange, making the flange much thinner and easier to get the joint popped free.
 
We had craptons of 1/8” bits for all the fab work in the shop, so I always started with those. Then 3/8. A center hole really helps remove strength.

Then ingersol rand long & heavy air hammer (weight and size matters here). Chisel cut of end and swap to punch to drive out. The 1/8” drill out was always the worst part. But we don’t have rust, so...?
 
I grind off the heads, then the ball joints usually pry and beat right out. If the rivet heads are on the ball joint side, I grind the head of the rivet and down into the ball joint flange, making the flange much thinner and easier to get the joint popped free.
On our K3500's the lower ball joints are encapsulated. If you grind to much, you are into the lower control arm. Top or bottom.

Best bet is probably to go to the GMT800 set up. If you are thinking of changing the knuckle, it's definitely time to think of the upgrade
 
I used a 10# Sledge Hammer and hired help brave enough to hold the punch in place when being hit with the 10# hammer. I made the help use pillars to hold the punch as holding it by hand made me a little nervous. ER is not fun on a Sunday...

A press would make the job a lot easier.
 
Oh yeah, forgot something big! Drill from top down and DONT drill all the way through. I use a 5/16 punch size in my air hammer. Put the a arm on a jackstand so it isn’t hanging on the suspension.

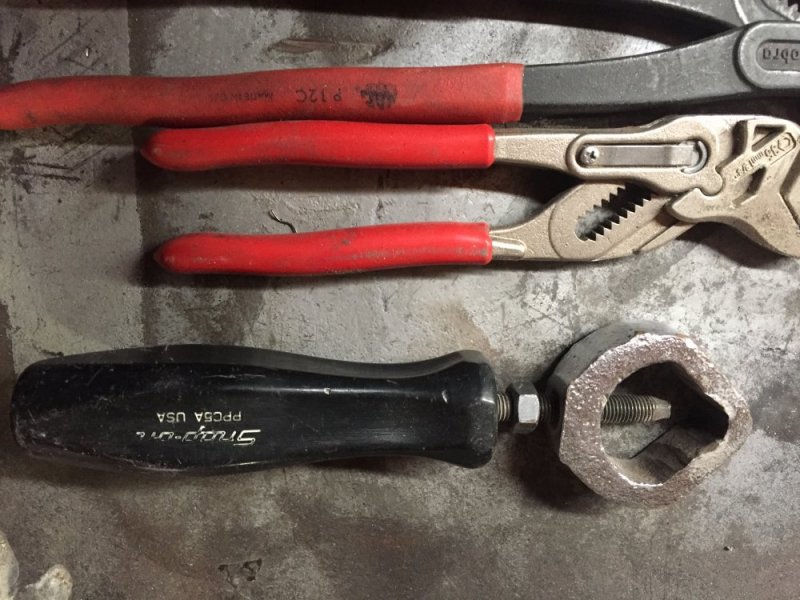
If no air hammer, there is a nice tool for holding punches and chisels so you don’t have to hire WarWagon’s helped:
Not hard to make your own, but make comfy handle.
AD8BB7D7-697F-49A3-8B8B-3A333631B370.jpegm

(Not the pliers)
 
Thanks guys for all the input. I talked to a buddy at church today who is a diesel mechanic and he said use penetrating oil and use a torch to heat it up then the air hammer or sledge and punch should work. I'll see tomorrow.
 
Oh yeah, forgot something big! Drill from top down and DONT drill all the way through. I use a 5/16 punch size in my air hammer. Put the a arm on a jackstand so it isn’t hanging on the suspension.

If no air hammer, there is a nice tool for holding punches and chisels so you don’t have to hire WarWagon’s helped:
Not hard to make your own, but make comfy handle.
View attachment 52553m

(Not the pliers)
PPC5A noted! Thanks, Will!
 
I drilled them out. Inevitable that you’ll drill off center and catch some of the parent metal. IMO not a big deal as you’ve got 4 attachment points and the ball joint itself floats.

On my to do list is to replace the stamped lower control arms on my son’s with the forged lower control arms, which make all of this a non-issue. I will have to cut those stamped arms off the torsion bars as nothing worked trying get them off the last time.
 
These stupid thinks are a PITA X 1000. I have sprayed pb blaster, heat, broke a snap on punch. I may have to drill them out.
 
the job doesn't pay much on flat rate - it's honestly worth paying to have a shop do it, in my opinion. Not that it helps you with the side you're on, but maybe for the other side, once the first one is done.
 
These stupid thinks are a PITA X 1000. I have sprayed pb blaster, heat, broke a snap on punch. I may have to drill them out.
Drilling them isn't bad. Just use good quality drill bits. Trigger the drill on and off with pressure.

That keeps the bit cool. A lot of people grab a drill crank it wide open and smoke the bits.

Did you chisel the heads off yet? I found drilling the heads before chiseling them off, made things go easier.

I found it much easier to gauge my depth and work my way up to 1/2" or so - staying above the control arm with the bigger bits. I like to start with a 5/32.

As long as I was confidant that I got my hole centered, I would drill through to the top of the bottom part of the rivet head. You do not want to drill completely through. You have to have something to whack on.

Once you have the heads off and can see your hole - you might have to warm it a little or sand it - depends on how bad you mar up the top of the control arm knocking the heads off.

Then you can drill through to the top of the bottom part of the rivet head. Don't drill all the way through. You can stay up about 1/8". The rivets are not that hard and drill fairly easy.

Keep up sizing drill bits until you get to the point that you have removed one side of the rivet.

If you are well centered, you can quit when there is very little rivet left inside the hole.

At that point what is left of the rivet will be very thin. Warm it up a little if you wish. - I had one that I could have drilled up another size or 2. But I warmed it up and it came right out.

If you do not have an air hammer a regular hammer drill, set on hammer only with an old 3/8 bit or something will work also.

Something like this Bosch SDS hammer drill. Dang I can not believe I sold one of those brand new for $50

https://www.grainger.com/product/54...3837!&ef_id=Ws267wAABogCTxME:20180419155943:s
 
When I did my 93 (upper and lower 16 rivets total) I chose to very carefully with a cutting torch, snip the rivet heads off, let cool, hit em a cut off wheel just enough to remove the slag and scale, drill a 1/8" hole all the way out the bottom to let the flame through, fire up the torch again and very carefully blow out just the rivet at least half of it then drift and hammer em out while still hot.

Takes some feel to get the torch to peel away the metal but it works well. Use at least a shade 5 safety goggle/glasses for obvious reasons and it helps to see what you're doing with the flame.
 
Back
Top