• Welcome to The Truck Stop! We see you haven't REGISTERED yet.

    Your truck knowledge is missing!
    • Registration is FREE , all we need is your birthday and email. (We don't share ANY data with ANYONE)
    • We have tons of knowledge here for your diesel truck!
    • Post your own topics and reply to existing threads to help others out!
    • NO ADS! The site is fully functional and ad free!
    CLICK HERE TO REGISTER!

    Problems registering? Click here to contact us!

    Already registered, but need a PASSWORD RESET? CLICK HERE TO RESET YOUR PASSWORD!

Project 350HP update

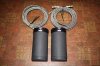
Yes we actually have two IAT gauges, one for pre-turbo and one for post-turbo. Trust me we are plenty covered on all aspects of what is going on with the motor and drivetrain.


I was wondering what your using for a guage as I have never seen an Iat Guage. I know some guys are using water temp guages but say they react slowly.
 
Cyberdyne & PLX both make digital IAT gauges.
Autometer used to make a 2-channel analog gauge, which allowed you to moniter both pre & post turbo with one gauge. That would be a nice one to have, but it seems to have been discontinued.
 
Finally recieved the two FS-2500 units for the oil and tranny fluid. Both of these will be mounted in the tool box with the AirDog pump and ZEX nitrous bottle.
 

Attachments

  • FS-2500 units.jpg
    FS-2500 units.jpg
    43.1 KB · Views: 15
Depending on my time frame I might be able to get you parts at a much reduced rate and have you add them one by one and dyno each part as they are added. By the end of summer you could have all the major performance parts on and a step by step dyno chart to tell what each product did for the truck. This way I could write something up about the entire build. It would take time and some money on your part but if you or someone out there is willing than I would try to do what I could to help you out.

I've been seeing engine build ups for decades in magazines. They usually add piece by piece, one on top of another. To add one piece, test, remove, add a DIFFERENT piece, test, remove, so on would be more of an accurate test, Cumulative improvements of efficiency are more fun when done all at once, and there are parts that "feed" off each other.

Actually, I am just subscribing to this great thread.):h
Good work, Gents!

Glad to know you are enjoying the post. I try and give as much info as I can without spoiling the articles for the magazines. This test will be exactly what you said you liked, everything all at once. Who knows, the old truck migh supprise us all. Thanks for the support!

Ian
 
Depending on my time frame I might be able to get you parts at a much reduced rate and have you add them one by one and dyno each part as they are added. By the end of summer you could have all the major performance parts on and a step by step dyno chart to tell what each product did for the truck. This way I could write something up about the entire build. It would take time and some money on your part but if you or someone out there is willing than I would try to do what I could to help you out.

That's a great idea. My friend just had his mustang dyno'd so I know there is at least one guy around to dyno it. Hopefully he can accommodate trucks. If not I'm sure there is someone local who can. My question now is the order we do the mods in?
 
That's a great idea. My friend just had his mustang dyno'd so I know there is at least one guy around to dyno it. Hopefully he can accommodate trucks. If not I'm sure there is someone local who can. My question now is the order we do the mods in?

Dave's post gave me another idea. After each mod I can take the truck on a round trip fuel economy test. It won't be scientific since temperature & traffic conditions can make a difference, but if I take the same route on the same day of the week at the same time it will be as close to scientific as you can get.
 
AirDog fuel pump and FTB mod is complete! Thank God, it took some time but 635 came over today and we got the truck up and running again. Also started making the mounting brackets for the twin FS-2500 filters and mounted the new Snow water/meth pump so I can finish the Snow system up tomorrow and take the truck for its first real test run with all systems GO! Just have gauges, some exhaust mods, FS systems, and some interior upgrades to finish off this bad boy. Friday is also the day, this comming friday we are headed over to Dynomite Diesel to see if all the hard work will pay off.

ian

Good luck! Keep those knuckles clean and blood free. :D
 
Good luck! Keep those knuckles clean and blood free. :D

Man, if I had a tank of diesel for every time I bloodied a knuckle on a 6.5 I don't think I would every have to buy fuel again, or the Navy for that matter. Tomorrow I am going to finish off the Snow system and take the truck on its first of 4 test runs before the dyno event. I will give an update as to how each days run goes along with any further info I can share. As for the magazines, I think everyone here should be subscribing to both MaxxTorque and Diesel World. These two magazines have been commited and are starting to commit to our wonderful trucks. Give them support and I will continue to bring your trucks to life through thousands of readers around the world. Thanks for your support.

Ian
 
That's a great idea. My friend just had his mustang dyno'd so I know there is at least one guy around to dyno it. Hopefully he can accommodate trucks. If not I'm sure there is someone local who can. My question now is the order we do the mods in?

Ian,

I don't think you saw this post. What order would be best to do the mods for documentation?
 
Heck, I'll bite, my dyno run on the '82 is scheduled for next weekend December 12th, pending good weather. I prefer a dyno run with temperature in the 60's or close. 18:1 engines don't really like starting in the cold and some one didn't opt for the block heater option when building the engine (me, it's just for summer play).

So, according to the weather forecasts, it'll be that day.

This will be a no-drugs fuel-only run.

My engine came out to ~19:1 and with adequate glow extension time, it's been starting well down to the lows of around 20 degrees I've experienced so far.

I've got fresh 880 cca batteries, 1-0 cables, & a Powermaster starter to get as much cranking speed as possible.

It does truly require glow extension (beyond the additional time my Kennedy chip does) to start cleanly. Had a gp die over the holiday, and that 20F morning, the cylinder w/ bad plug took 5-10 seconds to build enough heat to fire cleanly. Swapped out the bad plug (6 month old WAP's that came w/ the truck) & the next morning's start was clean/smoke free again.

You can also tell the first PCM directed after glow is still helping as there's a slight change for the better in combustion when the after glow cycles on right after a cold temps, cold start.

Need to get a set of the Duraterms for a long term fix. Been getting by w/ the WAP's because I had them, knowing full well they were likely to fail rather quickly, even quicker when subjected to some glow time extension.
 
There is still a significant difference between a 19:1 and a true 18:1 in starting abilility. The 19:1 is about the perfect ratio for a daily driver higher boosted 6.5 though.

Extended glow time would also be smart. I'm simply running 1982 Glow Plug original equipment controller (cigar style, non-electronic) with AC60G plugs (which need a little longer glow time to keep up with what the OEM 9G's did).

But, it starts perfectly in the summer, bump the key, no throttle, running and rattling well.
 
Look in the 6.5 Technical Reference library under Glow Plugs, guys... there are 2 very good pictorial How-to's posted there, under "Glow Plug Over-ride"... you can be up and running in short order!
 
Didn't mean to give the impression I didn't have the manual glow extension capability (put in even before I finished the engine). I expected the WAP plugs to fail rather quickly once they're subjected to longer glow times. I mentioned the necessity of extended glow time to get clean starts under ~40 degrees F, because a number of folks have asked me about the trade-offs of lower compression & how the engine started.

Part of my intent in winding up around 19:1 was a compromise for a little better starting in cold temps. Besides keeping the stock block heater, I also put a 2nd in on the other bank - figuring mostly as a back-up should the original fail. That said, if you've got a circuit that will handle both heater's current draw, just over a couple hours will heat it enough to begin to raise the mechanical coolant temp gauge off its 100 degree bottom peg.

Bought the truck w/ a blown headgasket, and the block deck had a low spot right around where the gasket failed. The factory deck machining hatch showed uniform across that area - were things still moving around that much, relieving casting stress after machining with all the heating/cooling cycles?

Anyway, the block needed a bit of deck surfacing to get it straight & square, so w/ a std depth head gasket, that's how I got to 19:1.
 
Back
Top