88gmctruck
02GMCtruck
This how-to applies specifically to 99-06(07 Classic) regular cab trucks.
If you would like to install a console in an 88-98 (99 Classic) regular cab the general procedure is the same, except those trucks have a double walled roof and do not require the domelight relocation, however require cutting the back tabs off the console or cutting holes in the roof for the tabs.
If you would like to install a console into any extended or crew cab truck the general procedure is the same, except those trucks have the necessary supports to install the console without modification.
-------------------------
This is the procedure I used to install a long overhead console from a 99 Yukon Denali into my 2002 regular cab. The regular cab trucks are interesting as they do not have a double walled roof. From what I hear, extended and crew cabs do have the double walled roof, which simplifies the process as they were designed to have the console so the slots for mounting the rear of the console are present.
Tools:
Razor Knife
Screwdriver (torx, flat & Phillips)
Drill
Long screw
Wire crimpers/cutters OR soldier gun
Wire
Tape OR Heat shrink
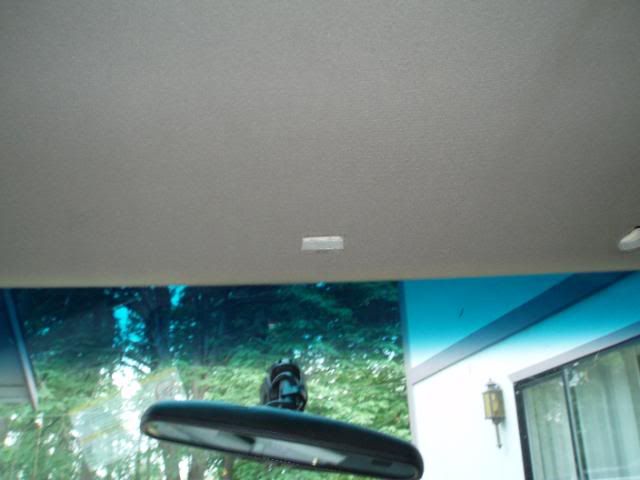
I suggest wearing latex gloves for a lot of this project. The light grey headliner attracts dirt easily. First remove all the stuff attached to the headliner. The sun visors screw off, A (front) pillars and back window trim pull off, the B (rear) pillars have screws under the window trim and then pull off, dome light, grab handle and coat hooks all come apart and unclip. Before pulling it down, mark where the dome light opening is (for measurement purposes later).
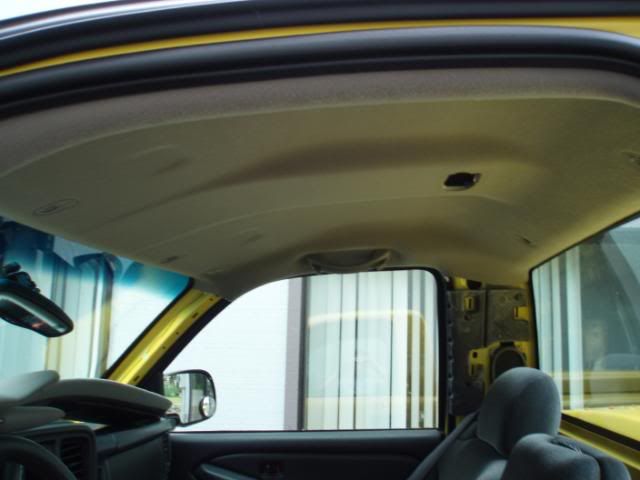
Take the headliner down. The driver's side has a magnet holding it up. A note, the glue from my windshield was stuck to the front so I gently pulled it apart from there.
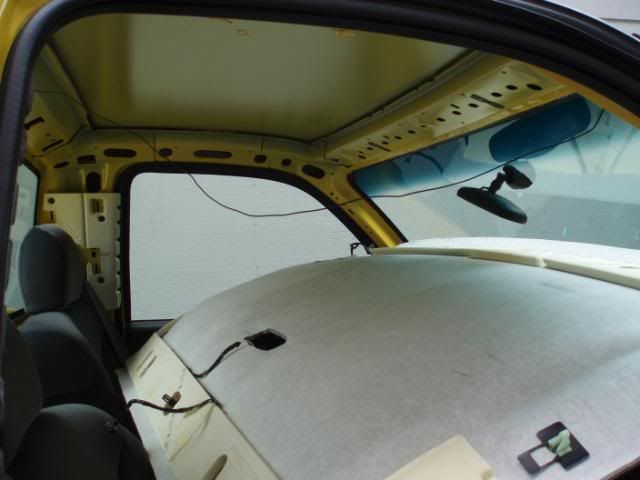
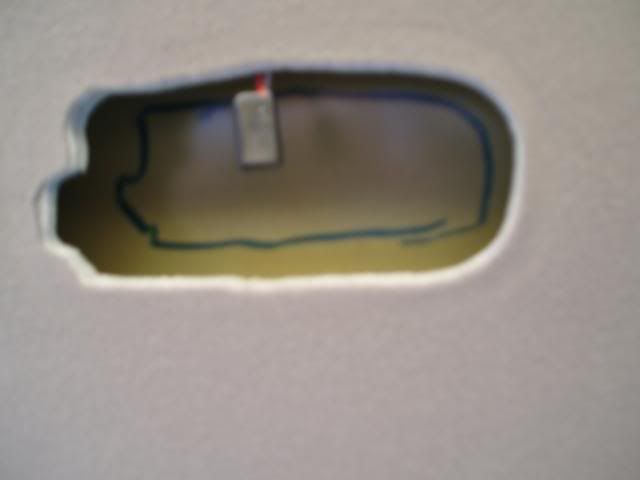
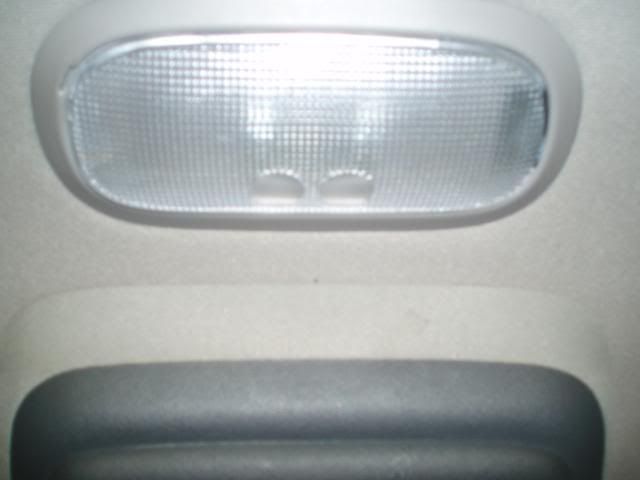
See how there is no double wall? Next step is to trace the shape of the dome light opening on something, so if you want you can relocated it behind the console. While your back there, pull the dome light wires from the headliner back a bit, as your dome light will be moved and you don't want to cut a wire.
Now, measure from the square hole (the one that sticks down a little, to the marking where the dome light was. This will tell you where to cut the headliner for the front of the console. Also, measure from the back of the headliner past the thicker support part. This will be used later for the dome light relocation. Write these numbers down!!!
Now put your headliner back up. I put the grab handle and coat hooks back to support it. Mark the area you need to cut. I choose to remove as little material as possible to help keep the rigidity of the headliner.
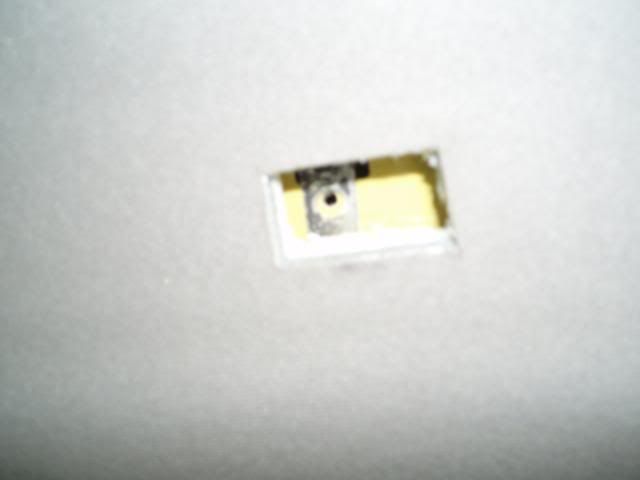
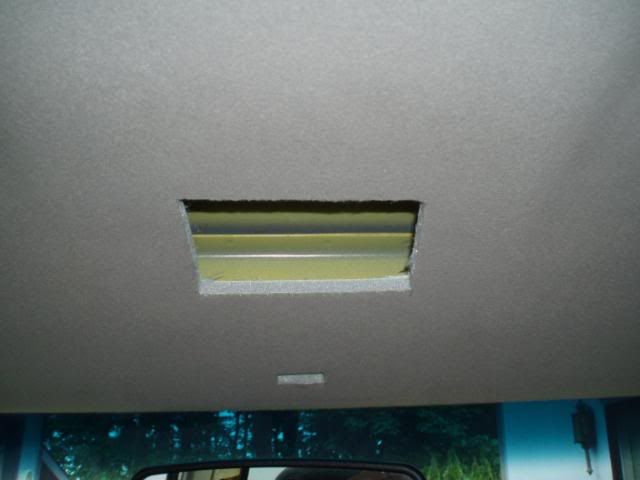
Next drill a hole in front of the square hole. be sure you don't hit the outter skin of the roof when doing so. This is where the front screw mounts for your console. I used a "J" clip like factory.
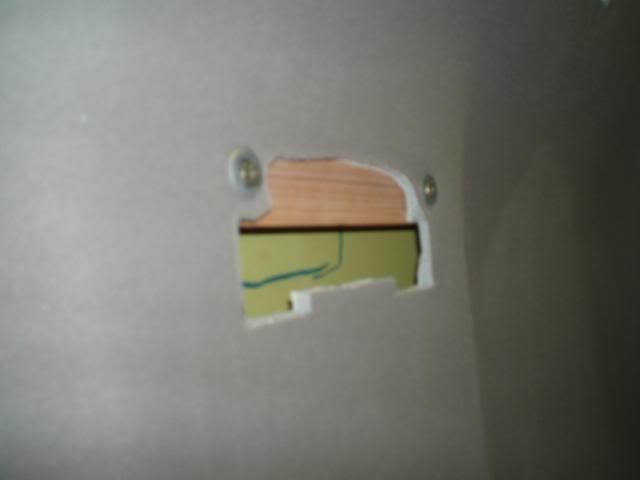
(Extended/Crew Cabs Skip this step) Now enlarge the dome light hole so your console tabs fit inside it. As there is no metal above the headliner, it will be supporting the weight of the console. The backboard isn't thick enough for the tabs, so find something to put up there. I used a piece of baseboard trim (it tapers slightly) and made it extend well past the sides of the hole. I also suggest attaching it with some adhesive.
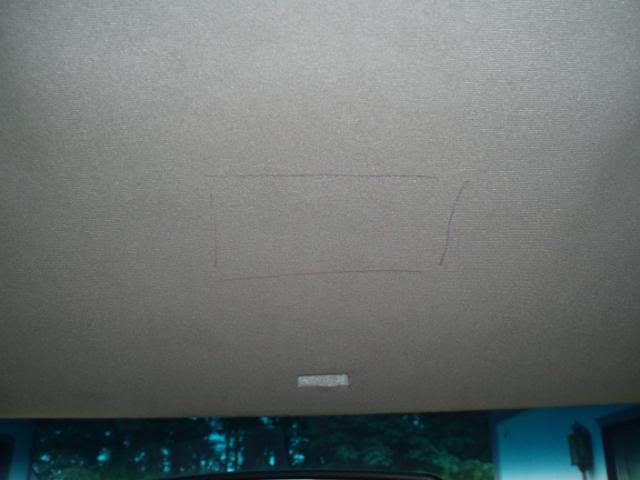
At this point you should be able to test fit the console. It won't quite go all the way up to the headliner yet, as the area behind the map lights hit. So you have to cut another hole out. Just press the console firmly into the headliner and you should see where it hits.
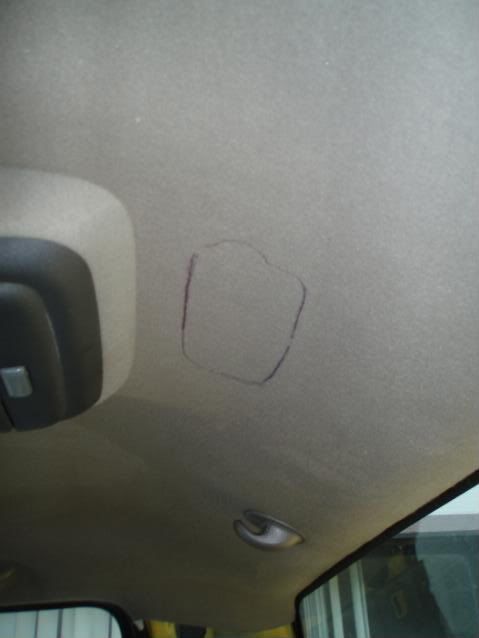
Now for the last step. Cut out your stencil for the dome light. Take your earlier measurement and go just a little longer and mark for your dome light. Start out small and trim as needed. Plug the light back in and test!


Wiring Info:
Orange: 12V + constant
Black: - ground
White (Homelink console only): Dimmed dash lights (can pick this up at radio or IP cluster).
You can connect to power at the dome light, but you will need to find your own ground as the dome light is a switched ground.
If you want your map lights to come on with your dome lights yet work individually as well, it's a bit tricky. You have to change the lights to a switched ground
1. Cut the factory wires where they split (both orange and black). You will want to swap the leads going to the map lights with each other (this will make it so the map lights are switched by ground just as the dome lamp).
2. Then you will run a wire from the dome light ground (which is white at the dome light) to your console.
3. Splice a Diode between each switch and each light, and connect both to the white lead. Be sure to keep the diodes leads separated on the console side going to the map lights. Follow the package directions as a diode only allows current flow through one way.
4. If everything works correctly, both map lights will turn on with the dome lights, and work individually with the button. If you have the diode wired the wrong way the switches will turn the dome light on but the dome light won't turn the map lights on.
If your console came like mine (with rear AC or Heat controls) you can replace them with a blank panel, part number 15737207 and runs about $16 at the dealer.
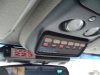
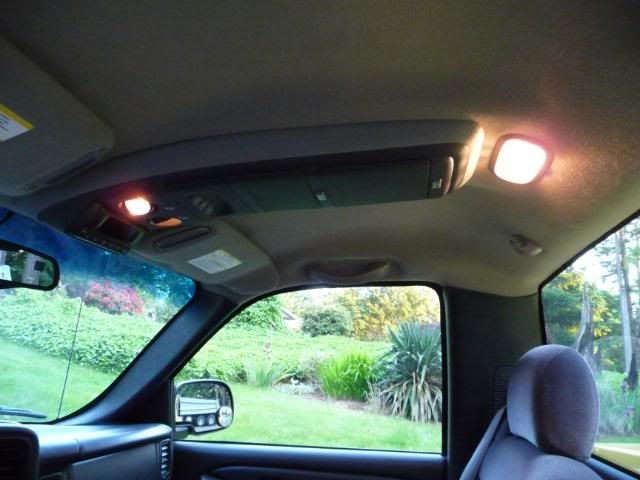
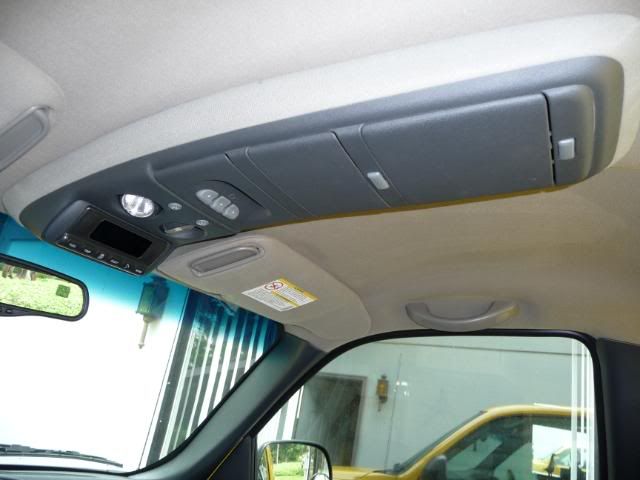
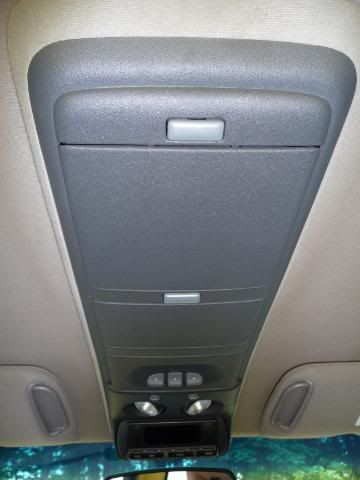
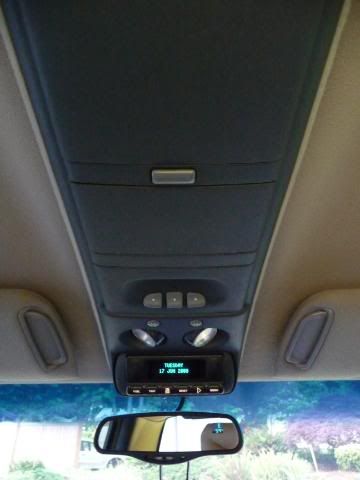
Pictures of the finished product (with Denali DIC installed)
------------------------------
Information on overhead consoles:
GMT400 trucks/SUVs used two styles of overhead consoles; a truck and an suv style, both long. The truck style has a smaller opening in the front (same as the S-10s) and is much harder to find. The SUVs had a larger opening for HVAC contols. There are no options nor provisions for an OH console in a regular cab.
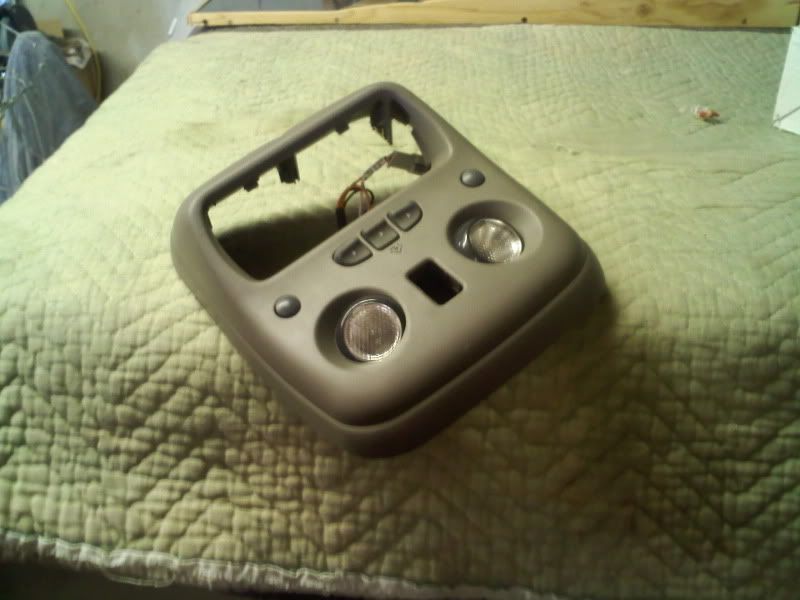
GMT800 trucks/SUVs used two consoles as well; a short console with only a pocket and maplights, and an extremely simlar long console as the GMT400 SUV console. The short console is the most common, and is available in all models. The long console is not available in regular cabs.
S-Series & Astro/Savana consoles will not fit without modification to them, the rooflines are different. There are short, long, and super long consoles from these vehicles.
GMT400 Truck console
This is the console in my 88 Sierra. It's the smaller opening style (shared with the S-10s). It has the compass/temp unit from an S-10 installed in it.

GMT400 SUV console / GMT800 long console.
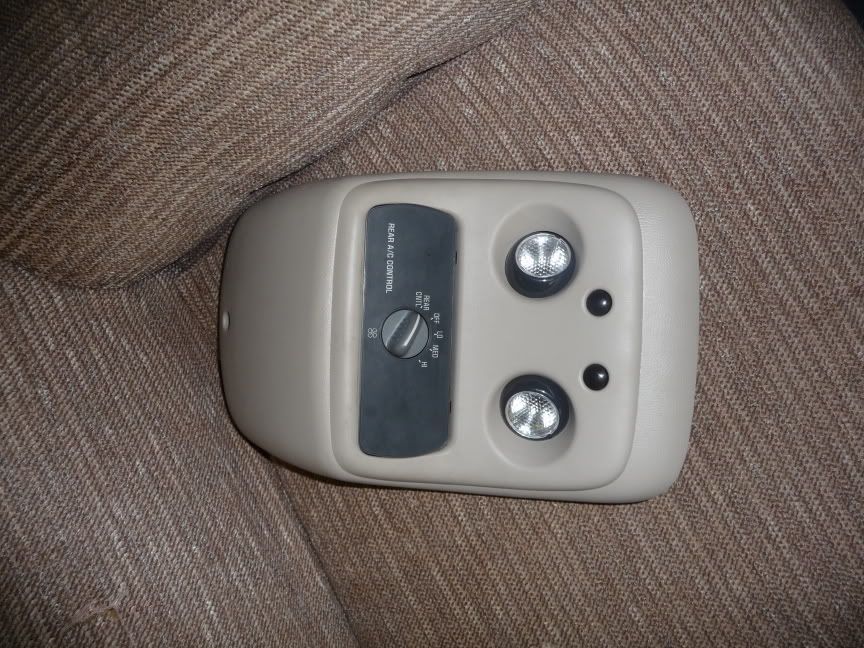
This is the console in my 02 Sierra. It's the large opening style, and is actually from a GMT400 SUV. The only difference is there is a small gap on the back where it meets the headliner (which you can't see in the regular cab). I have a Denali Driver Information Center custom mounted in mine.
GMT800 Short console variants (first is for a sunroof, second is standard)
Color breakdowns:
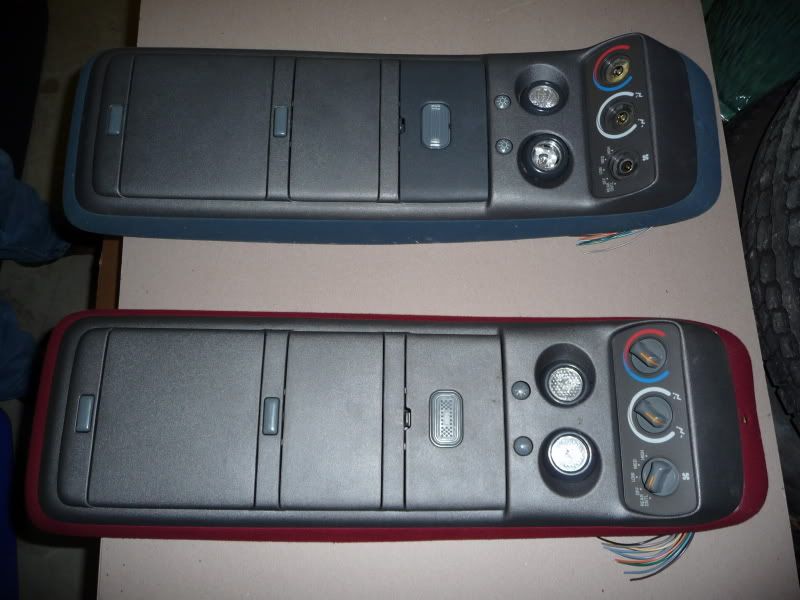
GMT400 colors range 92-94 and 95-98 (00c). The 92-94 consoles also had a lighter metallic silver color for the plastic, as opposed to the grey color more commonly seen in 95-98 (00c) trucks. See the difference in the door on the blue console? Both of these were 92-94 consoles from suburbans.
GM800 colors range 99-02 and 03-06 (07c). Some 99-02 colors are interchangeable with 95-98 (00c) such as the medium grey in my 02.
If you would like to install a console in an 88-98 (99 Classic) regular cab the general procedure is the same, except those trucks have a double walled roof and do not require the domelight relocation, however require cutting the back tabs off the console or cutting holes in the roof for the tabs.
If you would like to install a console into any extended or crew cab truck the general procedure is the same, except those trucks have the necessary supports to install the console without modification.
-------------------------
This is the procedure I used to install a long overhead console from a 99 Yukon Denali into my 2002 regular cab. The regular cab trucks are interesting as they do not have a double walled roof. From what I hear, extended and crew cabs do have the double walled roof, which simplifies the process as they were designed to have the console so the slots for mounting the rear of the console are present.
Tools:
Razor Knife
Screwdriver (torx, flat & Phillips)
Drill
Long screw
Wire crimpers/cutters OR soldier gun
Wire
Tape OR Heat shrink
I suggest wearing latex gloves for a lot of this project. The light grey headliner attracts dirt easily. First remove all the stuff attached to the headliner. The sun visors screw off, A (front) pillars and back window trim pull off, the B (rear) pillars have screws under the window trim and then pull off, dome light, grab handle and coat hooks all come apart and unclip. Before pulling it down, mark where the dome light opening is (for measurement purposes later).
Take the headliner down. The driver's side has a magnet holding it up. A note, the glue from my windshield was stuck to the front so I gently pulled it apart from there.
See how there is no double wall? Next step is to trace the shape of the dome light opening on something, so if you want you can relocated it behind the console. While your back there, pull the dome light wires from the headliner back a bit, as your dome light will be moved and you don't want to cut a wire.
Now, measure from the square hole (the one that sticks down a little, to the marking where the dome light was. This will tell you where to cut the headliner for the front of the console. Also, measure from the back of the headliner past the thicker support part. This will be used later for the dome light relocation. Write these numbers down!!!
Now put your headliner back up. I put the grab handle and coat hooks back to support it. Mark the area you need to cut. I choose to remove as little material as possible to help keep the rigidity of the headliner.
Next drill a hole in front of the square hole. be sure you don't hit the outter skin of the roof when doing so. This is where the front screw mounts for your console. I used a "J" clip like factory.
(Extended/Crew Cabs Skip this step) Now enlarge the dome light hole so your console tabs fit inside it. As there is no metal above the headliner, it will be supporting the weight of the console. The backboard isn't thick enough for the tabs, so find something to put up there. I used a piece of baseboard trim (it tapers slightly) and made it extend well past the sides of the hole. I also suggest attaching it with some adhesive.
At this point you should be able to test fit the console. It won't quite go all the way up to the headliner yet, as the area behind the map lights hit. So you have to cut another hole out. Just press the console firmly into the headliner and you should see where it hits.
Now for the last step. Cut out your stencil for the dome light. Take your earlier measurement and go just a little longer and mark for your dome light. Start out small and trim as needed. Plug the light back in and test!
Wiring Info:
Orange: 12V + constant
Black: - ground
White (Homelink console only): Dimmed dash lights (can pick this up at radio or IP cluster).
You can connect to power at the dome light, but you will need to find your own ground as the dome light is a switched ground.
If you want your map lights to come on with your dome lights yet work individually as well, it's a bit tricky. You have to change the lights to a switched ground
1. Cut the factory wires where they split (both orange and black). You will want to swap the leads going to the map lights with each other (this will make it so the map lights are switched by ground just as the dome lamp).
2. Then you will run a wire from the dome light ground (which is white at the dome light) to your console.
3. Splice a Diode between each switch and each light, and connect both to the white lead. Be sure to keep the diodes leads separated on the console side going to the map lights. Follow the package directions as a diode only allows current flow through one way.
4. If everything works correctly, both map lights will turn on with the dome lights, and work individually with the button. If you have the diode wired the wrong way the switches will turn the dome light on but the dome light won't turn the map lights on.
If your console came like mine (with rear AC or Heat controls) you can replace them with a blank panel, part number 15737207 and runs about $16 at the dealer.
Pictures of the finished product (with Denali DIC installed)
------------------------------
Information on overhead consoles:
GMT400 trucks/SUVs used two styles of overhead consoles; a truck and an suv style, both long. The truck style has a smaller opening in the front (same as the S-10s) and is much harder to find. The SUVs had a larger opening for HVAC contols. There are no options nor provisions for an OH console in a regular cab.
GMT800 trucks/SUVs used two consoles as well; a short console with only a pocket and maplights, and an extremely simlar long console as the GMT400 SUV console. The short console is the most common, and is available in all models. The long console is not available in regular cabs.
S-Series & Astro/Savana consoles will not fit without modification to them, the rooflines are different. There are short, long, and super long consoles from these vehicles.
GMT400 Truck console
This is the console in my 88 Sierra. It's the smaller opening style (shared with the S-10s). It has the compass/temp unit from an S-10 installed in it.
GMT400 SUV console / GMT800 long console.
This is the console in my 02 Sierra. It's the large opening style, and is actually from a GMT400 SUV. The only difference is there is a small gap on the back where it meets the headliner (which you can't see in the regular cab). I have a Denali Driver Information Center custom mounted in mine.
GMT800 Short console variants (first is for a sunroof, second is standard)
Color breakdowns:
GMT400 colors range 92-94 and 95-98 (00c). The 92-94 consoles also had a lighter metallic silver color for the plastic, as opposed to the grey color more commonly seen in 95-98 (00c) trucks. See the difference in the door on the blue console? Both of these were 92-94 consoles from suburbans.
GM800 colors range 99-02 and 03-06 (07c). Some 99-02 colors are interchangeable with 95-98 (00c) such as the medium grey in my 02.