• Welcome to The Truck Stop! We see you haven't REGISTERED yet.

    Your truck knowledge is missing!
    • Registration is FREE , all we need is your birthday and email. (We don't share ANY data with ANYONE)
    • We have tons of knowledge here for your diesel truck!
    • Post your own topics and reply to existing threads to help others out!
    • NO ADS! The site is fully functional and ad free!
    CLICK HERE TO REGISTER!

    Problems registering? Click here to contact us!

    Already registered, but need a PASSWORD RESET? CLICK HERE TO RESET YOUR PASSWORD!

Flashing; Castings; sand pocket; Removal. Oil return flow improvements done during rebuild.

Will L.

Well-Known Member
Messages
20,872
Reaction score
42,314
Location
Boulder City Nv
This subject gets brought up and people who know to do it, do so like putting on a sock before their boot because it’s that easy and that important. Anyone that has input, pics, videos, etc that helps - please share.

When casting engine parts where the molds come together and where portals are made, there are casting edges that form known as casting flashing. It is made of the same metal as the part- cast iron, aluminum, etc. In the 6.2/6.5 world we are talking cast iron. These small chunks or flakes can break off and get into critical locations such as bearings, ports, etc.

I made a few videos but haven’t gotten them onto YouTube yet as my tech crew (older son) is busy with a real job🤣. Along with cleaning out the flashing is making better oil flow on both pressure and return side. Also a good spot to mention “breaking the edges” as it is also a point if keeping cracks from forming and tiny pieces of cast iron from your bearings.

This is not a real requirement- until you fall into the small percentage of people who get damage from it and get to rebuild your otherwise new engine or re-rebuild your engine you are playing with.

Our engines are made with an older method, including BRAND NEW GEP ENGINES. So we are dealing with an old problem that GM dealt with and afaik GEP is doing a worse job on at the assembly plant. Because of this my recommendation is EVERY BRAND NEW 6.5 SHOULD BE DISASSEMBLED FOR DEFLASHING! There is no warranty so not like you void one. Annoying? Yes. Don’t like it? Sell your 6.5 go find a Honda. It is what it is.


Before and after type pics. Some are gm, some gep, some gep p400.

A 1/4” die grinder is about $20 and a set of carbide burrs around $30 for the cheap versions in amazon or harbor freight. Start there if you don’t own any. SERIOUSLY- SAFETY GOGGLE TIME. Metal shavings in the eye are easier to happen than you think especially using air die grinder.
Safer is electric die grinder because you don’t get air blow back but still needs eye protection.
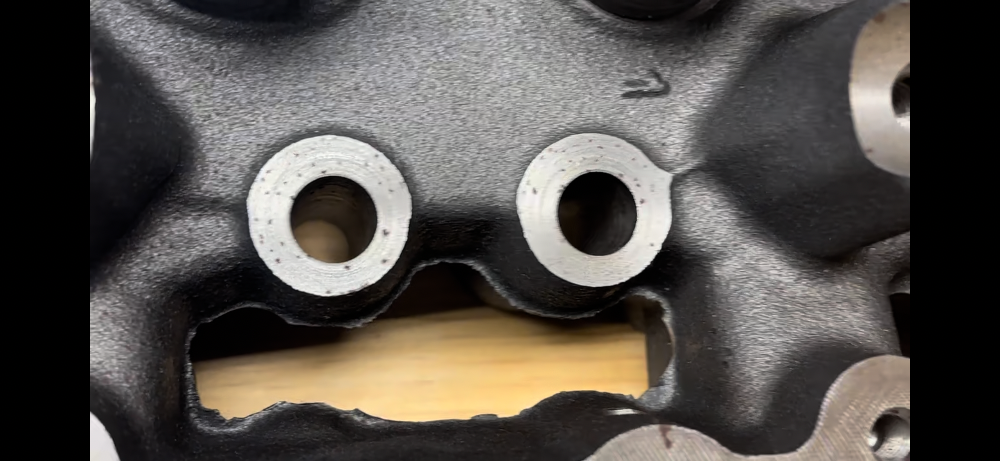
 
IMG_5704.pngIMG_5698.png

Here is before/ after example. I don’t think same head I used here but you can see the flashing before removing and the shiny & smooth area afterwards.
This is in brand new P400 heads. So yes, still a problem in the p400.
 
IMG_5697.png
See the point of the punch I am using as a pointer? That is a thin edge of cast iron. This needs to be removed. Time per average head if you only remove flashing and do no other improvements is 5-10 minutes per head of actual die grinding work. Takes a little set up time. You have to VERY THOROUGHLY CLEAN AFTERWARDS. Especially the oil ports. The cast iron particles will often magnetize so don’t expect it all to just fall away or go away with an air blower- it won’t.
 
IMG_5707.pngIMG_5704.pngIMG_5705.pngIMG_5700.png

In the 1st pic, look at the tiny sharp peak edge. Then look at my finger tip pic. Not the same piece but examples of the fine sharp edged pieces that easily break off. In fact, the one on my finger, I broke off with my finger & I haven’t had great finger strength in years. The average teenager could have popped that part off. 100% sure that would have came off by itself from normal engine vibration.

The two black dots I am pointing at on the paper: cast iron. Note the fine particles that look like sand on the paper next to them.
That is the stuff you hope your oil filter is doing it’s job for. Think that iron grit can’t do damage- think again. Think your oil filter will stop damage… think again. These are already all on the clean side of your engine post filter. Ticking time bombs. When the vibration breaks off these tiny chunks they go down and can fall again components like spinning crankshaft, rods, cam, etc and get thrown somewhere critical or fall into it.
 
Back in 2004 I bought a new optimizer long blog from Towbin Hummer.
I knew I SHOULD have pulled it apart- but Towbin at the time gave me a 3yr/36,000 mile warranty even though GEP doesn’t. So I left it together and kept no turbo as mine was originally. I got to somewhere around 70,000 miles and BOOM goes the dynamite…err… flashing.

Oil pressure drop but still in spec, pulled the engine to drill the oilmholesand modify to accommodate the centermount turbo -In the oil pickup tube I found a couple tiny pieces of flashing. Replacing the cam bearings because of what happened to my #3 bearing. Not the fact that the seam is pulled apart- but look at the scoring damage to it - cam also ruined.

This was from the fine dust like material in the pic above on the paper that occurs when some flashing breaks off, or when sand pockets break off.
I have a video with sand pockets- two attached and one that broke off - i have to search my videos and screen shot to show. Remind me if I don’t show them.
IMG_5703.png

You can see the scoring on the inside of the bearing. On the outside- that is from when the scoring got bad enough, the camshaft bound into the bearing and made the cam bearing spin in the block.

The broken apart seam often gets revealed like this when a bearing spins- but not this far apart. That was from me. There are billet cam bearings made- but not really required or worth cost for our application. Don’t let the seam bother or distract you.
 
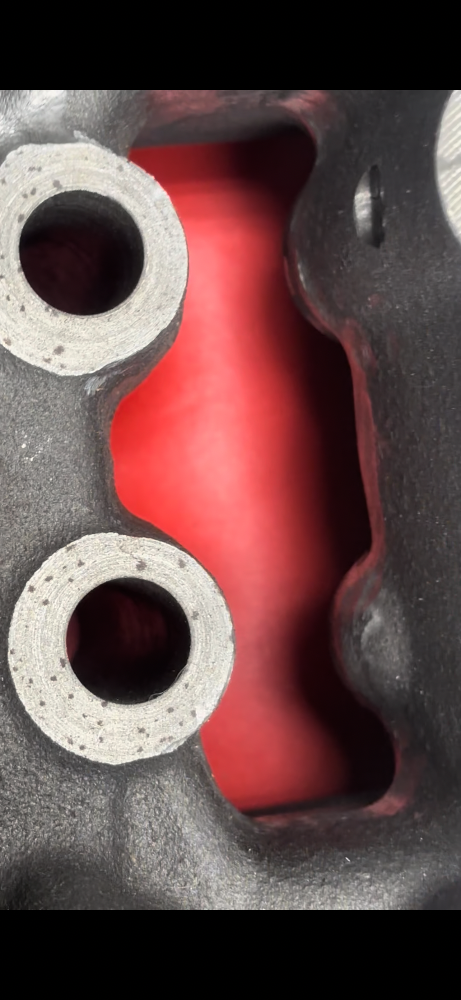
Down in the block near the lifters is another place flashing is found and needs removal. The large passage where the oil is returning from the heads to the pan- here I have a picture after I have done 99% of flashing removal and started doing a little “while I am here” improvement that helps the oil return to the pan faster.

Any of the ledges (look at before/after pic circled on head pics) where the oil has to build up a tiny pool then flow over the lip- this doesn’t just slow the oil return but is where sludge will naturally build up even with proper oil changes. The heavier stuff will be trapped, then later new clean oil with detergents will wash it out some, sending a “dirt clot” or “sludge clot” down to the oil pickup tube. It first goes through the oil pump causing wear, then through the oil filter where it hopefully gets trapped. But if any happens to hit the spinny crankshaft along the way… well another possibility (all be it slim) that excess wear or damage can occur.
Removing the tiny lip of metal in each location through the engine is just a little more assuring that the carbon/ sludge makes it way in a non concentrated form to the filter while it is a couple particles your eye can’t detect vs a build up to the size of a BB when it dislodges 4 years down the road.

The red circles are before and after removing shots of a tiny seam that will overtime be one of those “sludge trap”. So removing takes about 90 seconds, stops build up and helps faster oil return to pan. The oil is doing no good just sitting there. As it pours down across the engine it absorbs heat and gets the heat to to oil cooler while getting there slightly faster in a smooth stream rather than fighting obstacles keeps down aeration and fights oil starvation.

The yellow circle is just showing opening up the drain hole to easier transition. Eliminating the sharp edges and a small puddling area. That spot (2 per head) takes about 3 minutes each.


IMG_5714.jpegIMG_5712.jpegIMG_5709.png

This last picture- unfortunately I don’t have a “before” and can’t access my GM 6.5 in my shop right now. I have all the 6.5 stuff buried because I am doing the 5.3 tahoe at the moment. If others have an open block they can show a comparison- please do.
 
I really suggest looking into some of the higher quality engine builders that make videos and watch their details. Removing flashing, improving oil return flow, breaking the edge.

This is two random “shorts” how simple it is to remove the flashing.

 
How it is done in modern factories isn’t often shared because of trade secrets- basically Toyota doesn’t wanna share their system with GM. But here is the jist of why it isn’t a problem in modern manufacturing
 
Here is another random one. I know there are some excellent videos of race legends that show how to, & show porting oil passages & such. But maybe they are gone so they can sell the info? Anyways- i watched this guy’s one video - he doesn’t show anything crazy wrong. It should give the idea.

That video link won’t work.
But look up guys like- Ed Pink, Keith Black, Bill Jenkins, John Lingenfelter, there is more out there but these guys all had books or videos walking you through how to do these things easily.
 
Last edited:
Thanks Will that is good info for when I get mine apart. Looks like I’ll be stripping all the parts out of the heads and block.
 
Back
Top