• Welcome to The Truck Stop! We see you haven't REGISTERED yet.

    Your truck knowledge is missing!
    • Registration is FREE , all we need is your birthday and email. (We don't share ANY data with ANYONE)
    • We have tons of knowledge here for your diesel truck!
    • Post your own topics and reply to existing threads to help others out!
    • NO ADS! The site is fully functional and ad free!
    CLICK HERE TO REGISTER!

    Problems registering? Click here to contact us!

    Already registered, but need a PASSWORD RESET? CLICK HERE TO RESET YOUR PASSWORD!

Condenser

THEFERMANATOR

FRANKENBURBAN
Staff member
Lead Moderator
Messages
10,563
Reaction score
5,740
Location
ZEPHYRHILLS FL
Recently my compressor grenaded in the Burb, so I ordered all new parts to go back in. I ordered an APDI/PRO 7014544 condenser because I have one in my Tahoe and it's the largest drop in parallel flow condenser available for these trucks, when I opened the box, a Spectra 7-4721 was inside the box(I have another thread on this matter), the 7014544 is a 1" thick core, the 7-4721 was under 7/8" so I sent that condenser back, and ordered a UAC CN1635PFC. It's a thinner core(roughly 3/4"), but is 5" wider, and only about a 1/4" shorter.

I looked at Leroy's thread( https://www.thetruckstop.us/forum/threads/slight-redesign-of-a-c-system.43197/ ) and he used a 00-13 dual ac GM condenser. I considered it, but if you look at the fittings on it, I would have to have them cut off, and fittings welded on right at the core to have any hope of fitting it in with all the stuff I've already done to fit the intercooler in. And I would only gain an inch of height which may cause it to interfere with the supports I welded in.

I have 2 ideas in mind for how to connect the UAC to my stock lines. Either use the metal lines off my old condenser and have adapter fittings welded on, ir coldhose shows metric fittings to connect to my old lines and then I can use a #8 & #6 fittings to connect to the UAC. I will figure that out next week hopefully.

The UAC CN1635PFC
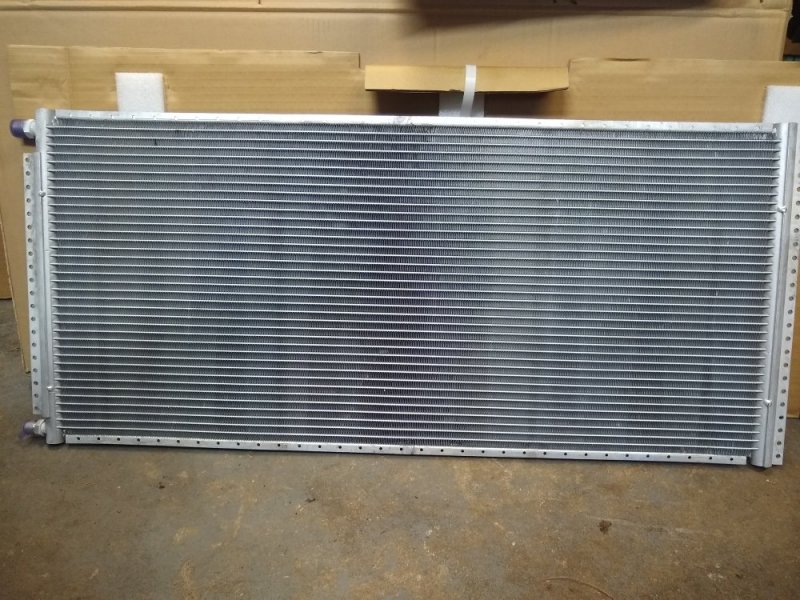
IMG_20211124_151554024.jpg
A stock 94-02 single air parallel flow condenser(I don't have a dual air serpentine left around) for comparison.
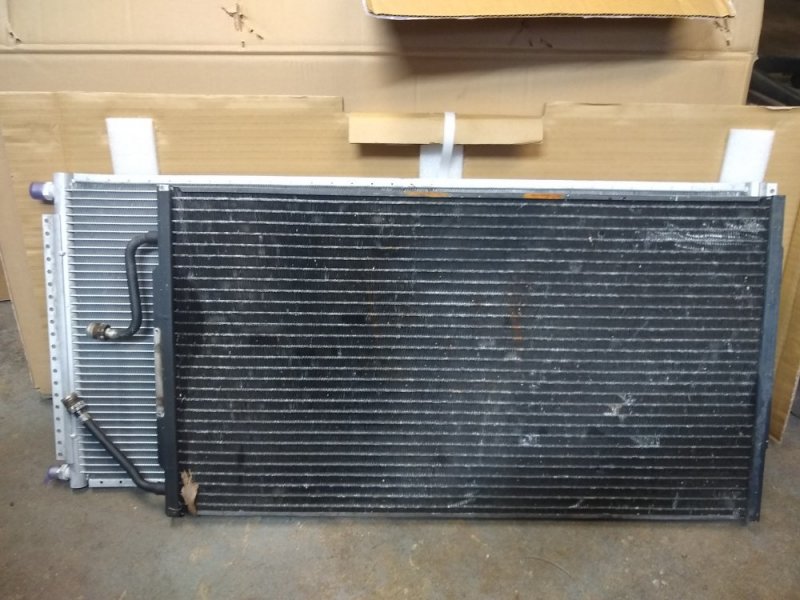
IMG_20211124_151425975.jpg
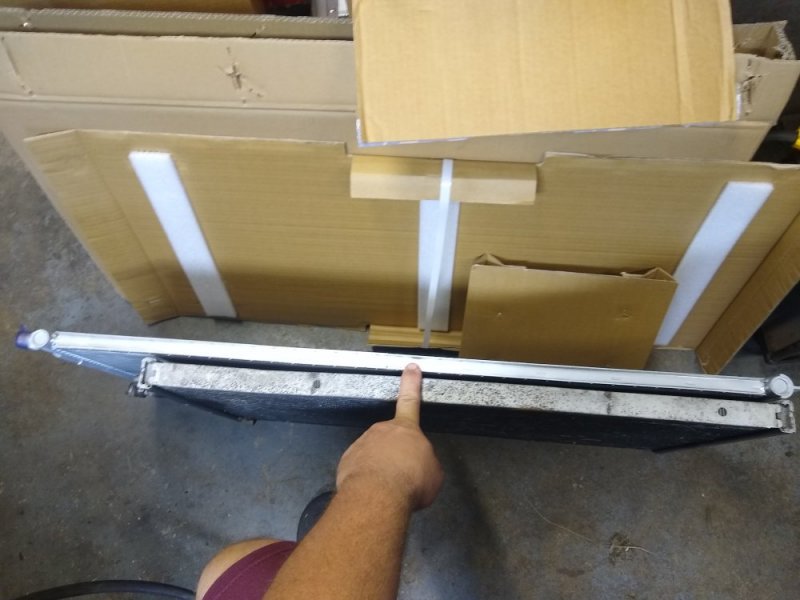
Thickness difference.
IMG_20211124_151436286.jpg
Modern parallel flow design with 8mm tube spacing. You can see how many more cross tubes there are in the modern cooler. And the UAC has universal mounting rails on all 4 sides.
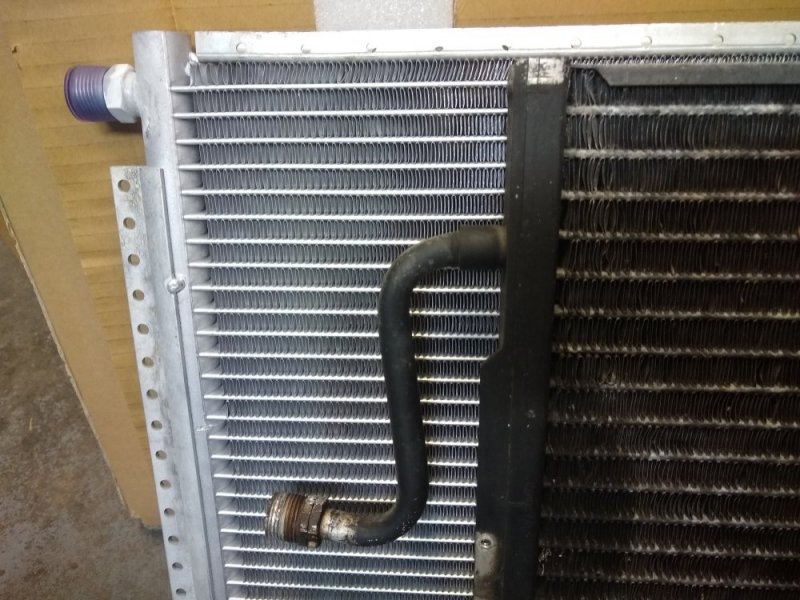
IMG_20211124_151453137.jpg
 
Last edited:
Here's 1 setup that will work, but in this configuration I lose the pressure port that 95's used for the high pressure activated switch that forces the system to inside air when the high side hits 370. I can use a short piece of hose to close couple them, and it will be a REAL close match for the stock hookups.
IMG_20211204_162120332.jpg

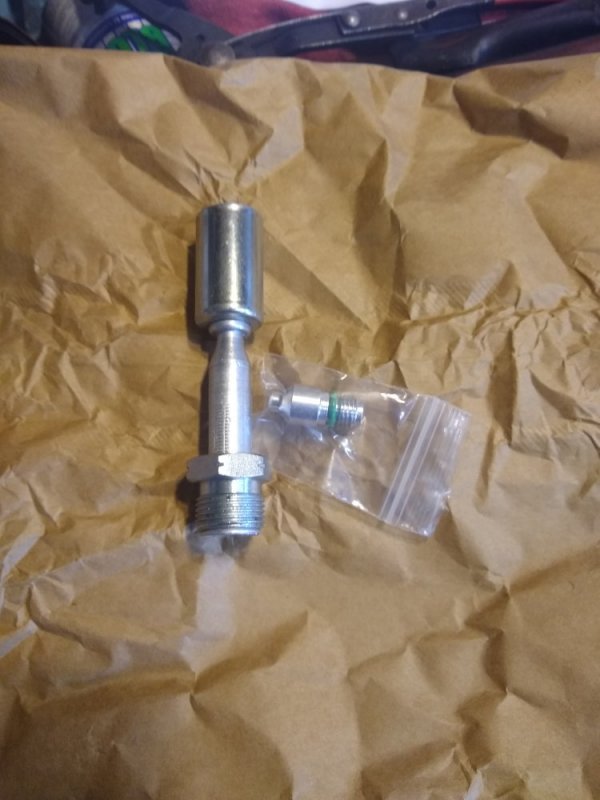
Losing the high pressure switch shouldn't be a big deal, but if I feel bold, I also got a weld in m10x1.25 switch port I can add in to retain the switch with this setup. This fitting has enough tube I can braze it into it, but I'm hesitant to mess with this tube when it was the ONLY one I could find in the whole USA.
IMG_20211204_163646729.jpg

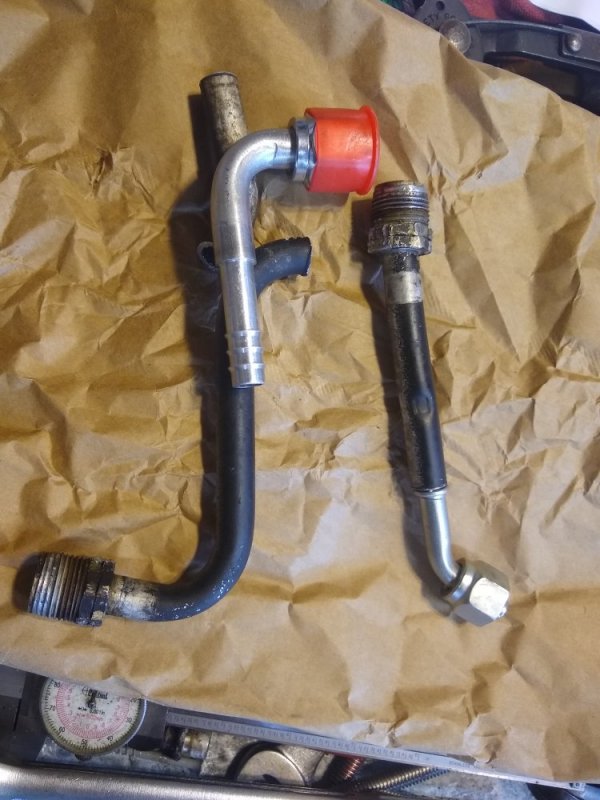
Or my last option is to cut the tubes off my condenser that is in the Suburban now as it has the switch port on them, and braze fittings into them like this(these tubes are for demonstration only).
IMG_20211204_163737211.jpg

So I have options for how to hook it up, just have to pick one and go with it.
 
Looks good!

I ran onto some OEM Harrison dual air condensers out of a few 94 and 95 Suburbans in the junkyard in Idaho, I picked a couple up and intend on swapping them into at least the crew cab project pickup (not in signature yet, a 95 CCLB) as its is mushed over and full of crap, and the compressor is failing. THe dual air units look to be coarser fins which will hopefully boost air to the radiator as well.

What changed on the condensers in 96? Rock auto only shows 94-95 as one part number, and 96+ as another. Rock auto also doesn't show different condensers between pickup and SUV for neither 94-95 and 96+, I assume the thick one was discontinued and only the pickup spec one remains? If so, pretty cool that I was able to find some originals!

I havent pulled a grille off to do any measuring (below zero with windchill right now) but I wonder if the lower mount that is welded to the core support is any different between pickup and SUV, or if its the same and the rubber insert is the only thing that changes. I'm anal enough I'd swap a core support just to have the correct mount... lol
 
I like the extra length on that condenser, on mine, there is a gaping hole in the front where the condenser ends and the tubes come off to connect to the rest of the system. this is allowing air being pulled from the fan to get sucked around the condenser not through it.

I would love to see this progress through for the end result :)
 
94, 96-02 are the same condenser, 95 is a 1 year only unit. The 95 condenser can be used in 94+, but the 94, 96-02 will not work in a 95. 95 has a m10x1.25 pressure port for a high pressure activated switch that forces the ac to recirc mode, 94 didn't use this switch, and in 96 they moved the switch closer to the compressor in the high pressure line. You can still buy the dual air condensers brand new from UAC, part #CN4544PFC(they list them as 2nd design or w/o police package which should mean 2 AC's). TYC lists it as 4721 and GPD shows 4720C for the thick serpentine style

GM used a 1 3/8" thick serpentine condenser on dual air Burbs & 4 door pickups and an accumulator that is roughly 2 inches taller(this is why 4 door pickups hold a 1/4 lb more charge), but it wasn't a 3/8" round tube, instead it was a thick, flat extruded tube with multiple ports through it like a parallel flow uses. All others got a 1" thick parallel flow condenser that had roughly 10mm tube spacing. APDI(7014544) makes a 1" thick parallel flow condenser that uses 8mm tube spacing. I have one in my 2 door and it works GREAT, but when I tried ordering a replacement, a Spectra came in the box that was only roughly 13/16" thick, hence why I found this one. Unfortunately other work and my health has kept me sidelined for months now(they think I tore my left hip abductor muscle out of my groin, probably going to need a replacement hip, and I'm waiting to see a Dr for my L5 to S that is paralizing me).
 
Last edited:
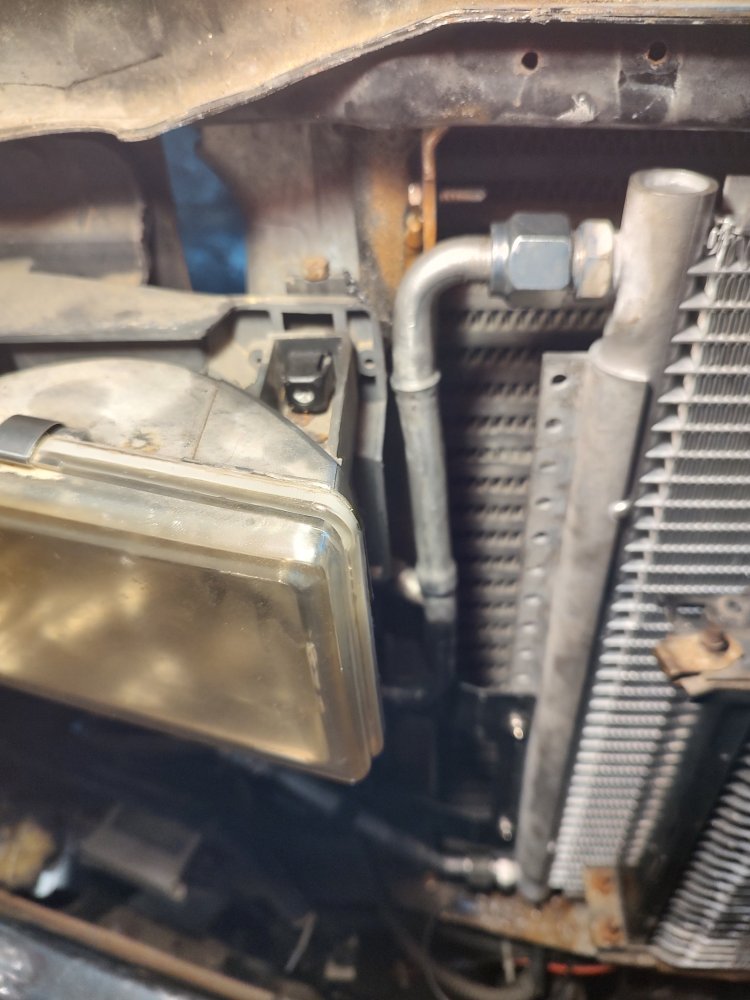
Guess I need to update this post. I did finally get around to getting this condenser swapped in. I ended up using a combo of tubes & brackets off my old condenser, an old evap, and some aluminum ac hose ends to build adapter lines to connect the factory lines to the condenser so that nothing is chopped/hacked up. I used some of the mounts off the old condenser & fabbed up some new upper mounts that hook to the new condenser, but use the stock mounts still. So far it seems to be working VERY well.

I still have to tweak the charge as the new parallel flow condenser holds considerably less charge than my old piccolo condenser, or the stock serpentine condenser did. So far it runs really low head pressures idling, I was only running about 200-205/32-35 idling with the front on fan 3 and the rear on medium. I don't know if this is a combo of the new technology condenser, or the fact the new condenser takes up ALL of the real estate making it so the air has no choice but to flow through it.

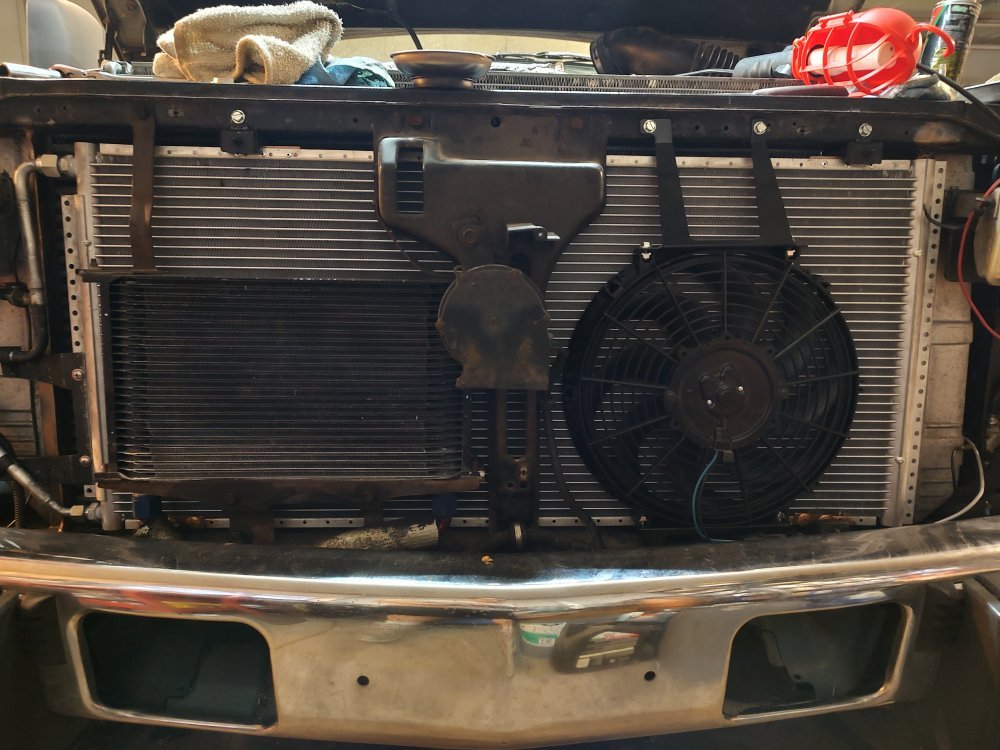
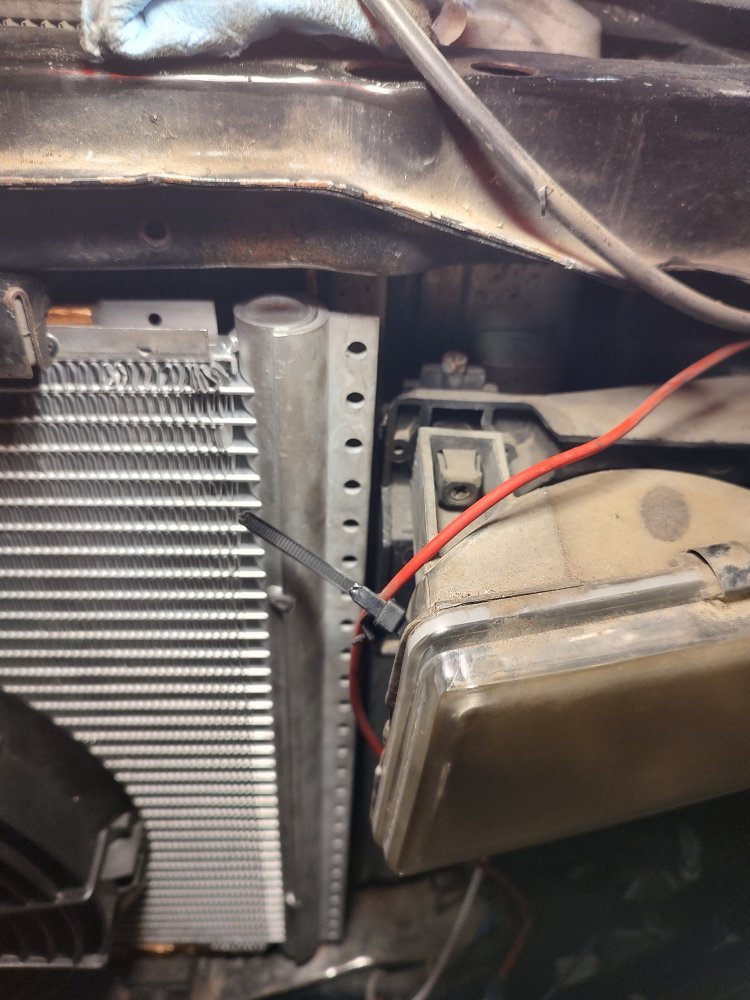
As you can see it takes up ALL of the room, I ended up having to relocate my power steering cooler to inside the bumper because there isn't even a 1/4" of clearance on the headlights.
IMG_20230707_202808582_HDR.jpg

As you can see, there is not much room at all left. And you can see how I built my lines up out of spare pieces and an aluminum hose end brazed together.
IMG_20230707_202835017_HDR.jpg

No room left for a power steering cooler.
IMG_20230707_202823685_HDR.jpg

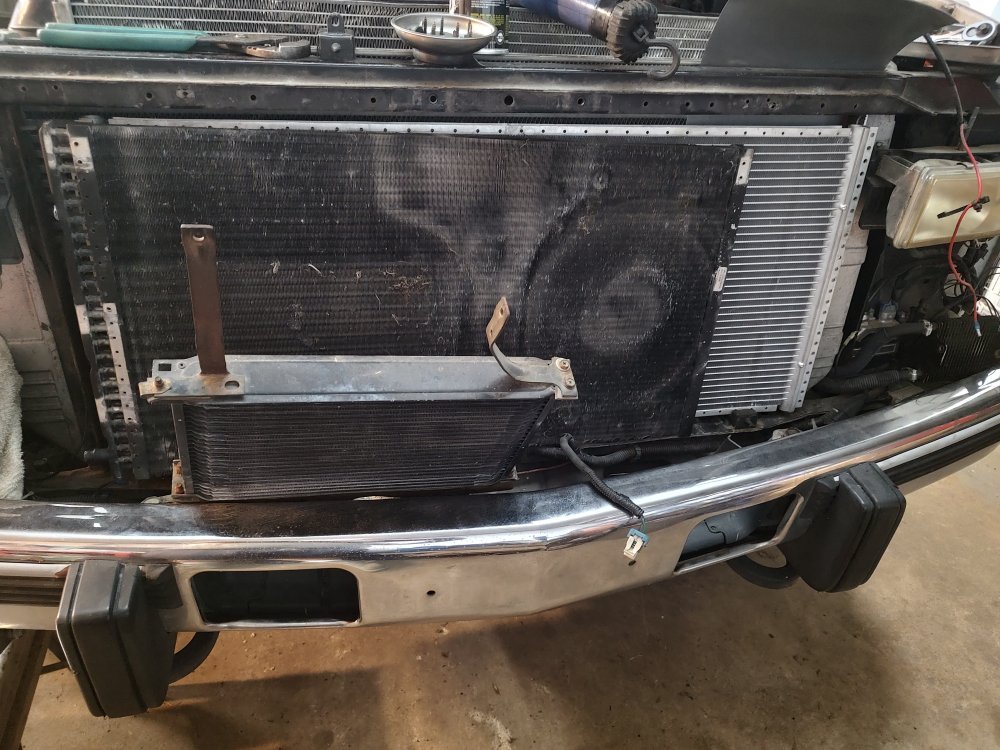
Here's my old piccolo style condenser laying in front of the new uac unit. A good bit of size difference between them.
IMG_20230627_213313207_HDR.jpg

And for those interested, the al822 brazing rods are EXCELLENT for brazing with. With just a little practice I figured out how to use them and make nice bonds. They do leave a nasty flux powder you have to remove afterwards though. And you will also need a swaging/expanding tool to join the pieces of tubing as they have to slide together with a collar to braze to.

 
Last edited:
As an Amazon Associate we earn from qualifying purchases.
@THEFERMANATOR That looks awesome. I couldn't help but notice that you must have relocated your oil cooler to install a electric fan. as some point I plan to attempt relocating my trans cooler to fit between the condenser and the radiator. I was reading back in your thread and also looked at the part numbers you mentioned to me, I will at some point need to replace my condenser and the liquid line going up to the evap since someone before me chopped off the portion where the orifice tube installs and used one of those repair kits for it. I have been wanting to get my AC colder for a while. right now I can get it to blow right at 50 deg out of the vents, but the cab really never cools down. need to gut and install some insulation and sound dampening solution.

anyhow since my rig is a 95, the one year only that had several diferences compared to the other years, what would be the suggested condenser part number I should go with? I have one that I pulled from a scrap yard that looks to be a parallel flow unit I was going to use, I will have to post up a pic of it. I think it's the same width as the factory one I have installed, but has the high side sensor port and the orifice tube section attached like mine should have.
 
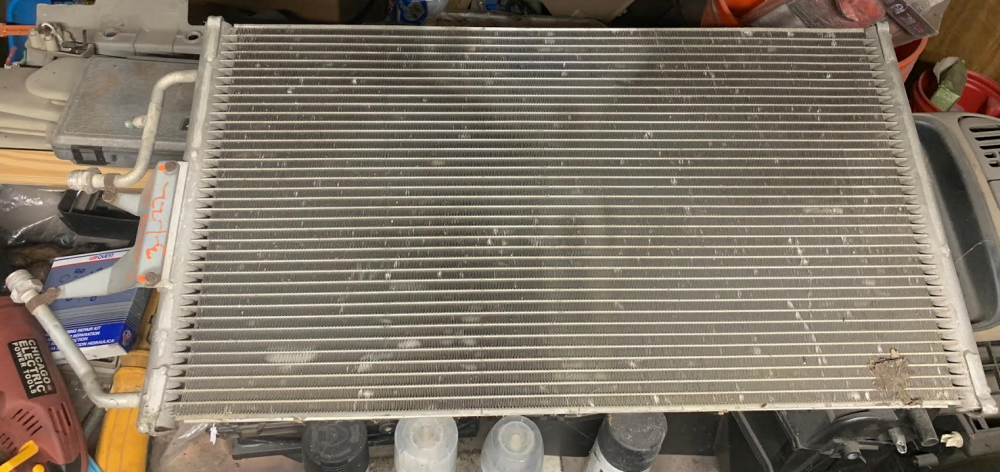
I dug the condenser I have out and took a pic. (don't mind the disaster in the garage) it looks like it is a parallel flow unit. can y'all confirm from the looks?

View attachment 82793
That is a parallel flow, but not the modern design. Fyi, parallel flow condensers cannot be properly flushed, so if there is ANY question about it's condition, replace it. The apdi/agility 7014544 is an excellent factory replacement condenser and is what I run in my Tahoe that puts out refer temps out the dash vents.

And mine is Duramax swapped, so no external oil cooler, it's built onto the block at the oil filter housing.
 
Probably a silly question, but for those of us with the PS cooler in the frame rail, there shouldn't be any concern about space, correct? I can't remember but think everything runs under the radiator support...

I just replaced my leaking rear a/c lines and remember thinking about this post. Even with a brand new charge it's hard to get the interior cooled down on a hot day. Unfortunately, I don't have any brazing skills so I'd have to find a shop to do the custom lines bit.
 
I'm not sure about the PS cooler locations, mine is mounted up on the radiator support upright on the drivers side. just a single loop with fins, but it's in a place that doesn't get any air flow. I ended up installing a trans cooler temporarily out on the grill guard due to fluid temps and pump noises. that made a world of difference on the PS system.

as for the condenser my factory one covers all the way over the radiator on the drivers side but has a large gap on the passengers side where it could be a bit longer in that area. the one Ferm mentions should extend over that area for more cooling or air flow over it.

iirc it was ether Will or Ak that mentioned to relocate the factory trans cooler that is on the passenger side to go in between the condenser and the radiator using an aftermarket cooler which will give you the room to mount a condenser fan with the factory bracket from a 454 gas truck. wire it into a fan pressure switch. if there is not any extra ports to install one, get a trinary switch installed (two pressure switches in one) so that one leg of the switch controls the factory compressor cut out side and the other leg of the trinary switch for the fan. just be sure to run the fan through a relay for the amp draw.

you can wire the fan to run full time when the ac runs too but still run it though a relay.

are you sure you gave it a full charge of 134a? units with rear air need more than for a front only truck. mine takes about 36oz for a front only system. your's should take 48oz iirc. an easy way to check the charge level is to do a static pressure check. with the vehicle off and it's best to do this when it's not hot under the hood (been sitting most of the day) connect your gauges and take a reading. Then look up the 134a temp pressure chart. you will also need a temp probe to get the outside ambient temp. so say if it's 100 degrees outside, the ac pressure on both gauges should read 124psi +/- 1psi that will give you an idea of how close you are to a full charge. it's not to be used as an exact reading, every vehicle will act differently but this will get you in the ball park. GM decided to put the stickers for the amount of charge on the accumulators which get replaced and the sticker is gone. also making sure it was fully vacuumed of air also makes a big difference.

Things to check: is you fan clutch working properly? given it doesn't know when the ac is on so it only reacts slowly to the hot air from the radiator, does hardly anything for the ac. when you had the leak, how long was the system exposed to air? moisture could have gotten in from the humidity causing issues. when you had it apart, did you pull the front orifice tube checking for debris or replace the expansion valve on the rear unit. I have seen the expansion valves work fine until the system lost it's charge, then mysteriously get stuck and not work anymore. connecting gauges and seeing what the operating pressures are can help determine that.
Single air gmt400's that were factory r134 are 2 lbs(32 oz) or 2.25 lbs(36 oz) for 4 door models, and dual air models were 4 lbs(64 oz) with the .062 front orifice or 4.25 lbs(68 oz) for ones with the .072 orifice. These are the factory specs, so take them as a guideline as replacement parts many times are different dimensions, people mix and match single or dual air accumulators without knowing as some manufacturers use a 1 size fits all, or different condensers get installed which can change the system capacity by over a pound. A good example was I was running a piccolo tube & fin condenser before, and it took over 5 lbs to fill my dual air system with a .072 orifice tube. I currently have about 3.5 lbs in mine, but I need to get an accurate clamp on temp meter so I can measure the subcooling of my condenser to see how it is doing, and then measure the temps going into and out of my evap to compare against my low side pressure to see where I'm at.

Probably a silly question, but for those of us with the PS cooler in the frame rail, there shouldn't be any concern about space, correct? I can't remember but think everything runs under the radiator support...

I just replaced my leaking rear a/c lines and remember thinking about this post. Even with a brand new charge it's hard to get the interior cooled down on a hot day. Unfortunately, I don't have any brazing skills so I'd have to find a shop to do the custom lines bit.
As db said, the power steering cooler in stock form is mounted behind the grill right next to the drivers side headlight. The condenser I'm running is a good bit bigger than the opening in a stock radiator support. Mine is dmax swapped and has a gutted core support which is how I fit mine. When you did your ac, did you replace any other parts? Does it have a condenser that is big enough for dual air? Did you replace the expansion valve? There is a screen inside of it that plugs easily. And then all the things db mentioned.

AC is pretty simple, the liquid refrigerant absorbs heat from the cabin through the evap at low pressure, the refrigerant is heated and turns to a gas, the compressor sucks that heated refrigerant gas in, pressurizes it which raises the temp of it further without adding actual heat, it leaves the compressor as a high pressure heated gas, enters the condenser where it is cooled down and turned back into a liquid, it goes to the metering device which drops the pressure of the liquid which chills it, and then repeats the process. If it's not working, something is interrupting one or more of those processes. Either not enough refrigerant to fill the system, too much is in it insulating the lines so the refrigerant cannot absorb the heat or shed it, or the heat exchangers(condenser/evaporator) are not doing their jobs. You can do alot of AC diagnostics just by feeling the lines to see what is hot, what is cold, and what is and isn't hot or cold that should be.
 
Single air gmt400's that were factory r134 are 2 lbs(32 oz) or 2.25 lbs(36 oz) for 4 door models, and dual air models were 4 lbs(64 oz) with the .062 front orifice or 4.25 lbs(68 oz) for ones with the .072 orifice. These are the factory specs, so take them as a guideline as replacement parts many times are different dimensions, people mix and match single or dual air accumulators without knowing as some manufacturers use a 1 size fits all, or different condensers get installed which can change the system capacity by over a pound. A good example was I was running a piccolo tube & fin condenser before, and it took over 5 lbs to fill my dual air system with a .072 orifice tube. I currently have about 3.5 lbs in mine, but I need to get an accurate clamp on temp meter so I can measure the subcooling of my condenser to see how it is doing, and then measure the temps going into and out of my evap to compare against my low side pressure to see where I'm at.


As db said, the power steering cooler in stock form is mounted behind the grill right next to the drivers side headlight. The condenser I'm running is a good bit bigger than the opening in a stock radiator support. Mine is dmax swapped and has a gutted core support which is how I fit mine. When you did your ac, did you replace any other parts? Does it have a condenser that is big enough for dual air? Did you replace the expansion valve? There is a screen inside of it that plugs easily. And then all the things db mentioned.

AC is pretty simple, the liquid refrigerant absorbs heat from the cabin through the evap at low pressure, the refrigerant is heated and turns to a gas, the compressor sucks that heated refrigerant gas in, pressurizes it which raises the temp of it further without adding actual heat, it leaves the compressor as a high pressure heated gas, enters the condenser where it is cooled down and turned back into a liquid, it goes to the metering device which drops the pressure of the liquid which chills it, and then repeats the process. If it's not working, something is interrupting one or more of those processes. Either not enough refrigerant to fill the system, too much is in it insulating the lines so the refrigerant cannot absorb the heat or shed it, or the heat exchangers(condenser/evaporator) are not doing their jobs. You can do alot of AC diagnostics just by feeling the lines to see what is hot, what is cold, and what is and isn't hot or cold that should be.
Very good to see You posting, especially being this close to a hurricane landfall thats suppose to do a direct hit on Your area.
Please keep us informed of how You are doing and if there is anything You are in need of that we can get shipped over to You.
 
Back
Top