• Welcome to The Truck Stop! We see you haven't REGISTERED yet.

    Your truck knowledge is missing!
    • Registration is FREE , all we need is your birthday and email. (We don't share ANY data with ANYONE)
    • We have tons of knowledge here for your diesel truck!
    • Post your own topics and reply to existing threads to help others out!
    • NO ADS! The site is fully functional and ad free!
    CLICK HERE TO REGISTER!

    Problems registering? Click here to contact us!

    Already registered, but need a PASSWORD RESET? CLICK HERE TO RESET YOUR PASSWORD!

ARP main stud instructions

Will L.

Well-Known Member
Messages
18,531
Reaction score
35,032
Location
Boulder City Nv
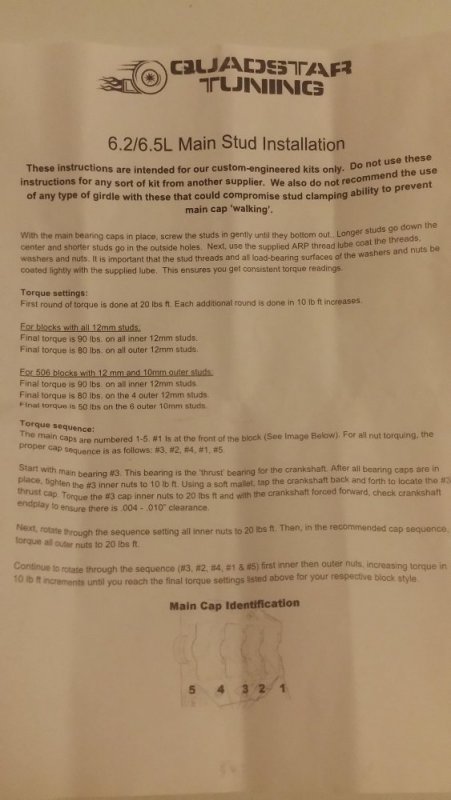
Anybody save their ARP main stud instruction sheet? Trying to get the block to the machinist today...

I got my latest installment if Leroydiesel.com parts this week.
This one was ops extension hose, head studs and main studs.
But as luck would have it, mainstuds sheet is mia.

I called Leroy, no luck- usually inside box. Left messages with quadstar and ARP.

I spoke months ago to John @ quadstar, he took a block to ARP after the many discussions of which studs to use. They worked out the best ones and he said thats why he holds exclusively the ARP main kit- his expense with ARP. So I am not sure ARP will release info until any exclusivity's are done.

Back when i was playing 6.5 go fast, we had a automotive mechanical engineer in the group. He determined stud sizes, material, tempur, and torque for us. I learned way back then too loose is obviously no good and too tight causes all kinds of wacky issues. If a person can repull the bearings and examine after break in, they can actually “tune” the desired torque based on wear patten. But I don’t want back in this engine ever if at all possible. So...

That is why I spent 4 bills on main studs instead of just doing the “X” is good enough factor.

ARP has a generic torque chart (see pic) but it you notice- ARP calls for 90 on the head studs. (Too much torque causes issues long term). But look at the possible loads the stud can handle. WAY more than the heads can handle.
Infact, I used it when I made my homemade studs for the i take manifold adapting van intake to truck block. Got no where near close to minimum and DESTROYED the gasket and cracked the first intake I had. So lessons of the past relearned.

I dont want “well I used X and it is still running good”. I could guess myself and just buy one-sy two-sy and saved a lot trying the learning game.
Post here, pm me, whatever you prefer-
THANKS!5AB1C9AA-A91A-4E13-B627-4F3B28DAF68A.png

The headstud instruction sheet is example of what all their sheets look like, and also to show the torque ARP says vs the generic sheet.32F96E52-8AD0-43E9-9059-9DEBEC77495F.jpeg
 
Sigh ...
Good thing about living so close to Vegas is there are many reputable machine shops around. I spoke to 6 of the best known shops. (Dang this gets expensive!). Anyways...

4 shops when I sent pic of the paper and it NOT being ARP labeled instructions- the shops flat out refuses to bore/hone the mains under those instructions. The liability is too high for them to risk instructions from a company they haven’t heard of. For me to sign off the machine shops liability on 2 of the shops from $350 up
To $500-550 for them to do a letter waiver through their lawyer. Son of a

So.... waiting on return call from John @ Quadstar...

Really dont want to return the ARP and go Milodon or someone else.
 
Calls are slow in the busiest time of year. Always feel free to message through here or email and we'll get back to you, even over a weekend. Sorry for the delay in getting that to you.
 
Mostly on topic as it deals with the head studs. Is there a better way to seal them in the block. I just had to pull my engine due to coolant contamination. The sealant I used had failed. Another engine I had used blue lock-tight but still had extremely slight seepage past one or two studs but not enough to worry about.

So should I just lock-tight them again or is there a better way?

P. S. If anyone needs any studs measured I have full access to every bolt in the engine right now.

Tons of hours with the different manufacturers for this - worth the long read.
 
Sigh ...
Good thing about living so close to Vegas is there are many reputable machine shops around. I spoke to 6 of the best known shops. (Dang this gets expensive!). Anyways...

4 shops when I sent pic of the paper and it NOT being ARP labeled instructions- the shops flat out refuses to bore/hone the mains under those instructions. The liability is too high for them to risk instructions from a company they haven’t heard of. For me to sign off the machine shops liability on 2 of the shops from $350 up
To $500-550 for them to do a letter waiver through their lawyer. Son of a

So.... waiting on return call from John @ Quadstar...

Really dont want to return the ARP and go Milodon or someone else.

Just spoke, face to face, with the owner of the local engine builder/machine shop. He showed me my block, freshly bored and decked, and we discussed what else I wanted done. Part of the reason I was there was to drop off the main stud kit, along with the head stud kit. I brought up the subject of line honing when installing the studs. He said; "No problem".
 
Just spoke, face to face, with the owner of the local engine builder/machine shop. He showed me my block, freshly bored and decked, and we discussed what else I wanted done. Part of the reason I was there was to drop off the main stud kit, along with the head stud kit. I brought up the subject of line honing when installing the studs. He said; "No problem".

You do know the stud threads into the block LESS than stock bolts do don't you?

In my book that is not a good thing....

EDIT... one of the studs is shorter...
 
Last edited:
This is gonna go full book, tune out or get popcorn...
Give me sometime between posts, I type slower than a stock 6.2 overloaded up a hill...

So want to update folks. Need to caution anyone not familiar with studs so they know what to watch for.
The stud kit didn’t work for me, But first:

Thanks to Leroy for a quick refund-it showed up and my $ was returned right away. I would say without question- but he did ask. Don’t get me wrong- never was a hesitation he would take them back and refund payment. He asked questions about possible issue so he knows whats up for future customers and himself.

I would continue to wait for a response from John, but I have 2 people with main studs awaiting a response before the build their engines, another in the middle of his build, and 2 more wanting to order parts. John, no disrespect here. I appreciate your efforts to put together a kit, investment of money to do so in order for all to have more 6.5 options. Hope your racing last weekend went good, love the tach shot!

I spent some descent time on phone with multiple folks at ARP in tech dept, custom made fastner dept,etc.
Good folks and willing to help- a word of warning:
Talked to 5 guys there, all but 1 always agree on everything without even talking to each other most the time, except zach. Infact zach disagreed with himself a couple weeks apart. Seems nice but no where near the knowledge and answers of the others. Al and Sam are the 2 “go to” guys when things get sticky.

We all could measure the block and get studs ordered off the shelf or custom. I went w/ the kit’s added expense since John of Quadstar took them 6.5 and had ARP determine proper sizing and specs, etc. so I thought.

John and Leroy carry each other’s products to offer their customers the most options available. And no disrespect to John either- I don’t think he purposely mislead the product. I called Leroy, then John before purchasing. I was or i got misunderstood on details.

Stud fitment is good for MOST 6.2 6.5 blocks. But ARP did no shoulder fitment, no load cell testing, no pull testing. And without these, they could not determine proper max torque spec or procedure.
In clarifying with John, after problems found he said ARP helped in stud choice, but said ARP did no block testing. The specs are determined by John. And since I believe I have more experience with studded and girdled engines than he, I wont follow his suggestions. I only wish I knew that to be the case before purchasing. John seems a stand up guy and not out to wrong folks.

His spec and procedure is not far off, and by itself is not bad conceptually imo or that of the ARP guys I spoke to. Just understand I am a finicky, detail oriented guy. And when dealing with something that is to improve on a dangerous area of the engine, would rather stay stock than gamble with an “improvement” that has potential to do more damage than good.

ARP was very clear, No one has any exclusivity deal for any 6.2/6.5 parts from them. They will release NO spec unless they do all the steps to produce a kit they stand behind for sale to the public. Some details concerned them.

When talking with ARP (4 guys) regarding the spec and procedure given by John they all agreed with my impression there is error and exclusion in his instructions, along with risk. Torque procedure and final values based on my concerns I explained for this engine.

I worked with them and their custom dept, for some different studs. I have called in some favors from a couple mechanical engineers. Also I am working on a 4th project with a mega rich dude that has 3 hummers, and just bought a hmmwv that he will keep non-p400. He may eat cost of failure testing 6.5 block stud combos which would determine exact torque spec. If he does, he will allow me to share the info. This is provided he doesn’t cummins or dmax the hmmwv. My fingers crossed, looks like an $8,000 investment.


Mine is Nov ‘04 GEP. I found Aug ‘04 GEP and a ‘98 GM that was different, March ‘04 GEP and ‘97 GM that are the Same. Even more annoying, found same and different 6.2 blocks. So measure and find solutions before ordering parts. It seems the range of tolerance by block mfr is large. Also measure EVERY HOLE.

For me to find (and describe) the issue, I did some measured drawings. DO NOT ASSUME YOUR ENGINE IS IDENTICAL!!!

The colored cut out “studs” in the pics show a good example hopefully without giving away info for anyone to undercut John’s investment. The only spec on the stud I will post here is the outside diameter range given to me over the phone by ARP. I didn’t measure it when I had them. John’s kit should work ok for most engines- just know what to look for and use your judgment on spec, procedure, fitment.

More to come within the hour...
 
Just realized Quickest answers / issues should have been first.

DO NOT LET THE SHOULDER OR SHANK OF THE STUD CONTACT THE BLOCK.

DO NOT LET THE BOTTOM OF THE STUD CONTACT THE BLOCK. ALL THE WAY IN, UNSCREW 1/8 - 1/4 TURNOUT. NEVER APPLY ANY TORQUE OF STUD INTO BLOCK FOR MAINS UNLESS IN FULLY CUSTOM STUDS ARE DESIGNED FOR IT. Many copy this being done in race engines like top fuelers. The bottom of the hole in block and stud are both made special for this. These studs will sideload from it. ALSO IT WILL AMPLIFY VIBRATION TO THE MAIN WEB, which is a major issue for us. If any loctite is used, final nut torque must be achieved before set up time, no disturbance afterwards. If you do not use loctite or similar, you MUST use ARP lube on the threads. DO NOT use these studs dry since we have soft bottom ends per ARP.

According to multiple ARP guys, any of these rules broken may be worse than just using stock bolts. The rest is subjective to situation, these are in concrete.

pic 1 is MY block with main cap on it.
Pic 2 is MY block with main stud kit in it.
pic 3 is the theoretical perfect block with main stud kit in it—with exception of bored holes, explained later
pic 4 is my block with factory bolts in it
pic 5 studs from kit showing diameter of shank, depth of thread to shank.

Look closely at how high the studs sit in my block. The shoulder is hitting a the block face on some and a hair under block face on others.

The problem is the hole that is drilled in the block before threading. Note the dimension range I show. Note the hole dimensions of the cap holes. Some blocks have the block hole above threads even slightly larger than the hole in the cap. If your engine has the larger hole so the stud never touches it- BOB’s your uncle! Run them happily. Just determine your final torques first and work your way from there.

A bit more...
 
If the studs fit your engine = can nearly bottom out with light shoulder or shank contact:
It is perfectly ok, desired for all holes actually, to lightly chamfer the edges. Sharp corners enhance cracking. Inside or outside edges, holes, etc should always be chamfered, rounded edges.

If you have a brand new block and need to enlarge the blank area above the threads, just be sure to not hit the threads when doing it, with one caveat...

If you are like me running a block that has already heat cycled multiple times, the caveat is a much larger concern...

Drilling or machining it larger will work harden the metal more in its already weakest spot. And work hardening increases the brittleness a lot.

So the possible gains of strength could be offset, possibly to a negative. Its up to you, your machinist, and your neighborhood metallurgist to decide.

I may enlarge mine. I am more likely to have custom studs made. Roughly $1000 for everything.
 
Something I meant to mention earlier and missed:

The 10 studs adjacent to the crankshaft, if I had simply install them and ran them- Only three threads per stud would’ve been holding it. I would’ve been lucky To drive 1 month before the crankshaft ripped out of the bottom of the engine.

I am all for guys and gals out there learning and doing the DIY. But take the time ask the questions learn everything and do it right the first time, for you will pay dearly for it.

I do have other information things that I could talk about with this but I’m not sure who would be interested in what, so if you have questions, fire away.

One question brought up by someone was what about the head studs and the shoulder of the head stud hitting the block.
It is best if the shoulders where the shank never hit the block anywhere. However this rule is not as crucial on heads as it is on a rotating assembly or rotating adjacent assembly. It does however become crucial to have chamfer the block rather than a tapered edge of the stud hitting a perfectly flat edge of the deck. And angled edge against a flat edge is never a good contact. It gets more detailed with a couple of options on how much to chamfer the edge based on sealing methods used.
ARP guys are familiar with the thread right up done about how to seal the ARP studs on this forum, and for legal reasons cannot endorse it, however I may have heard if you think you was well back on the phone with them this go-round from a few ghosts...
They dont make the sealant. The only sealant outside the one they resell is permatex...
 
I do have other information things that I could talk about with this but I’m not sure who would be interested in what, so if you have questions, fire away.

Keep sharing. This is interesting and 99% of people (me included) would not have measured anything and just dropped the studs in and went with it. Thanks for all the information.

Share all you want. I’m listening
 
Ok, how many threads is something that comes up.

ASE, ARP, Moroso, etc all say minimum is 7 threads on bolts or studs for full strength. You may have more threads in contact, but in most cases only 7 does any good.
Getting the studs to the bottom of the hole means approx 13 in contact, the bolts drop out after 11, studs benefit all the way to 18, but first 12 hold 95 percent- and this requires thread filler (thread locker, silicone, etc) to get any benefit above 10. Now this is one of the critical ellects of the bottom of the stud NOT torquing into the block. The lateral pretension of the stud eliminates any chance of the extra threads carrying the 2-3% that they may carry. Mind you anything above the 7 is very dependent upon the female threads being cut perfectly.
Not everyone agrees to the advantages of any threads beyond 7. And the 7 is a rule of thumb, it actually changes based on diameter, thread pitch, thread fit, etc.


ARP’s stance on tightening any of their studs in is NO. Install fully and back out 1/8-1/4, regardless of main, head, valve cover, anything. Tightening in if it bottoms out causes it to have a few possibilities:

Lateral movement. When “loose” studs will always self center, but preload can cause it to tilt slightly.

Vibration. If the stud is fully suspended by threads, all the vibration will be distributed to the threads in accordance with what percentage of load it is holding. Deeper threads hold a higher percentage than shallower threads - think pyramid shaped scale. Base is farther down holding a higher percentage of load.

Here is where tightening the stud in alters things because now instead of the stud only contacting the threads on the bottom of threads as the nut tightens while self centering, when the bottom hits, it creates small separation of at least one thread, maybe more because the force to tighten and try deepening the hole- loads the thread face differently than it would if only free floating.

When the shoulder /shank hits, and you tighten it:
Think of the lesser performance of a bolt. Negative Rotational torque and positive vertical force. You’re actually making the stud work like a bolt, so it looses some of it’s advantage. So instead of (random number, not accurate) 30% stronger, maybe only 25% stronger clamping force and block thread security.

But that isn’t the bad part. When the stud shank holds contact to the face, bad things occur. Lateral movement, think of a flag pole leaning. Ever do head studs and wonder why you can’t slip the gasket over evenly like every other studded engine can? Yup they are not perfectly perpendicular to the block face, they are in porcupine mode.
Also the load on the face of the block instead of most load deepest, you are causing some of the load to be placed on the face, and this steals it away from the bottom threads first.
Remember the vibration? This is how studs come loose easier. And of course don’t forget the biggest problem I had with the fit on mine- that shoulder hits early it means the stud isn’t as deep. Think of a flagpole you want to upgrade so it will handle more wind. Yes a stronger steel pole over the aluminum one you had before, but now instead of a 20’ pole thats 5’ buried and 15’ up, it is 17’ up with only 3’ buried. Yes the pole won’t bend, but now it is easier to rip out of the ground. Especially when you realize the shoulder in contact gets to work like a fulcrum when lateral load is applied.

When fighting things like coolant coming up the head studs, it is worth giving up the shoulder contact often because the forces the head studs are subject to is less per stud than force applied to the main bolts.
Separate 1 cylinder: 5 head studs. 4 main studs- possibly 2 are smaller diameter and less clamp force. The angle of the force pushes exactly opposite on head studs, yet an angle of mains, so it actually loads one side more than the other. So cylinder 1 pushes main cap towards even side. Then later cylinder 2 pushes cap back towards odd side. Ever wonder how cap walk gets started? Cap walk- its own section... Also how the splayed main helps. But there is an issue doing that to weak blocks- sometimes it makes it worse- you have to decide. Many love it for 6.5, I had better results a different way studs plus full girdle. FULL girdle. Make sure I talk about that.

Getting studs all the way to the bottom helps because some of the threads are worn slightly from the load they had on them before, the lower threads are untouched.

Remember the flagpole in the wind? Deepest possible pole location by full depth studs over bolts or Studs that stop early by bolt length or by shoulder stopping early.

I know I missed something on the shoulder issue, sorry. If it hits me I’ll post it.
 
3 reasons for studs.

1. Greater clamping force to withstand excessive pressure of crank ripping caps away from block- not our issue. Like ever. With out journal size and rod size- you will break a
Couple other things before this is a possibility. Ask if anyone needs more info.

2. Main webs cracking/ failing. Yep- my panic and I believe everyone else's main panic for this engine’s bottom end. Simply the deepest and most threads in contact and use the better. This is almost solely my only care for studs, balancing rotating assembly, balancing injector load, etc. Ask if anyone needs more info.

3. Cap walk. This is the secondary concern many have, legitimately so. Many others dont know anything about it, or have misconceptions of it or how to stop it. Think how would you move an empty heavy book shelf yourself. Tilt back and walk 1 corner at a time. Or if you have a body cast from shoulders down to your ankles with feet spread apart shoulder width— how would you walk? Pivot on left foot and swing the right leg around til it lands, then lift and swing the left foot while pivoting on right foot.

Cylinder 1 fires lifting that side of the main cap away from block, then cylinder 2 fires and lifts the other side...
Maybe someone can post pics of what to look for on face of cap and face of block showing wear from cap walk?

So think when cap is walking it does couple things. Twisting force bearing to crank, uneven wear on bearing, more chance of main separating from block and crank coming out bottom end allowing crank flex/ break. Basically nothing good.

More clamping force obviously holds it down more. So why not go mega diameter and kazillion tons of clamp force? Easy- gonna rip threads out of block, or pay attention now- rip main webs out of block. So anyone understand why using studs that can apply much more force against the main webs can be a bad thing?
8740 chromoly (180ksi min) or ARP2000 (220ksi) are options I am considering for the custom studs. The normal studs are 8740, the arp2000 is more expensive (additional $250-$400 over the ready $1000) would stop cap walk 100%. But block strength is a factor too. Hmmm.

So what else stops cap walk? Girdles (hey, I remembered to say this!). There are 3 types of girdles for mains. They also help disperse load from one main cap to the surrounding studs to take pressure of the one cap otherwise handling the load mostly by itself.
Keep in mind the crankshaft spreads the load first, but a girdle will absorb some of the load and bridge it to other locations.

Partial-They hit some of the main caps and may or may not contact other parts of girlde. Also May contact block or pan. So the angle iron that only hits the middle cap outside studs is good example. $

Halo, wrap, wrap around girdles. This is the most common type. It hits all main studs, is one piece, does not contact block or pan. Search about any girdle for hot rods and this is what you find. $$$

Full girdle. Like the halo, but also contacts (is mounted to) the engine block and or pan to help disperse more of the load to the block so less load is on 1 location. $$$$ Quite often the caps are replaced with the girdle having them all built in as a 1 piece unit. Think p400. $$$$$

While cap walk is a concern for any engine, higher compression and higher cylinder pressures raise concern more. Higher power and higher rpm also raise more concern. A cap has to walk quite extremely to down an engine. Shorter bearing life is a more common issue from it.

For my drawing, I left it that the cap top is the same height to demonstrate bolt and stud issues and options, However the actual heights of 1.830 and 2.515 is not exactly the same driver’s side compared to passenger.

In any girdle, getting these surfaces to an equal height means they must be machined. You simply find the shortest one, and shave the others down to that height.

Adding any girdle without doing this step is a mistake and can cause negative affects. Even if diy angle iron- get out the hand file if needed. Bolt them all touching each other to a flat steel plate and file flush them if you cant afford machine time. They will never be exact from factory. Not even billet made race caps.

With any main studs- you will need to take block in for align hone to true up the holes because studs will slightly distort the caps more than bolts do. If new caps are used, or if your caps are way out- align boring is needed. More expensive. Think honing cylinders vs boring cylinders.

Also from cap walking- often needed to fix it and always in race engines is cutting the main cap faces to true them and get them straight. This always requires align boring.

Adding girdles possibly having negative affects of clamping force of main studs.
Yes, if your machinist is a waste of oxygen. If the caps are true, the girdle is true, the clamping force of studs will not be affected by it enough for you to even hesitate until you exceed the power level at which the 8740 studs are too weak to withstand...so yeah- not with this engine.
 
This is all fantastic info, Will!! Thank you so much for taking the time to explore this topic with experts, digest the info and then regurgitate it all for us. I had never considered the issue of the shoulder of a stud contacting the face of a block and creating a side load. I will definitely be examining the main holes in blocks of any future engine I build so I make sure conditions are optimal. The comment about not boring the clearance holes in the block to accommodate the shoulder of the stud was also interesting.....I’m going to re-read that and digest it. In fact I’ll be re-reading all of this many times so I can get my head fully wrapped around it. Oh and thank you too for taking the time to make the drawings and then post them, those help to explain the text of what you’re explaining.

If you think if any other pertinent info that you know, or learned during this exploration, PLEASE share it! On some subjects it’s hard to ask a question because one doesn’t know what one doesn’t know. Also hearing one thing can trigger questions on another thing.
 
Back
Top