• Welcome to The Truck Stop! We see you haven't REGISTERED yet.

    Your truck knowledge is missing!
    • Registration is FREE , all we need is your birthday and email. (We don't share ANY data with ANYONE)
    • We have tons of knowledge here for your diesel truck!
    • Post your own topics and reply to existing threads to help others out!
    • NO ADS! The site is fully functional and ad free!
    CLICK HERE TO REGISTER!

    Problems registering? Click here to contact us!

    Already registered, but need a PASSWORD RESET? CLICK HERE TO RESET YOUR PASSWORD!

AD244 Install on 95 Suburban

JMJNet

Recruit
Messages
2,363
Reaction score
920
Location
Richardson, TX
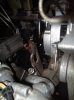
This is some pictures from installing AD244 Alternator to replace the small CS130 in a 95 (Driver Side).
Just to give people some idea if they want to replace the stock alternator.

There is a lot of thread on replacing the CS130 with CS144 and in the thread, TheFermanator always said that AD244 is a better replacement.
So, with the CS130 alternator started to get weak, I decided to put the AD244 alternator.

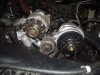
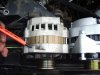
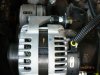
AD244 is relatively thin and it is about the same thickness as the CS130 with a larger cross section diameter.
It is only a slightly heavier than CS130 but it seems that the removal of rear bracket is not affecting anything.
AD244 has a plastic looking rear side for heat dissipation with a heatsink regulator.

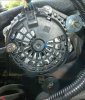
It is actually a fairly easy replacement.
All the rear bracket is gone.
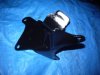
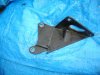
The bottom bracket lines up perfectly and it uses the same bolt, it was a 3/8"-16 bolt.
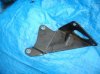
The side bracket have to be reversed as suggested by Leroy (Burning Oil) in his build thread.
It is a 10mm or 3/8" bolt hole so the hole in the original bracket have to be enlarged a little bit from the original 8mm.
I used a 10mm bolt for the side bracket with a few nuts and a fender washer.

The connector have to be replaced with the oval style connector (same as 96+ with CS130D).

So far, voltage stays close to 14V with loads (AC, headlights and stereo all on).

Here is the pictures of the install.
 

Attachments

  • AD244_1.jpg
    AD244_1.jpg
    61.7 KB · Views: 74
  • AD244_2_Side_Mounting.jpg
    AD244_2_Side_Mounting.jpg
    84.6 KB · Views: 67
  • AD244_Rear_View.jpg
    AD244_Rear_View.jpg
    76 KB · Views: 65
What is the rated amperage of this unit? I need to upgrade my alternator and at one point had a cs144 but due to my belt driven hydraulic setup the larger cs144 did not fit, i would have had to make many custom brackets. I cant do that since i dont have a welder. Wonder if this will fit?
 
Burning oil snapped the case of an alternator clean off without the rear bracket attached. The rear bracket is critical to keeping the alternator and belt on the engine. Especially when the alternator has to take the AC compressor load and deal with the diesel engine vibration.

I have broken alternator brackets on the Olds 5.7 diesel. (Common failure.)

Can you attach a rear bracket anywhere on this unit?

So far the CS-144 is holding out longer than the cs130's did on my 6.5's.
 
I recommend the AD244 for 96+ trucks with the CS-130D as it is a bolt in install(BURBS with heated seats and dual air from 96-99 already had the CS-144), for the 95- trucks I like the CS-144 as it is an easier install since it uses the same plug as the CS-130 and has a spot for the rear bracket support. The AD244 and CS144 both put out about the same, and both seem to hold up well. Only real downfall to the CS144 is most of them have the small rear bearing, and it doesn't do well on the diesel trucks(kept taking it out on my 6.5). GM offered a heavier rear bearing for the CS-144 in diesel and police applications. That being said the AD244 in my BURB ALWAYS holds good steady voltage even with all 6 lights and both A/C's blasting.
 
What is the rated amperage of this unit? I need to upgrade my alternator and at one point had a cs144 but due to my belt driven hydraulic setup the larger cs144 did not fit, i would have had to make many custom brackets. I cant do that since i dont have a welder. Wonder if this will fit?

It is rated at 145A. I got from AZ webstore, free ship to the house and 20% off.
It came from Remy. I search for 2003 Tahoe, 145A 144mm version, the other option is the same size as CS130 with only 105A.

The mounting on the AD244 looks very hefty.
I did not put any back bracket as said in my post and it seems to hold very good.

The original rear bracket will line up with the bottom brace very good so you can put it in if you want.
The hole for the other hole line up with the battery connector, so you may need to cut that off.
I don't have a proper saw to cut it neatly so I left it off.

The connector was from Ebay around $11 with all 4 wires pigtail, you only need 2 (P and L).
 
My son mounted as described without rear bracket and the front bracket broke.

I have bought brand new AD 244s with upgraded amperage (170) and the rear bearing went out in 2 years and 30K miles. It had a warranty but that was worthless when you're down and purchased it on-line and have to ship it back. I'm now on a rebuilt AD244 from NAPA with lifetime warranty.
 
Im not recomending fliping the stock bracket anymore. Mine actually broke. I have a proto type bracket Im making. Been working on it for a few weeks its a heavy duty peice and will be available soon. I also do recomend as many mounting points as you can use, so the lack of any rear support would concern me.
 
Thanks for the input.

Leroy, let me know if you have the bracket.
I can try it.

This alternator is from Autozone.com which can be returned to any Autozone (nearest is 3 miles from home) with lifetime warranty.
That was my consideration for buying from other online sources (Amazon or RockA) as BigT said.
Not sure what lifetime means but I can always exchanged it when something happened.
 
I'll be posting it up once I have a final version of it. Should soon (next couple weeks I hope)
 
Im not recomending fliping the stock bracket anymore. Mine actually broke. I have a proto type bracket Im making. Been working on it for a few weeks its a heavy duty peice and will be available soon. I also do recomend as many mounting points as you can use, so the lack of any rear support would concern me.

Leroy, that bracket is something my son would need immediately.
 
I'll be in the machine shop tomorrow (if time allows) The prototype is ugly and multi peice. I am going to make it all one peice and pretty it up some before I make it available.
 
Unlike the CS144, the AD244 does not have any hole(s) for bracket on the backside.

So all the reinforcements should be done either at the bottom hole or side hole.

Never hold a CS144 but from the look, the AD244 is about the thickness of the CS130 that I had and the CS144 is a little bit thicker?

Hopefully, Leroy can come up with a reasonable solution.
 
CS144's mod's require (or should use) a longer belt. Alt diameter is larger so it moves the pulley away from the engine.
 
CS144's mod's require (or should use) a longer belt. Alt diameter is larger so it moves the pulley away from the engine.

When I put the CS144 on I made an all new upper mount using a 1/8" X 1" strap metal about 3 1/2" long, and no bends. I drilled the holes about 2 1/4" apart, which put the alt closer to the tension pulley spring than stock. I have about 1/4" space between the alt and the tension pulley spring. If my memory is correct, I was able to re-use my almost new belt that I put on when I deleted the vacuum pump.

Don
 
Don, thanks for the measurement.

I probably can create that very easily.
Did you have any problem with the strap breaking?
 
The strap is unbent so it transfers tension straight to where it is mounted onto the tensioner mount location. This is the stock location for the CS130 alt mount. It has never given me any problem.

Just for good measure I'm including some pics of my alt swap.

Pic 1:--Shows the difference in the upper mount between the CS130 (on left) and CS144 (on right).

Pic 2:--Shows the upper mount I made for the CS144 using the strap metal.

Pic 3:--Shows a size comparison between the CS130 (on left) and CS144 (on right).

Pic 4:--This shows how the rear mount sets in stock form. The mount has been cut already as you can see the line across it.

Pic 5:--This shows how I slid the upper of the two pieces of the cut rear mount bracket to the right prior to rewelding it back together.

Pic 6:--I did have to modify the spacing of the holes that hold the back of the alternator, but I don't remember the details. This pic shows the completed modifications to the rear mount. The fresh black paint makes it difficult to make out the outline of the bracket.

I hope this is of help to you, and any others who are contemplating an alternator swap.

Don
 

Attachments

  • IMGP1210 a.jpg
    IMGP1210 a.jpg
    18.6 KB · Views: 51
  • IMGP1207 a.jpg
    IMGP1207 a.jpg
    81.8 KB · Views: 53
  • IMGP1206 a.jpg
    IMGP1206 a.jpg
    59.3 KB · Views: 48
  • IMGP1204 a.jpg
    IMGP1204 a.jpg
    85.3 KB · Views: 45
  • IMGP1203 a.jpg
    IMGP1203 a.jpg
    91 KB · Views: 42
  • IMGP1199 a.jpg
    IMGP1199 a.jpg
    87.5 KB · Views: 49
Update for the AD244.

I can put back the rear bracket since the thickness between CS130 and AD244 is almost the same.
I have to cut the 9 o'clock upper bolt hole since that is where the battery stud location is.
I put a washer as a shim between the lower mounting bracket and back bracket where the bolt goes so the rear bracket is barely touching the plastic back of the alternator.

So far, it seems to make it more sturdy.
Still working on the side mount since my experiment did not work so back to the drawing board.
 
Back
Top