turbovanman
I has boost, :O)
Pretty cool build. I can't fathom the dollars, 
What turbo did you go with?
What turbo did you go with?

Follow along with the video below to see how to install our site as a web app on your home screen.
Note: This feature may not be available in some browsers.
Pretty cool build. I can't fathom the dollars,
")
Am just coming out of a similar build, and No, you do not want to see the bill :yikes: Only thing that would have made it more expensive was a DMax conversion. At least it was less expensive than buying a new-er truck and modding it
The way I look at it is the truck just got at least another 15 year extension on life :hihi:
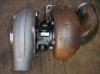
The turbo is a Borg Warner model #173379 and there is no waste gate.
As far as cost, it's all relative. It took me about 5 years of looking to find this style and size motorhome with this engine, in this condition. Considering the original cost of the rig when it was new, what I paid for it and what it's worth to me to have a reliable powerful motorhome that should last for many miles and years, even with the expense of this build.
As far as cooling the transmission with anything more than the stock cooler, we'll have to wait to see if any additional cooling is even needed. By adding the transmission temp gauge to the gauge cluster should tell me if it's running hot or not. I guess the biggest question will be, how hot is too hot?
So far the hardest part of the build, is the waiting for parts, the engine, from all parts of the country and to get everything all together in one place at the right time. It's kind of like being the general contractor on a house build, organizing all the sub-contractors to coordinate together.
") ).
).As per the instructions from Heath:
". . . If this happens, call for specific instruction."
Well, those are the first instructions here too. I just didn't list them, as I figured they are the same as any PCM re-learn
1. Turn key 'ON' (do not engage starter) for a minimum of 5 min.
2. Turn key 'OFF' for a minimum of 1 min.
3. Glow plug & start engine.
I was more concerned with the new PCM learning the wrong info, since it's a fresh motor with a fresh (brand new) IP, if things aren't quite right after the install.
IIRC, that is for the security system (if the MH has it). You will know if you need to do the 5 'On' 1 'Off' if the 'Wait to Start' light does not turn on.
IP re-learn is 'Key On' (not started) *and* throttle to 100% (floored) for 45 seconds, 'Key Off' for 30 seconds, then start normally.
Using that logic, why bother putting aftermarket differential covers on that allow increase lube capacity AND increase the cooling of the lube by the heatsink effect of the cast aluminum with internal and external fins?
No hate, just asking for the reasoning/logic in not increasing both capacity and passive radiated cooling of the transmission by going with an aftermarket cast aluminum or steel pan.
Am just coming out of a similar build, and No, you do not want to see the bill :yikes: Only thing that would have made it more expensive was a DMax conversion. At least it was less expensive than buying a new-er truck and modding it
The way I look at it is the truck just got at least another 15 year extension on life :hihi:
When you did your project, what did you do about exhaust/intake studs? Did you buy new or transfer the old ones? If new, where did you get them?
Heath's instructions for swapping out ECMs are the same regardless of Security system or lack of. . .
Not arguing the 5 On / 1 Off sequence. At best it will enable the truck to start, at worst the truck was already good to go without the sequence. I have also had to do this after disconnecting the batteries, so it has a wider use than just a new ECM.
Only pointing out that the IP re-learn is a different sequence for an ECM that has already executed it (ex: re-using the old ECM after re-mounting the IP).