• Welcome to The Truck Stop! We see you haven't REGISTERED yet.

    Your truck knowledge is missing!
    • Registration is FREE , all we need is your birthday and email. (We don't share ANY data with ANYONE)
    • We have tons of knowledge here for your diesel truck!
    • Post your own topics and reply to existing threads to help others out!
    • NO ADS! The site is fully functional and ad free!
    CLICK HERE TO REGISTER!

    Problems registering? Click here to contact us!

    Already registered, but need a PASSWORD RESET? CLICK HERE TO RESET YOUR PASSWORD!

2007 Saturn Vue 3.5L V6 How To: AC Compressor Replacement

WarWagon

Well it hits on 7 of 8...
Messages
10,689
Reaction score
8,460
Location
AZ
Clearly built for the assembly line and no concern what-so-ever for repair. Videos give options of dropping the subframe or raising the engine via pass side engine mount disconnect and removing the alternator.

Seriously you need to make a video for a paragraph of text?! :wtf: All Google wants to feed one nowadays is 10,000 Youtube videos that are 5 min of suck before we get to the point.

Anyway got a 2007 Saturn Vue to replace the compressor on. Fighting it for a few years. First the AC Compressor Control Solenoid Valve failed in the "no cool at idle" position. You can get this part kit alone off fleabay or other places. You can change the valve by recovering the system, unbolting the compressor, and then the tilt of the compressor allows you to get to the valve located in the rear of the compressor from under the vehicle.

Couple years later the system lost it's charge with PAG oil all over the front of the compressor. A *cheep* recharge held another couple years.

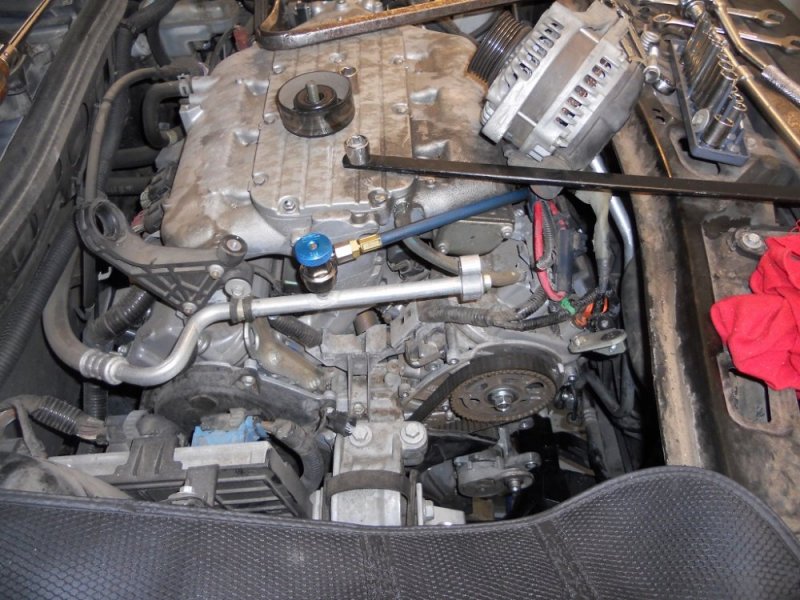
Now it's time to rip the leaking compressor out. (The dryer is located behind the driver's side headlight. The headlight hooks the front bumper requiring some of the grille to be taken apart.) We removed the air cleaner box, timing belt cover, alternator, knocking the wire hold down on the rear of the alt off, then popping the two engine mount nuts off, top alternator bracket to valve cover, separating the AC line mid engine, removed tensioner pulley, and raising the engine some.

We used a section of scrap extension cord for a rope threaded through the compressor bolt holes to help pull the SOB out. The ports need to be rotated to the sky and clutch comes out first around the alt bracket. The AC hose needs to be moved out of the way taking 3 hands.
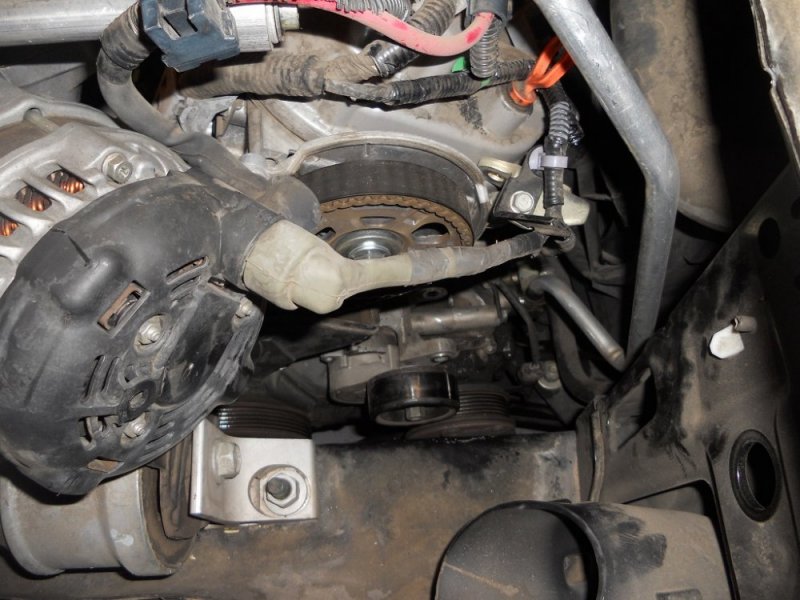
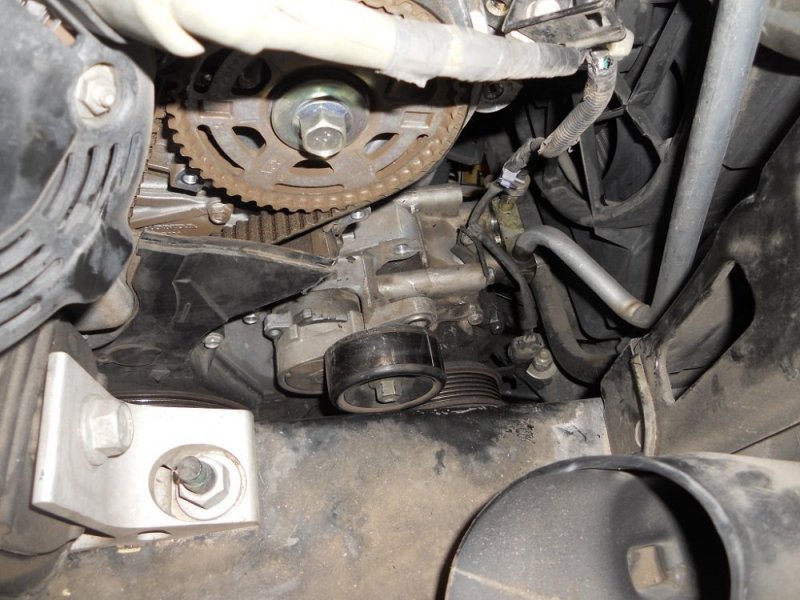
DSCN4653.JPG
DSCN4654.JPG
DSCN4655.JPG
DSCN4656.JPG
 
Gotta love modern vehicles.

I put a hydraulic pump on a 6.7 Cummins. Took about 8 hours, I figured it would be a 4 hour job to replace the serpentine belt after the addition of the pump.
 
Clearly built for the assembly line and no concern what-so-ever for repair. Videos give options of dropping the subframe or raising the engine via pass side engine mount disconnect and removing the alternator.

Seriously you need to make a video for a paragraph of text?! :wtf: All Google wants to feed one nowadays is 10,000 Youtube videos that are 5 min of suck before we get to the point.

Anyway got a 2007 Saturn Vue to replace the compressor on. Fighting it for a few years. First the AC Compressor Control Solenoid Valve failed in the "no cool at idle" position. You can get this part kit alone off fleabay or other places. You can change the valve by recovering the system, unbolting the compressor, and then the tilt of the compressor allows you to get to the valve located in the rear of the compressor from under the vehicle.

Couple years later the system lost it's charge with PAG oil all over the front of the compressor. A *cheep* recharge held another couple years.

Now it's time to rip the leaking compressor out. (The dryer is located behind the driver's side headlight. The headlight hooks the front bumper requiring some of the grille to be taken apart.) We removed the air cleaner box, timing belt cover, alternator, knocking the wire hold down on the rear of the alt off, then popping the two engine mount nuts off, top alternator bracket to valve cover, separating the AC line mid engine, removed tensioner pulley, and raising the engine some.

We used a section of scrap extension cord for a rope threaded through the compressor bolt holes to help pull the SOB out. The ports need to be rotated to the sky and clutch comes out first around the alt bracket. The AC hose needs to be moved out of the way taking 3 hands.
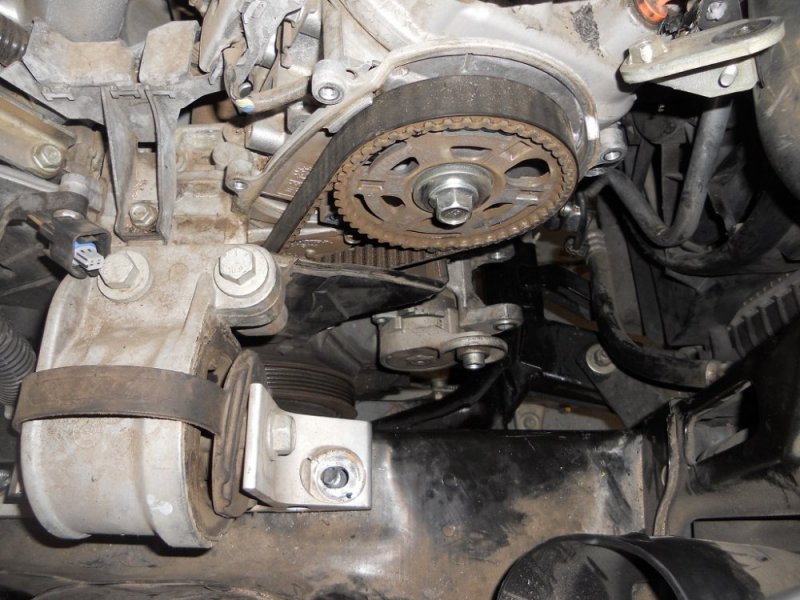
View attachment 52164
View attachment 52165
View attachment 52166
View attachment 52167
In my case, the Engine Carriage Bolts were frozen and I was afraid of breaking one off. Following your tips, try as I might, I couldn't get the Compressor through the opening and come out the top. What I ended up doing is removing the top radiator brackets (since I was replacing the condenser as well). Then I removed the plastic splash pan across the front of the car. By pulling up on the left end of the radiator and pushing it forward, I was able to fish the compressor out the bottom. Hindsight being what it is, I wouldn't have needed to pull the alternator or jack the engine. In fact, if I did it all over again, I would pull the radiator, which is much less work than pulling the alternator IMHO.
 
Part of the reason why GM ditched the Saturn Division and why never to buy a used Saturn of any kind, especially over the last few years of production.
 
Still much easier to work on than some European cars. My 2009 Mercedes CLK350 wasn't any easier to replace a power steering pump. What I learned through all this; never treat the Service Manual as gospel. The shop manual on the Merc said to pull the compressor so you could get at the rear bolt on the PS pump. I got to the rear bolt simply using a 13mm with integrated u-joint.
 
As an Amazon Associate we earn from qualifying purchases.
Factory Service Manuals (as are Chilton/Haynes) are based on new, torn down on an engine stand/lift with access to specialized Factory tools the way the engineers say to do it. I had a Factory-trained Subaru dealership mechanic friend show me dozens of shortcuts they learned "hands on" the hard way to work on my Subarus 30 years ago that cut tons of time off of things, so they could take far less time than "the book" said how long and how. Doing two vehicles in the time to do one "by the book" is how both the mechanuts and stealership made money. Kinda like a lawyer billing 1hr standard for a 5 minute call, but not as smarmy!
 
Even with all the specialty tools, it generally takes a good& experienced mechanic doing a job 3 times to beat book time. That is figured in when setting book time.

most of the time saving tools are created by a mechanic, and he sells idea to tool manufacturers like otc, snappy or mac
 
Also after owning a '74 Peugeot 504 n.a. diesel and an '83 Audi 5000 turbo diesel, a '68 Triumph 650 Bonneville hardtail chopper and a bone-stock '75 Triumph 750 Bonneville, I refuse to own anything European built.

Japanese or American vehicles only, no matter how many wheels!
 
Even with all the specialty tools, it generally takes a good& experienced mechanic doing a job 3 times to beat book time. That is figured in when setting book time.

most of the time saving tools are created by a mechanic, and he sells idea to tool manufacturers like otc, snappy or mac
Yes, but then there are things like to replace a torn outer CV boot on a Subaru. "Book" says remove wheel, axle nut, remove the inner splined rotor/hub/wheel stud assembly off splined CV joint shaft, lower control arm inner pivot bolt, press out the hub/axle end from steering knuckle bearing while swinging strut/knuckle away, cut boot bands, remove boot bands cut boot away. Remove inner race circlip. Slide outer CV race housing off ball race. Carefully not lose/drop CV balls. Remove expansion pin. Slide inner race off outer end of splined axle shaft. Slide small end of new CV joint boot and small band over end of axle and about half way down so it's out of way. Clean all CV joint components. Reassemble outer housing, balls, inner race, circlip. Repack with grease. Slide that onto axle shaft. Reinstall expansion pin. Slide boot so it pops over lip of CV housing. Tighten and punch both bands. Using puller threaded over axle/hub threads, pull housing into axle bearing race until it bottoms. Install rotor/wheel stud assembly. Reinstall axle nut. Swing lower control arm up and replace lower pivot bolt. Reinstall wheel. Lower to ground and torque axle and lug nuts. About 1.75 hours if you were fast and nothing went wrong and that was Flat Rate time.

OR Mechanic's shortcut:

Vehicle on lift. F*ck removing wheel/axle nut! Drive out expansion pin through inner tripod joint flange and transaxle stub shaft. Remove inner pivot bolt of lower control arm. Swing strut and tire outward about 3", sliding inner tripod joint housing off of transaxle stub shaft. Cut/remove inner boot clamps. Slide inner boot back about 4". Slide tripod joint assembly off of splined inner axle shaft. Slide inner boot off axle shaft. Cut/remove outer boot bands. Remove torn outer boot. Clean/repack CV joint/housing if needed. Slide new outer boot down axle. Install new bands. Slide inner boot onto axle. Slide tripod bearing housing assembly back onto axle. Slide inner boot over housing/install bands. Swing strut and axle inward, sliding Tripod joint flange over transaxle stub shaft with pin holes aligned. Reinstall tension pin. Reinstall lower control arm pivot bolt. Put car on ground. About 25 minutes if you're good.

I could do it in about 45 minutes on jackstands laying on my back in the driveway. WAY faster and easier, WITHOUT having a special puller or fabricating one using a piece of 2½"ID diameter by 2" pipe, an 1½"ID flat fender washer, a dab of grease and the axle nut to pull the assembly into the knuckle bearing.

My buddy loved getting paid 1.75 hours for 25 minutes work replacing a torn outer CV boot (which happened fairly frequently on those mid 70's to late 80's Subarus until modern thermoplastics replaced those rubber boots. I used the same trick on my 82 Audi instead of those aftermarket glue together split outer boots.
 
Last edited:
I love My Triumph, 1974 T-150 Trident.
Also have a 1978 MG-B Roadster and that little critter is a breeze to work on.
Yeah. I just effing hated Darkness by Lucas. Using British Whitworth-sized fasteners and threads was fun. Like P.O. of my chopper using a ¼"SAE Fine bolt in a ¼" Whitworth hole in the Primary case cover. Only problem is that there is a one thread per inch difference between the two and he stripped out the threads in the motor and I always had an oil drip from that corner of the primary cover.
 
I had my 750 Bonny up to 165 on the speedo, based off of needle position, out on the Interstate one day when I was 5 minutes late for work. Punched in 3 minutes early. Figured that was fast enough.
 
Ooooh yeah. Headed to Sturgis one year. One guy on a CR Harley sprtster, another on a Honda shadow or some such. We pulled into the Alzada saloon for a couple a beers. Got ready to leave, one guy said, can we slow it down just a little ? Other guy says yeah man. I said, why, we been running about 70 to 75, once in a while 80. They both said, no way man, we been running 85 and 90 to keep up. I was like, okay, You guys lead. 😹😹😹😹
That was on the 74 T-150.
I also had a 1957 Thunderbird. That was a mighty fast little machine too. Single carb. I had it about 95% restored and sold all My Triumph stuff except for one T140 Bonny. Then bought the 1976 FLH Harley. Full dresser and totally untouched by any previous owner. It had 1436 miles on it, that was in 1990. Guy was a truck driver and was never home to ride it.
 
Hear ya. My '68 650 Bonny chopper was quite the crotch rocket. Paughco hardtail Sportster frame set up with Triumph motor mounting points. 20° rake in the neck and 6" of stretch in the frame. 12" over springer front end with twisted legs. 6" risers mounting Ram's Horns bars (think Schwinn Varsity Sport ten speed Maes Bend handle bars, mounted backwards and rotated so they come straight out from the risers, curve up 90°, then back 180° so that the grips are vertical, shoulder-wide and chest-high. Flat duck tail rear fender, King'n'Queen seat with a 2' tall back rest raked back 4" to the top. King's saddle sat 18" off the ground, my back support following the fender curve to the Queen's seat atop the rear fender with the backrest. 22" rim rear tire, 16" front. Normal peg positions for shifting and rear brake pedal under and slightly in front of my seat, highway bar fold up pegs on the front down tubes about 2½ feet out in front of my seat, so my legs were almost straight out in front with my knees slightly bent and heels hooked on the pegs. 2 gal. Sportster peanut tank. NO tach. NO speedo/odo. NO front brake. NO battery, ignition/lights ran off of magneto. Had a teardrop 5¼" Hi/Lo headlight mounted on the baseplate for the risers. Tail/brakelight/licenseplate bracket was a sideways Maltese Cross mounted just above the rear axle nut off the rear fender/seat riser. Without rider(s) bike barely broke 200lbs in weight. Faster than shit, I used to take XLCH's stoplight to stoplight no problem and could stay ahead of them through an ⅛th and most of a quarter. By stopwatch through a rolling flying mile I clocked out at 140, as I did have the sprockets geared low for quick acceleration and the '68 was a 4-speed, not a 5 like the 750 Bonny was. DAMN comfortable ride between the seating position (like riding in a Lazy Boy halfway kicked back) and the long wheel base with the springer front end, didn't really miss rear suspension 31 years ago. Now? It would have to be a softtail frame with that set up!
 
It was, right up until the motor let go one day on the way out to the in-laws acreage out of town to meet wife there for dinner after work. Was bombing down the highway, the mile roads going past (look at a Google satellite map of eastern Nebraska, it's a checkerboard of paved/gravel roads every mile, "section" roads) every 25 seconds and I was a mile from the turnoff to head 2 miles over to their place when all of a sudden, BAM! and the rear tire locked up and I left about 200' of rubber before I could pull in a very stiff clutch lever to unlock the rear tire and brake to a stop. Somehow got the shifter to get it into neutral, tried to kick the motor over and I couldn't even get the lever to move, so I pushed the beast the rest of the way to the in-laws' place and put it in their old shed/coop.

Drove back out the next day after work with the Whitworth wrenches to see what was up. Pulled the valve cover and saw enough to tell me the worst. Left side intake spring laying there in two pieces. Pulled the head and it was a gory sight. Left cylinder, well the first thing I saw was the rather beaten to death small end of the connecting rod with the wrist pin still through it and a couple of big chunks of piston laying under the crank along with a very bent up intake valve. Right piston had a big crack across it and a dime-sized hole in the face. Pulled the cylinders off the crankcase, there was tons of debris of various sized pieces of piston remains. I found pieces of piston in the primary side of the case, in the left carb and left T-T pipe, too!
 
Back
Top