I don't know how I get talked into this for family. This time it took cold hard cash and even then...  it's a BIG job.
Started out with a noisy compressor. Evac and recharge to a known state finding no refrigerant loss. Found the rear air wasn't working and mediocre front air. System was modified for dessert heat with good results over the past few years: HPTuners raised engine idle speeds from 500 RPM to 650 in gear and 750 in P/N. Electric fan wired to go on with compressor, new ACDelco dealer fan clutch and Envirosafe Industrial refrigerant. Has a 4 seasons De-Slugger kit on it as well. Without this the AC system simply sucked while waiting for people in a parking lot: You sweat your balls off with R134a when it gets over 105 degrees out... Give it up at 115+ degrees.
The alternate refrigerant blend isn't controllable via pressure like the low side switch GM uses. This results in (front) evaporator freeze up on lower fan speeds unless you use a temp probe to control the compressor kick out. It's like -4 degrees when the GM switch trips on this stuff. Most of the time the fan is running at high enough speed this really isn't an issue here.
Regardless neither line for the rear was cold indicating a bad or clogged TXV. Removing the O/T and inspecting the screen indicated the TXV would also be clogged.
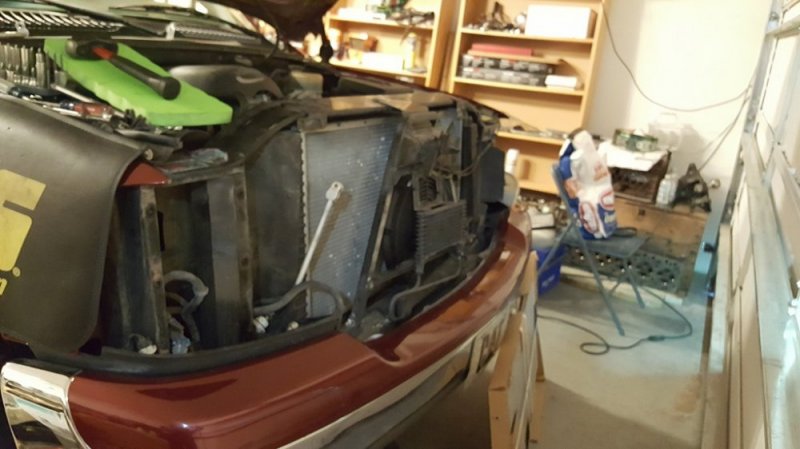
GM decided to make condenser removal a royal PIA. Just had to weld the top hood latch brace. So you remove the grille, headlights, and entire passenger side light support then slide the condenser out the passenger side. Note the electric fan. And bag of charcoal next to some Cumapart scrap metal.
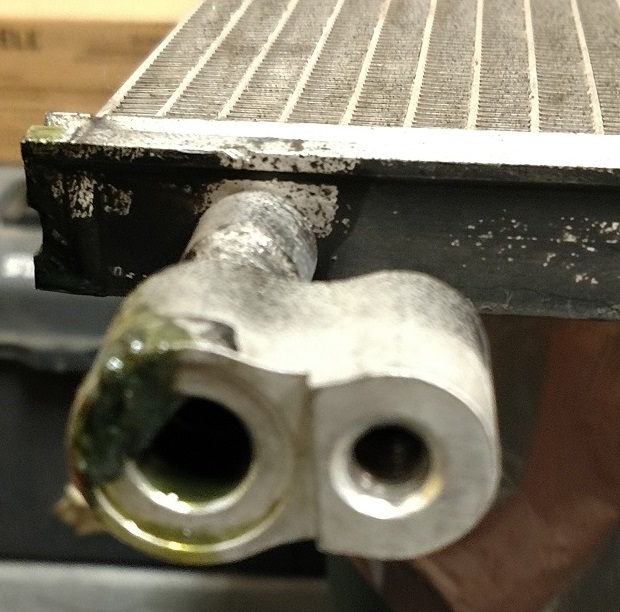
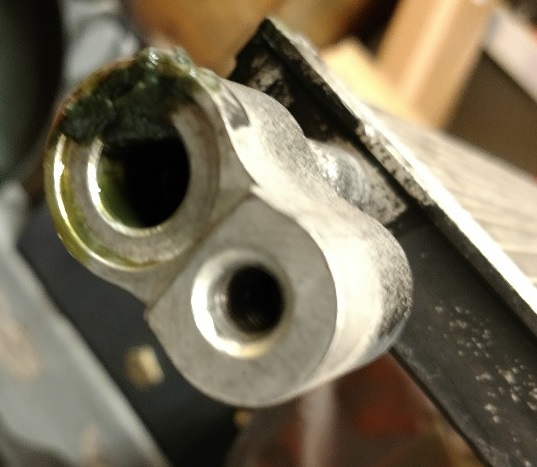
After condenser removal, they can't be flushed, the extent of the compressor shrapnel grenade is clear. I cut the accumulator open to make sure the dryer material didn't come apart. It hadn't. This sludge drained out overnight.
No way to flush the TXV in place so, no, I wasn't striping the interior out for track day...
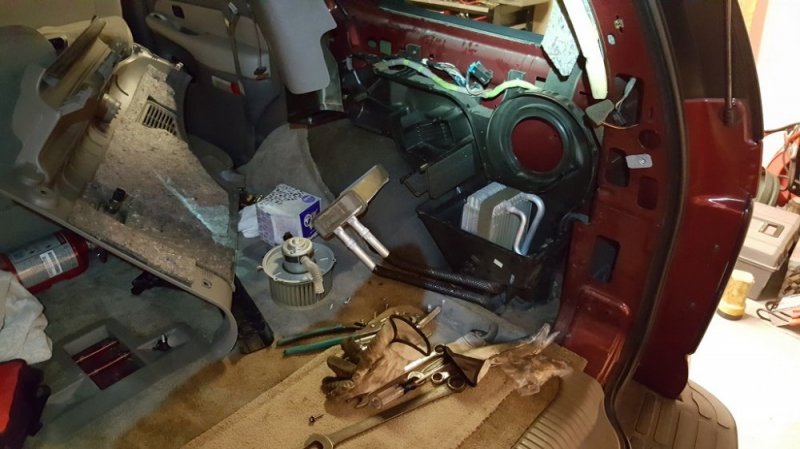
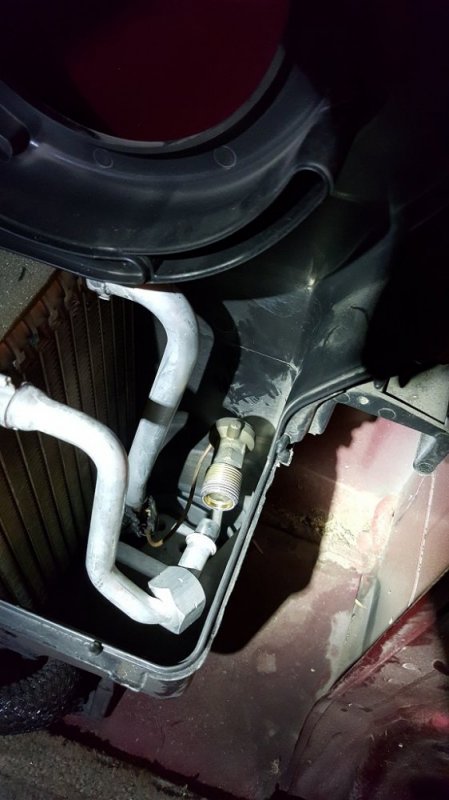
Just to get to this little SOB TXV. GM is still using the brain dead steel nut on aluminum threads despite the rest of the system using a stud and nut to hold joints together. Takes a crows foot to get the TXV out. The HVAC case is easier to open up than the 1995 I did a long time ago. Not a fan of cutting them up.
Flush the lines, evaporators, and use AC deodorizer on the evaps. New cabin air filters. New compressor (drained wrong quantity of oil), new TXV, cleaned TXV filter as they don't include the $0.005 screen part and ask $12.00 for it, new orface tube, AC Delco 15-10413 liquid line filter on line going to condenser to protect it as well, new condenser, PAG 46 oil 11 oz, Vac for a couple hours and charge. (VOV use attempt failed...)
After leak check put it all back together. Runs beyond ice cold and it's 110F out today.
Started out with a noisy compressor. Evac and recharge to a known state finding no refrigerant loss. Found the rear air wasn't working and mediocre front air. System was modified for dessert heat with good results over the past few years: HPTuners raised engine idle speeds from 500 RPM to 650 in gear and 750 in P/N. Electric fan wired to go on with compressor, new ACDelco dealer fan clutch and Envirosafe Industrial refrigerant. Has a 4 seasons De-Slugger kit on it as well. Without this the AC system simply sucked while waiting for people in a parking lot: You sweat your balls off with R134a when it gets over 105 degrees out... Give it up at 115+ degrees.
The alternate refrigerant blend isn't controllable via pressure like the low side switch GM uses. This results in (front) evaporator freeze up on lower fan speeds unless you use a temp probe to control the compressor kick out. It's like -4 degrees when the GM switch trips on this stuff. Most of the time the fan is running at high enough speed this really isn't an issue here.
Regardless neither line for the rear was cold indicating a bad or clogged TXV. Removing the O/T and inspecting the screen indicated the TXV would also be clogged.
GM decided to make condenser removal a royal PIA. Just had to weld the top hood latch brace. So you remove the grille, headlights, and entire passenger side light support then slide the condenser out the passenger side. Note the electric fan. And bag of charcoal

After condenser removal, they can't be flushed, the extent of the compressor shrapnel grenade is clear. I cut the accumulator open to make sure the dryer material didn't come apart. It hadn't. This sludge drained out overnight.


No way to flush the TXV in place so, no, I wasn't striping the interior out for track day...

Just to get to this little SOB TXV. GM is still using the brain dead steel nut on aluminum threads despite the rest of the system using a stud and nut to hold joints together. Takes a crows foot to get the TXV out. The HVAC case is easier to open up than the 1995 I did a long time ago. Not a fan of cutting them up.

Flush the lines, evaporators, and use AC deodorizer on the evaps. New cabin air filters. New compressor (drained wrong quantity of oil), new TXV, cleaned TXV filter as they don't include the $0.005 screen part and ask $12.00 for it, new orface tube, AC Delco 15-10413 liquid line filter on line going to condenser to protect it as well, new condenser, PAG 46 oil 11 oz, Vac for a couple hours and charge. (VOV use attempt failed...)
After leak check put it all back together. Runs beyond ice cold and it's 110F out today.
Last edited:
