
Navigation
Install the app
How to install the app on iOS
Follow along with the video below to see how to install our site as a web app on your home screen.
Note: This feature may not be available in some browsers.
More options
-
Welcome to The Truck Stop! We see you haven't REGISTERED yet.
Your truck knowledge is missing!
- Registration is FREE , all we need is your birthday and email. (We don't share ANY data with ANYONE)
- We have tons of knowledge here for your diesel truck!
- Post your own topics and reply to existing threads to help others out!
- NO ADS! The site is fully functional and ad free!
Problems registering? Click here to contact us!
Already registered, but need a PASSWORD RESET? CLICK HERE TO RESET YOUR PASSWORD!
You are using an out of date browser. It may not display this or other websites correctly.
You should upgrade or use an alternative browser.
You should upgrade or use an alternative browser.
Fuel Pump pressure gauge set up
- Thread starter Bezzer
- Start date
Will L.
Well-Known Member
@Bezzer if you add the @ symbol immediately before typing the name of the person it can notify them… this might help you catch the attention of @MrMarty51 easier.
I will say on the liquid filled gauge- not a good idea for couple reasons.
Fuel going into the cabin can go really really wrong. I done it before and got away lucky. After having seen it go wrong on others, I now am dedicated to electric gauge for fuel.
The liquid filled is to tamp down the pulsing in a line but you are better off knowing if the lift pump is creating pulsing as it is not good for the injection pump.
dbrannon79
I'm getting there!
In order for you to install a pressure gauge setup properly, you will need to ether make an adapter to raise your fuel filter housing so that the hoses can run over top of the intake or completely remote mount the housing. the inlet and outlet fittings are on the bottom. I'm not sure how cold of a climate you live in but what I did was completely eliminate the OEM filter setup and mount an aftermarket filter housing to the firewall of my truck.
the down side of this is you will no longer have a pre-heater to keep the fuel in the filter from gelling up in temps below 15 degrees. in my area temps rarely dip that low so it wasn't a problem for me.
on my other truck I opted to remote mount the OEM housing over the the drivers inner fender and extend the harness over to it so it still has the heater working. the bracketry used to mount the OEM housing is simply some flat bar bent in the vice and some holes drilled for bolts. you can use steel or aluminum which is available at Home Depot. I think what I have is some scrap stainless and the bolts are stainless just to prevent rust.
doing something like ether one will allow you access to add extra fittings for gauges.
Here are pics of both trucks so you can get an idea.
dbrannon79
I'm getting there!
iirc your working on a motor home. not much room to work but remote mounting, just pick an area that gets you easy access when you need to replace the filter. you don't need to pull the intake, only be able to access the main line from the tank so that you can run the fuel hose to where ever you choose to mount it along with the return fuel line. once you got that all setup and figured out, then we can work on adding adapters to install gauges.
Marty will chime in soon with how he setup his. I thing his setup is much nicer than mine. Mine is just to give you ideas and options. If you are interested in the aftermarket filter I used, I can post the link, I got it off amazon searching for R12T filter.
Marty will chime in soon with how he setup his. I thing his setup is much nicer than mine. Mine is just to give you ideas and options. If you are interested in the aftermarket filter I used, I can post the link, I got it off amazon searching for R12T filter.
Will L.--- I planned on using an electric gauge. I've seen those two different types of gauges. One would be liquid filled so the needle doesn't bounce.
The other would be an empty gauge..that the needle would possibly bounce.
dbrannon79: I don't have the room to raise the hoses. But I can run two new hoses over top the manifold. Thanks for the pictures wish I had the room like your set up.
The other would be an empty gauge..that the needle would possibly bounce.
dbrannon79: I don't have the room to raise the hoses. But I can run two new hoses over top the manifold. Thanks for the pictures wish I had the room like your set up.
dbrannon79
I'm getting there!
if you run electric gauge, there's no need for a liquid filled gauge. What @MrMarty51 has setup is a single gauge in the cab and two electric senders under the hood. a toggle switch next to the gauge to select which sender he wants to see.
one sender is connected aft filter on the IP inlet, the other is pre-filter. using this method he can see pressure before and after the filter which will tell when the filter is clogging up along with seeing when the LP is failing. iirc Will came up with the idea.
on my 93 truck when I bought it, it had a live fuel line ran into the cab with a liquid filled gauge. that was one of the first things I got rid of due to the thought of that fuel line leaking into the cab! it's a huge fire hazard. I have since just moved that same gauge under the hood right at the tee where the line was connected.
MrMarty51
Well-Known Member
The gauge I am using.

 www.glowshiftdirect.com
I will get some pics of how I have the FFM mounted on a home made pedestal.
Probably tomorrow.
I did go with the Leroy Diesel Feed the Beast FFM and it comes with a 6AN IP adapter fitting.
Between the adapter fitting and the 6AN to hose adapter I installed one of them AN swivel fittings with the 1/8” NPT bored into it.
That is where the post FFM 30PSI sending unit fits in.
The Air Dog lift pump has the option for installing a sending unit on the pump, post pressure regulator.
As @Will L. ( IIRC ) suggested to run with two sending units and a toggle switch to switch sending units. Nice suggestion too.
The original SU with the gauge was causing the gauge to read wonky. Got a new SU, installed it and now the gauge reads steady and smooth.
Pre FFM pressure runs slightly over 10 PSI. Post FFM runs about 8 or 9 PSI.
I just had the truck fired up momentary to see how the new SU was going to react.
All now is good.
I was setting on the couch tapping out messages and posts. Dogs wanted out so I went and took a couple of pictures.
It is too bad I didnt think to get a pic of the post FFM SU as I had the upper intake off to switch out that wonky unit.
I did get in as close as possible with the phoney to get a pic. The SU is actually heading straight rearwards.
The 3/8ths fuel hose pretty much blocks out a good visual.


Then the pedestal mounted FFM.


So You can see that now the FFM is mounted 90* CCW from its original direction.
To Me, that just seemed to make hose routing a lot cleaner.
2-1/16" Tinted 7 Color 30 PSI Fuel Pressure Gauge Kit
GlowShift’s Tinted 7 Color 30 PSI Fuel Pressure Gauge Monitors Any Diesel Truck that is Running Lower Fuel Pressure to Ensure it is Running at Peak Levels.
www.glowshiftdirect.com
I will get some pics of how I have the FFM mounted on a home made pedestal.
Probably tomorrow.
I did go with the Leroy Diesel Feed the Beast FFM and it comes with a 6AN IP adapter fitting.
Between the adapter fitting and the 6AN to hose adapter I installed one of them AN swivel fittings with the 1/8” NPT bored into it.
That is where the post FFM 30PSI sending unit fits in.
The Air Dog lift pump has the option for installing a sending unit on the pump, post pressure regulator.
As @Will L. ( IIRC ) suggested to run with two sending units and a toggle switch to switch sending units. Nice suggestion too.
The original SU with the gauge was causing the gauge to read wonky. Got a new SU, installed it and now the gauge reads steady and smooth.
Pre FFM pressure runs slightly over 10 PSI. Post FFM runs about 8 or 9 PSI.
I just had the truck fired up momentary to see how the new SU was going to react.
All now is good.
I was setting on the couch tapping out messages and posts. Dogs wanted out so I went and took a couple of pictures.
It is too bad I didnt think to get a pic of the post FFM SU as I had the upper intake off to switch out that wonky unit.
I did get in as close as possible with the phoney to get a pic. The SU is actually heading straight rearwards.
The 3/8ths fuel hose pretty much blocks out a good visual.
Then the pedestal mounted FFM.
So You can see that now the FFM is mounted 90* CCW from its original direction.
To Me, that just seemed to make hose routing a lot cleaner.
MrMarty51
Well-Known Member
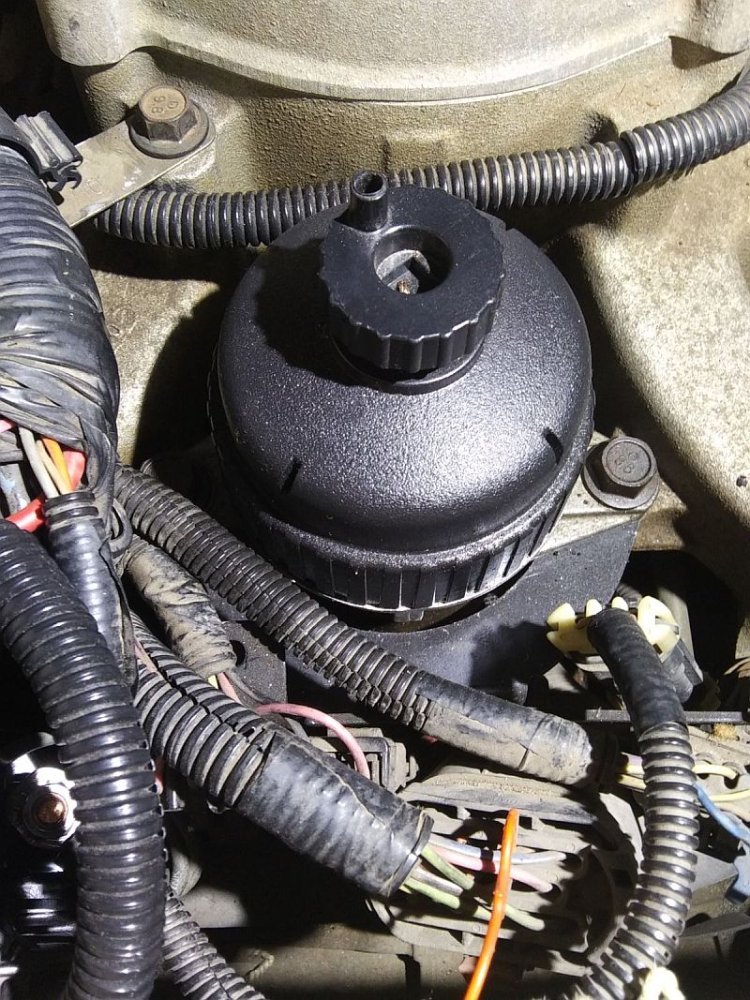
This picture, that black hose with the green stripe is a hose I had made at the parts store, hydraulic hose and fittings.
That allowed Me to remote mount the oil pressure sending unit and move it from under the intake manifold.

That allowed Me to remote mount the oil pressure sending unit and move it from under the intake manifold.
MrMarty51
Well-Known Member
Oh, yeah sure, then I forgot to get a pic of the three pod gauge cluster thats so busy You’d think there’s five gauges in there.
Oh wait, I guess there is, thanks to @ak diesel driver the one gauge, made for boost pressure, is actually a two needle dual turbo boost gauge.
Except, I’m using them for pre and post turbo drive pressure.
Except the post turbo needle has yet to move.
Maybe someday if I ever get a good load onto it.
Maybe June, be pulling an enclosed trailer to Ohio and return.
Then maybe with enough exhaust belching through the system that gauge might budge.
MrMarty51
Well-Known Member
The three gauge display.
The toggle switch is set to post FFM sending unit.
With the new SU the gauge is steady. It was bouncing then eventually falling off to a couple of pounds.
The little red LED light is an indicator so I know when the electro viscous fan kicks on. If I have the Autel Maxi200 ALDL dongle running the app on My phone, I can watch the coolant temp from the ECM and know exactly the temp it kicks in.
This is the faulty Glo-Shift SU.

It will get sent to GS and ask them if they will test it.
The toggle switch is set to post FFM sending unit.
With the new SU the gauge is steady. It was bouncing then eventually falling off to a couple of pounds.
The little red LED light is an indicator so I know when the electro viscous fan kicks on. If I have the Autel Maxi200 ALDL dongle running the app on My phone, I can watch the coolant temp from the ECM and know exactly the temp it kicks in.
This is the faulty Glo-Shift SU.
It will get sent to GS and ask them if they will test it.
MrMarty51: Thanks so much for all your info and pictures! This looks like quit a fancy set up that you've made for yourself. I'm going to study it real hard and see if I can figure out how much space I have to use some of your ideas.
Right now the weather has hit us with 20's at night for a week. If it gets warm enough .... I'll take the dog house off and do some measuring.
dbrannon70: Thanks to you for filling me in on all of Marty's info!
Right now the weather has hit us with 20's at night for a week. If it gets warm enough .... I'll take the dog house off and do some measuring.
dbrannon70: Thanks to you for filling me in on all of Marty's info!
MrMarty51
Well-Known Member
If You want to know about the electro/viscous fan conversion, @ak diesel driver has quite a thread on the subject.MrMarty51: Thanks so much for all your info and pictures! This looks like quit a fancy set up that you've made for yourself. I'm going to study it real hard and see if I can figure out how much space I have to use some of your ideas.
Right now the weather has hit us with 20's at night for a week. If it gets warm enough .... I'll take the dog house off and do some measuring.
dbrannon70: Thanks to you for filling me in on all of Marty's info!
dbrannon79
I'm getting there!
Ask and you shall receive!
Here is a link to his thread. I did this upgrade to one of my trucks, some day the other one will get it too!
Here is a link to his thread. I did this upgrade to one of my trucks, some day the other one will get it too!
Electric Fan clutch
So for those who want accurate fan clutch engagement this could be for you. I know on my 96 the fan clutch has never engaged the entire time I've owned it. Living in cooler climates does have it's advantages. I even tried modding the spring to no avail. This clutch will only work with the spin...
www.thetruckstop.us
dbrannon79 - Thanks for the come back.
I have a GM 9 blade fan and heavy duty regular clutch (not electric). Changed it over on a trip West with the motorhome ...25 yrs ago....from the stock fan and clutch. I spotted a motorhome at a Chevy dealer - same as ours on our trip....stopped in and talked to the service manager....and he told me that the motorhome was in due to overheating going up the mountains in Colorado. And he told me---anytime they sold a truck with a 6.5 TD they recommended to the customer to change over to the 9-blade fan and heavy duty clutch . And that would cure any over heating . I had him change it the next morning and I've never had any overheating. It comes on at 205 degrees and within 30 to 45 seconds it goes back to regular driving temperature at 188 degrees going up moderate grades. I have the correct 190 degree thermostat for the 6.5TD in the motorhome.
I have a GM 9 blade fan and heavy duty regular clutch (not electric). Changed it over on a trip West with the motorhome ...25 yrs ago....from the stock fan and clutch. I spotted a motorhome at a Chevy dealer - same as ours on our trip....stopped in and talked to the service manager....and he told me that the motorhome was in due to overheating going up the mountains in Colorado. And he told me---anytime they sold a truck with a 6.5 TD they recommended to the customer to change over to the 9-blade fan and heavy duty clutch . And that would cure any over heating . I had him change it the next morning and I've never had any overheating. It comes on at 205 degrees and within 30 to 45 seconds it goes back to regular driving temperature at 188 degrees going up moderate grades. I have the correct 190 degree thermostat for the 6.5TD in the motorhome.
ak diesel driver
6.5 driver
Besides having it come on based on engine temperature. It also uses the spin on fan clutch which is the balanced flow version. Also you can anticipate a hill an get it going before it gets too hot. 205* is marginal for temps on the 6.5. Ideally you don't want to go over 210*. When working the 6.5 hard it's easy to spike over temp before the radiator get the air hot enough to kick in the fan clutch.
MrMarty51
Well-Known Member
I just thought it would be a nice uprated component for Your van.Still waiting to hear why MrMarty51 thought I needed to read about the "electro/viscous conversion fan"?
I have not had one overheating problem with the truck since installing that electro viscous fan system, even in ambient temperatures at 112*F.
I have mine set, it comes on at precisely 198 degrees.
When that red LED indicator lamp ignites, then I know the electro portion is functioning.
dbrannon79
I'm getting there!
The one thing I have noticed since installing the cooling upgrade on my 95 is it seems to take longer to have heat in the cab! not sure if this was due to the equal flow pump, but the 93 which is still styling the factory style wp gets it's heater warm in maybe 5 minutes where my 95 takes at least 10 minutes to feel any heat from the vents!