NOW in case your in need of some how to on the water pump R&R and cover R&R here is a complete run down.

OMG Naw not bad at all
With the coolant all flushed out and nothing left but clean water.
Drop the contents of the radaitor (water)
Remove upper and lower hoses
Remove shroud (top and bottom)
Unhook battery grounds
Remove serp belt
Remove all accessories (Lay ac pump and PS pump to one side, no need to unhook lines)
Remove any of the brakets that are going to interfere with getting the cover off.
Normally replacing a water pump does not cause issues with the timing cover sealing.
If your worried about it, well here is how to do the job
Get the water pump off
(there are some smaller bolts under the pump that are hard to see so be sure you get them all before getting brutal wirth the pump.
The pump has a gasket between itself and the plate. The plate has the anerobic between itself and the cover.
The cover has a gasket between itself and the block
Remove the 4 bolts and get the serp pulley off the VB. Remove the large bolt that holds the VB on
Use a suitable puller that will span two bolts across from each other (180 degrees) and pull the VB off (use a protector of some kind to protect the threaded crank snout)
Remove the IP gear (3 bolts) Remove the 3 nuts that hold the IP to the cover. (IP will sit happily in place while you work)
*****Mark the cover and IP before you loosen the nuts so it will all go back perfect)******
Remove the front pan bolts and dont mess with any bolts that go into the pan rail, just the front cover.
Remove the remaining cover bolts.
ALSO 3 inner bolts behind the gears.
If the cover is stuck, be sure ALLLLLL the bolts are out before getting rough with the cover.
Normally a light tap or two with a wooden hammer etc will dislodge the cover.
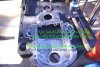
Clean the cover, the block and the pan real good.
Wipe all surfaces with rag soaked in BrakeKleen to remove any oil from the gasket surfaces.
A timing set should include all the gaskets and the seal.
Some set include a short gasket for the from cover to pan joint.
********Dont use it*********
If the timing chain is sloppy???? yup great time to toss in a fresh chain.
Generally the sprockets are fine even at 200K or more miles.
If the sprocket teeth are in good shape just a chain is all you need.
While the cover is off and being washed up, good time to replace the crank sensor.
These can be a bitch after many miles but can be tapped out easily with a hammer and a dowel from the inside out.
If you need to replace the chain ???
Remove the cam center bolt and then the outer Gear
The crank sprocket will likely need to be pulled with a 2 or 3 jaw puller to get it off far enough to allow the cam sprocket and chain to clear and come off.
Once these are apart you can replace the chain.
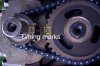
********* Be sure to align the timing marks first*********
Crank sprocket mark at 12 Oclock and cam mark at 6 Oclock
OK replace the chain and be sure the marks are looking at each other.
GENTLY tap the crank sprocket back onto the crank and guide the cam sprocket onto the cam nose.
Continue until the sprockets are seated fully.
Reinstall the outer GEAR on the cam. Wash out the cam bolt hole with BrakeKleen and blow dry.
Use a little blue loctite on the bolt threads and tighten.
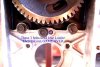
Now once the chain and sprockets are done rotate the engine and place the timing mark on the outer cam GEAR at the top.
Ready to replace the cover now
Apply some hight temp silicone to the block surface (make sure it is very clean with no traces of old gaskets)
Stick the new gasket to the block and align the holes.
Apply silicone (light smear) to the cover surface that faces the block.
Now apply a goodly amoount of the goop to the pans front area and be sure to get a good fillet in the corners.
Carefully work the cover in and onto the dowels taking care not to dislodge the gasket.
Once seated install the outer cover bolts and any others that are not connected with the water pump.
Snug all the bolts down going across the cover and back and forth.
Install and tighten the pan rail bolts.
The goop should have oooozed out all around the cover to pan contact area.
Tighten the cover bolts to torque or tight with a short wratchet and socket etc.
Lets get the IP bolted back in now, a new gasket is in order if the old one was damaged (install dry without goop)
Install the IP gear on the IP (will only fit one way) and line the mark with the mark facing up on the cam gear.
Use Blue loctite on the bolts that hold the gear to the IP
Remember, any of this stuff falls out its GAME OVER
NEVER USE RED LOCTITE NEVER NEVER or you will have loads of issues hetting the stuff apart again.
Reinstall the VB and serp pulley.
The Crank sensor can be installed now and the wire secured. (Grease the O ring on the sensor lightly)
Apply silicone to the water pump rear surface and stick the proper gasket to it. apply silicone to the gaskets back surface and then install the steel back plate.
Use some blue loctite on the bolts that hold the cover to the pump.
********** If one of these falls out, its GAME OVER*********
With the plate secure to the pump apply silicone to the back plate and stick its gasket in place. (light silicone smear just where the gasket contacts)
Apply silicone to the covers front facing machined surface and then bolt the pump assembly back on.
Use either silicone or High tack on any bolts that thread into the water jacket.
Just coat the threads and screw them in.
Reinstall the remaining parts in reverse order and your good to go.
If the hoses are trash, nows a great time to replace them.
Get the water pump to fan studs installed in the new pump. (use two nuts jambed together to remove stud from old pump NOT VISE GRIPS
)
Install accessories.
Install radiator
Install lower shroud half
Install lower radaitor hose (aim the nuts on the clamps so you can reach them later in case they loosen after a good warm up.
Make sure coolant hose from storage bottle is in good shape and connect to lower hose.
Install fan pulley, fan and tighten nuts well.
Install serp belt.
Check all items to be sure all is well and nothing has been forgotten
Install uper shroud half.
Install upper radiator hose.
Install vent hose and heater return hose
Install tranny cooler lines.
OHHH Be sure coolant drain is closed on radiator before you install the thing.
ASK me how I know this
Open air bleed in T stat housing.
Add the 3 gallons of green and allow air to bleed out.
Squeeze upper hose from time to time and once coolant comes out air bleed, close and snug the bleeder.
Connect batteries
Start engine and watch coolant level.
Add plain water to maintain about mid level of Jug.
Warm the engine and watch the temp. Once temp is normal, check for any leaks, install fill cap and job is done.
Inspect things for a couple days to make sure all is well.
Check the clamps a couple times to be sure they are tight.
New hoses will "settle in" and may need a little snug up after a few days.
If you make sure the clamps are faceing right you can do this without having to tear into things.
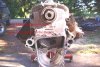
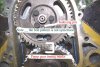
Here are some useful pix too.
That should just about cover this chapter troops.
I will be in my office if there are any questions.

Good luck
Missy