dangerousdave
1994 6.5 Suburban
What do Y'all think?
(Besides "cheap")
Here's another one for NA motors. wonder if it'd work for a turbo.
http://journeytoforever.org/biofuel_library/ethanol_motherearth/me3.html
Here's another, on a turbo. Long read, but good detail.
http://www.key-ideas.com/2ndWaterInjection.htm
I used a coolant tank from an '89 Merkur XR, the tank was designed to handle pressure and since I was going to "pre-charge" the water before sending it through the pumps, I needed to have a tank that could handle boost pressure. Another bonus was that I got the tank for around $15. With a water reservoir selected, then I needed to figure out what kind of pump(s) I would use. Looked around a little and finally selected a couple universal replacement windshield washer pumps from Wal-Mart for around $9 each. These seemed like good choices because they were inexpensive, heavy duty gear driven pump that were supposed to provide a constant flow. I did some testing with these pumps and discovered that each pump individually could provide 18psi dead head pressure. Together, in series, they would push 28psi dead head pressure. Based on some calculations I did to determine the proper flow rate of water, I decided to run the two pumps in series to get the approx 20psi (above boost pressure) that I wanted. I ran a boost line to the tank with a check valve so the tank would be pre-charged with boost pressure. That way, I would get nearly 40psi at full boost at the nozzle. This was important since water was injecting AFTER the turbo and needed to be able to overcome the boost pressure in the manifold where the nozzle was mounted. I figured that I needed at least 20psi to get a fine mist through the nozzle. I added the check valve so that the pumps would not lose their prime during engine vacuum conditions. Initially, I had tried the system without the check valve and the water in the tank would "boil" as the vacuum pulled all the water out of the lines and sucked air in through the nozzle. This is not a good situation, because then when the engine gets into boost, it would take a while to prime the pumps, pressurize all the lines, and start injecting a consistent spray of water. By this point, detonation would have set in and ignition timing retarded, which would have completely defeated the point of having H20 injection in the first place.
I also got a small, universal fuel filter to keep the water clean before it got to the nozzle. To run the pumps, I ran a relay with a pressure switch that allowed me to pick the boost pressure which activated the water injection system. In addition, I added a solenoid valve in the water line that only opened when the pumps were energized. I learned the hard way that this is a VERY important component on a water injection system. After getting the system working, on my maiden voyage (almost a voyage with all the water!), the car ran incredibly bad. I'd get into boost and the car would sputter and cough. Would get to a stop light and when the light would turn green, the engine would nearly stall as it bogged down when I tried to go. I limped home and popped the hood. The water tank was empty. The motor had consumed 2 quarts of water in about 5 miles of driving!! No wonder it coughed and gagged - glad I didn't get hydraulic lock in the cylinder and bust something. What was happening was that as the engine went into boost, the tank was pressurized. With the check valve, the tank remained pressurized. As I drove around out of boost, the water continued to inject into the manifold at all time resulting in rough running. Then, when I'd step on it, the motor would really bog as it inhaled the water logged mixture. I installed a solenoid valve in the water line just before the nozzle. This way, the line would remain charged with pressurized water, but would not inject until the proper time determined by the pressure switch. This completely eliminated the "waterfall injection" problem. I used a stock pressure switch off a wrecked XR and experimented with different activation points. Finally settled on about 4psi before the pumps and solenoid are energized. This ensures that there is water injecting before the boost pressure shoots up to detonation prone levels (above 15psi). Recently, I also added a small bleed orifice (.030-.040in) to the boost line going to the tank. The main reason for this bleed valve is to relieve pressure in the tank when the car is sitting. Before, the tank would remain pressurized for days and would cause water to drip past the pump seals. Over time, this would lower the water level in the tank and require more frequent fillings. Speaking of water levels, I utilized a stock coolant tank level sensor which I wired into the windshield washer level warning light. This way, when the water level in the tank drops below a certain level, the warning light comes on and I know it will soon be time to refill. This protects the pumps from running dry - which would destroy them in short order.
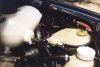
Now on to what I consider to be the single most important component - the injection nozzle. I looked at some industrial supply catalogs and finally ran across just what I was looking for in the McMaster-Carr catalog. They had brass "Mini-Misting" nozzles in a wide assortment of flow rates for less than $6 each. Based on my calculations, I purchased 3 different flow rate nozzles so I had some room to experiment. I mounted the nozzle in the Spearco elbow coming off the turbo compressor housing. There is a tapped hole intended to be used with the aspirator fitted on factory cruise control equipped cars. In this fitting, I screwed in some brass components that enabled me to mount the nozzle recessed from air flow. This was important to me, because I didn't want to have the nozzle restricting air flow. I chose this location because it was as close to the turbo as possible where the air would be hottest and most turbulent. This would help completely vaporize the water mist. It was critical to get the nozzle placed correctly, because as I've mentioned if it was protruding too far it would interfere with air flow. If it was recessed too far back, the water spray pattern would hit the sides of the recess and break up into drops - defeating the purpose of having a fine mist. I experimented and finally made a small brass extension that placed the nozzle in an ideal location. I ended up trying 3 different flow rate nozzles and finally settled on the highest flow rate available. The nozzle mounted in the turbo elbow.
On to the really good stuff, after months of tinkering and tuning I recently ran some charge air temperature tests. I mounted a sensitive wire thermocouple into the turbo outlet right after the water injection nozzle. I ran multiple tests using the digital voltmeter to capture the max temperature for each run. Each run would consist of approximately 5 seconds of full 19psi boost. Ambient outside temperature was a typical Florida 82F. Below are the surprising results that I discovered...
CHARGE AIR TEMPERATURE DATA
TEMP(F) W/O H20 TEMP(F) W/H20
316.9 170.4
326.0 168.9
324.3 168.9
322.3 170.8
317.6 185.9
317.0 150.7
320.8 173.8
320.0 170.9
AVERAGE TEMPS (F)
320.6 170.0
AVERAGE TEMPERATURE DROP = 150.6 F
I was very surprised at the tremendous temperature drop caused by the water injection. It dropped the temperature 150F!! This is more than the average temperature drop in my air/water IC system! H20 injection is a very economical intercooling solution. Total cost of my system was probably around $80 or so. This is a real bargain considering the tremendous "intercooling" effect of the water.
(Besides "cheap")
Here's another one for NA motors. wonder if it'd work for a turbo.
http://journeytoforever.org/biofuel_library/ethanol_motherearth/me3.html
Here's another, on a turbo. Long read, but good detail.
http://www.key-ideas.com/2ndWaterInjection.htm
I used a coolant tank from an '89 Merkur XR, the tank was designed to handle pressure and since I was going to "pre-charge" the water before sending it through the pumps, I needed to have a tank that could handle boost pressure. Another bonus was that I got the tank for around $15. With a water reservoir selected, then I needed to figure out what kind of pump(s) I would use. Looked around a little and finally selected a couple universal replacement windshield washer pumps from Wal-Mart for around $9 each. These seemed like good choices because they were inexpensive, heavy duty gear driven pump that were supposed to provide a constant flow. I did some testing with these pumps and discovered that each pump individually could provide 18psi dead head pressure. Together, in series, they would push 28psi dead head pressure. Based on some calculations I did to determine the proper flow rate of water, I decided to run the two pumps in series to get the approx 20psi (above boost pressure) that I wanted. I ran a boost line to the tank with a check valve so the tank would be pre-charged with boost pressure. That way, I would get nearly 40psi at full boost at the nozzle. This was important since water was injecting AFTER the turbo and needed to be able to overcome the boost pressure in the manifold where the nozzle was mounted. I figured that I needed at least 20psi to get a fine mist through the nozzle. I added the check valve so that the pumps would not lose their prime during engine vacuum conditions. Initially, I had tried the system without the check valve and the water in the tank would "boil" as the vacuum pulled all the water out of the lines and sucked air in through the nozzle. This is not a good situation, because then when the engine gets into boost, it would take a while to prime the pumps, pressurize all the lines, and start injecting a consistent spray of water. By this point, detonation would have set in and ignition timing retarded, which would have completely defeated the point of having H20 injection in the first place.
I also got a small, universal fuel filter to keep the water clean before it got to the nozzle. To run the pumps, I ran a relay with a pressure switch that allowed me to pick the boost pressure which activated the water injection system. In addition, I added a solenoid valve in the water line that only opened when the pumps were energized. I learned the hard way that this is a VERY important component on a water injection system. After getting the system working, on my maiden voyage (almost a voyage with all the water!), the car ran incredibly bad. I'd get into boost and the car would sputter and cough. Would get to a stop light and when the light would turn green, the engine would nearly stall as it bogged down when I tried to go. I limped home and popped the hood. The water tank was empty. The motor had consumed 2 quarts of water in about 5 miles of driving!! No wonder it coughed and gagged - glad I didn't get hydraulic lock in the cylinder and bust something. What was happening was that as the engine went into boost, the tank was pressurized. With the check valve, the tank remained pressurized. As I drove around out of boost, the water continued to inject into the manifold at all time resulting in rough running. Then, when I'd step on it, the motor would really bog as it inhaled the water logged mixture. I installed a solenoid valve in the water line just before the nozzle. This way, the line would remain charged with pressurized water, but would not inject until the proper time determined by the pressure switch. This completely eliminated the "waterfall injection" problem. I used a stock pressure switch off a wrecked XR and experimented with different activation points. Finally settled on about 4psi before the pumps and solenoid are energized. This ensures that there is water injecting before the boost pressure shoots up to detonation prone levels (above 15psi). Recently, I also added a small bleed orifice (.030-.040in) to the boost line going to the tank. The main reason for this bleed valve is to relieve pressure in the tank when the car is sitting. Before, the tank would remain pressurized for days and would cause water to drip past the pump seals. Over time, this would lower the water level in the tank and require more frequent fillings. Speaking of water levels, I utilized a stock coolant tank level sensor which I wired into the windshield washer level warning light. This way, when the water level in the tank drops below a certain level, the warning light comes on and I know it will soon be time to refill. This protects the pumps from running dry - which would destroy them in short order.
Now on to what I consider to be the single most important component - the injection nozzle. I looked at some industrial supply catalogs and finally ran across just what I was looking for in the McMaster-Carr catalog. They had brass "Mini-Misting" nozzles in a wide assortment of flow rates for less than $6 each. Based on my calculations, I purchased 3 different flow rate nozzles so I had some room to experiment. I mounted the nozzle in the Spearco elbow coming off the turbo compressor housing. There is a tapped hole intended to be used with the aspirator fitted on factory cruise control equipped cars. In this fitting, I screwed in some brass components that enabled me to mount the nozzle recessed from air flow. This was important to me, because I didn't want to have the nozzle restricting air flow. I chose this location because it was as close to the turbo as possible where the air would be hottest and most turbulent. This would help completely vaporize the water mist. It was critical to get the nozzle placed correctly, because as I've mentioned if it was protruding too far it would interfere with air flow. If it was recessed too far back, the water spray pattern would hit the sides of the recess and break up into drops - defeating the purpose of having a fine mist. I experimented and finally made a small brass extension that placed the nozzle in an ideal location. I ended up trying 3 different flow rate nozzles and finally settled on the highest flow rate available. The nozzle mounted in the turbo elbow.
On to the really good stuff, after months of tinkering and tuning I recently ran some charge air temperature tests. I mounted a sensitive wire thermocouple into the turbo outlet right after the water injection nozzle. I ran multiple tests using the digital voltmeter to capture the max temperature for each run. Each run would consist of approximately 5 seconds of full 19psi boost. Ambient outside temperature was a typical Florida 82F. Below are the surprising results that I discovered...
CHARGE AIR TEMPERATURE DATA
TEMP(F) W/O H20 TEMP(F) W/H20
316.9 170.4
326.0 168.9
324.3 168.9
322.3 170.8
317.6 185.9
317.0 150.7
320.8 173.8
320.0 170.9
AVERAGE TEMPS (F)
320.6 170.0
AVERAGE TEMPERATURE DROP = 150.6 F
I was very surprised at the tremendous temperature drop caused by the water injection. It dropped the temperature 150F!! This is more than the average temperature drop in my air/water IC system! H20 injection is a very economical intercooling solution. Total cost of my system was probably around $80 or so. This is a real bargain considering the tremendous "intercooling" effect of the water.