• Welcome to The Truck Stop! We see you haven't REGISTERED yet.

    Your truck knowledge is missing!
    • Registration is FREE , all we need is your birthday and email. (We don't share ANY data with ANYONE)
    • We have tons of knowledge here for your diesel truck!
    • Post your own topics and reply to existing threads to help others out!
    • NO ADS! The site is fully functional and ad free!
    CLICK HERE TO REGISTER!

    Problems registering? Click here to contact us!

    Already registered, but need a PASSWORD RESET? CLICK HERE TO RESET YOUR PASSWORD!

Sveins 1999 6.5 Suburban that´s getting "everything I ever wanted" eventually

I pray that You smeared, the spring side of the front crank shaft seal, liberally with some good grease. It is not uncommon for the spring to pop out of the seal when driving it into position onto the front cover.
A light and a mirror will tell the story, the spring will be dangling around the cranking shaft.

Uh Oh! I did smear the spring side with oil before getting it in place. I'm not sure id use the word liberally, though.. When I looked at it, it looked fine, and I started the engine after I had the new balancer In place and everything seemd fine. But I guess time will tell..
 
Uh Oh! I did smear the spring side with oil before getting it in place. I'm not sure id use the word liberally, though.. When I looked at it, it looked fine, and I started the engine after I had the new balancer In place and everything seemd fine. But I guess time will tell..
I always pack the spring side of seal with a chassis lube type of grease, wheel bearing grease or anything heavy that will lubricate. I have had a spring or two bounce out on Me when driving a seal into position.
Also liberally lubricate the external outside of the seal with some known good gasket sealer. No. 2 Permatex that comes in a bottle like container with the brush in the cap will usually keep most any liquid from leaking between a seal and its housing. I never rely on that red, blue or green or whatever color paint they coat them with to make a sure seal. It seldom works.
 
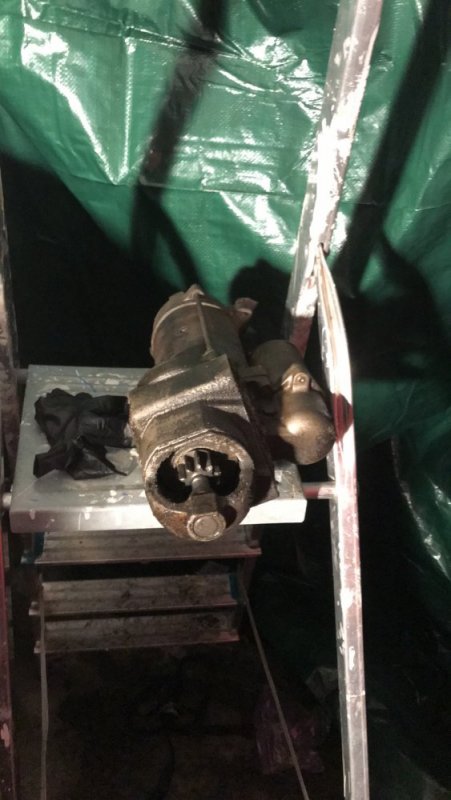
So, since the turbo was ****ed and everything was closed for Christmas, I quickly realized there was no way I´d have my burb back on the road before I had to leave for work at the 5th of January - so I decided to give the projects I wasn't supposed to do over Christmas a shot, starting with replacing my old (but well functioning) starter with the gear reduction starter from Quadstar. The old one could easily be 20 years old for all I know, and even though it worked better than I thought after my battery change earlier this autumn, I decided to swap it for the better one when I had the inner fender out already.

After a bit of cursing with the electrical connections, it was out. Again - a great thanks to @Hink for the great guides on 65turbogarage.com! :)
2019-12-29 19.39.59.jpg

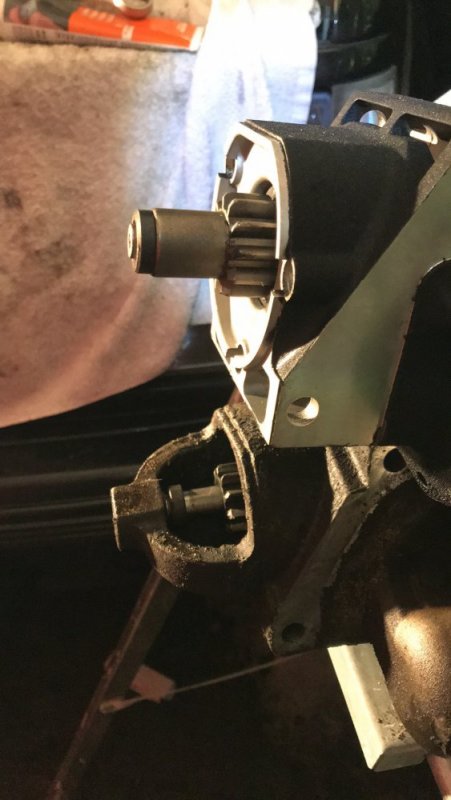
Old vs. new:
2019-12-29 19.45.51.jpg

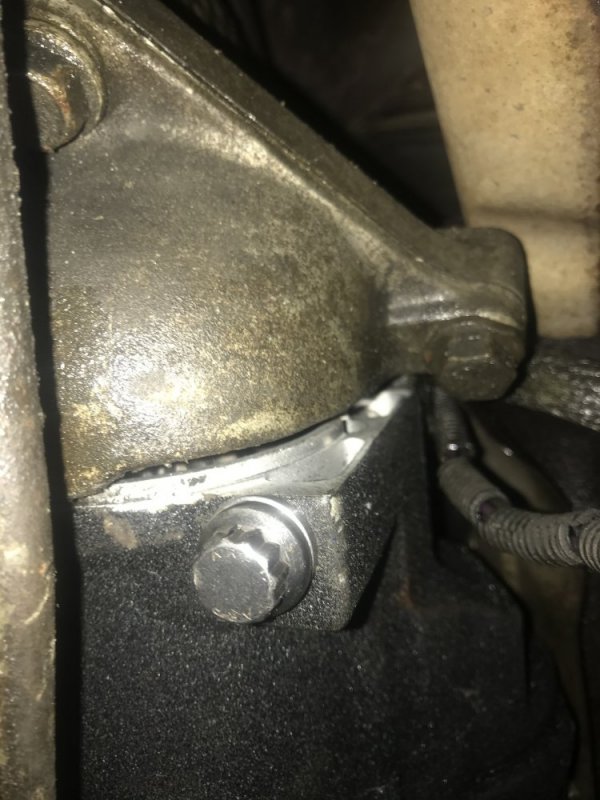
New starter in place. I was a bit concerned about the alignment, so I decided not to torque it down and put out a request for help on various facebook groups. Apparenty, this is how they fit!
2019-12-29 20.14.51.jpg

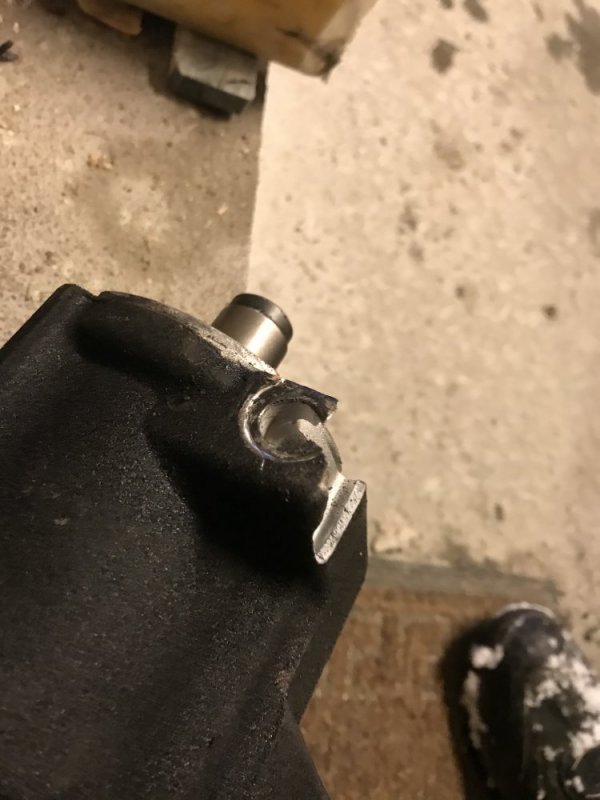
Next day, I decided to torque it down and finish up. Torqued down the first bolt...CLICK. Torqued down the second bolt....SQUEAK. SQUEAK? SQUEAK! The casting gave in! My torque bar was correctly adjusted, so I really don't know what went wrong. Luckily, both Powermaster and @quadstar87 gave me great customer support, so as we speak, a new casting is on its way to Norway from Powermaster free of charge. Hopefully there will be good outcome of this project at the other end! :)
2020-01-03 13.52.57.jpg
 
So, since the turbo was ****ed and everything was closed for Christmas, I quickly realized there was no way I´d have my burb back on the road before I had to leave for work at the 5th of January - so I decided to give the projects I wasn't supposed to do over Christmas a shot, starting with replacing my old (but well functioning) starter with the gear reduction starter from Quadstar. The old one could easily be 20 years old for all I know, and even though it worked better than I thought after my battery change earlier this autumn, I decided to swap it for the better one when I had the inner fender out already.

After a bit of cursing with the electrical connections, it was out. Again - a great thanks to @Hink for the great guides on 65turbogarage.com! :)
View attachment 59176

Old vs. new:
View attachment 59177

New starter in place. I was a bit concerned about the alignment, so I decided not to torque it down and put out a request for help on various facebook groups. Apparenty, this is how they fit!
View attachment 59178

Next day, I decided to torque it down and finish up. Torqued down the first bolt...CLICK. Torqued down the second bolt....SQUEAK. SQUEAK? SQUEAK! The casting gave in! My torque bar was correctly adjusted, so I really don't know what went wrong. Luckily, both Powermaster and @quadstar87 gave me great customer support, so as we speak, a new casting is on its way to Norway from Powermaster free of charge. Hopefully there will be good outcome of this project at the other end! :)
View attachment 59179
There is a post on here someplace about cracking castings while replacing the starter on the 98 Suburban. I never did figure out the cause. I think I went through 3 starters before I was successful.
 
There is a post on here someplace about cracking castings while replacing the starter on the 98 Suburban. I never did figure out the cause. I think I went through 3 starters before I was successful.
Oh no! It makes me feel a bit better that Im not the only one in the world that managed! Too bad you could never figure out the cause - it would be nice to be able to not do it again!!

I wonder if some anti sieze lube under the head of the bolt might keep it from creating friction and causing the cracking.
That is not the most stupid idea! I might just try that when I get the new casting!
 
Oh no! It makes me feel a bit better that Im not the only one in the world that managed! Too bad you could never figure out the cause - it would be nice to be able to not do it again!!


That is not the most stupid idea! I might just try that when I get the new casting!
I guess for Me, the "Squeak, squeak, squeak" in the one posting was sort of a giveaway. Now I`m not guaranteeing that anti seize will keep from busting the aluminum end cone but it shore cant hurt. LOL
 
Oh no! It makes me feel a bit better that Im not the only one in the world that managed! Too bad you could never figure out the cause - it would be nice to be able to not do it again!!


That is not the most stupid idea! I might just try that when I get the new casting!
I had never heard of it, until it happened to me. Haven't heard of it since. Til now
 
I guess for Me, the "Squeak, squeak, squeak" in the one posting was sort of a giveaway. Now I`m not guaranteeing that anti seize will keep from busting the aluminum end cone but it shore cant hurt. LOL
There was only one squeak-sound to be fair, but I still think You have an excellent point! 😂

I had never heard of it, until it happened to me. Haven't heard of it since. Til now
Well, that makes our club a very exclusive one I guess... 😂😂😂
 
Anyway, the story continues. As I had ****ed up pretty much everything I tried to work on in the holiday period, I decided, I might as well give the exhaust a go as well. I have red countless posts about people ripping of the heads of the bolts on the crossover, so I decided to let time, rust penetrating oil and heat help me. I even invested in a impact gun to try to loosen the bolts.

Then, a friend of mine gave me THE BEST TIP EVER:
50/50mix of acetone and atf was supposed to be the best rust penetrating goop ever. Okay, I decided to give it a shot. Bought it and a steel oil can to mix it in. Let it work for a night, and then my plan was just to heat it up, let it cool down, and apply more to let time work for me. I just had to feel the bolts. DON`T YOU THINK THEY CAME LOOSE! ALL 6 bolts on the crossover came out quite easily, and I got all the four nuts on the down pipe connection off as well. This is a miracle mix!!

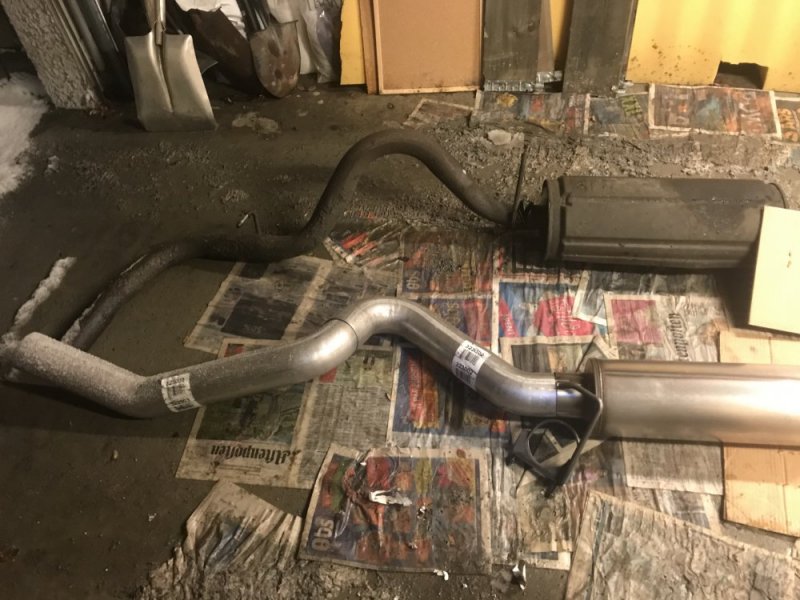
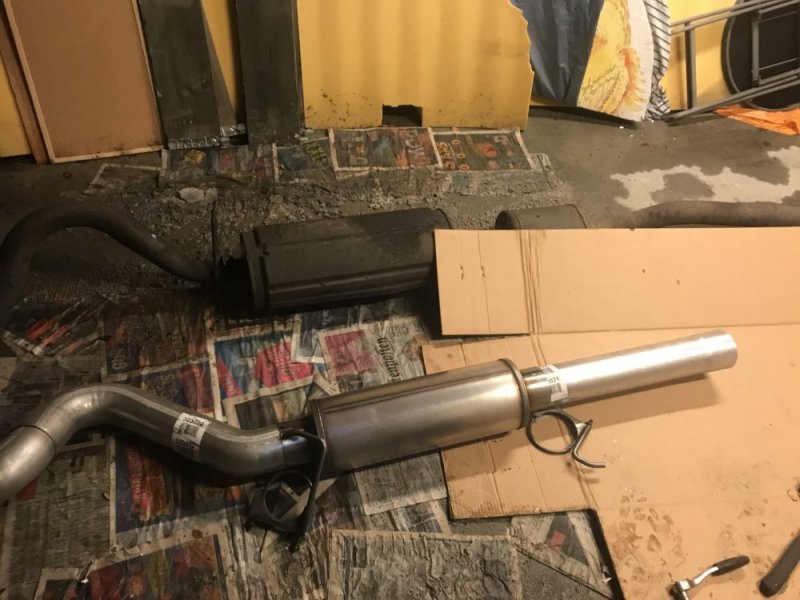
I tried to divide the exhaust without hurting it, but at the end I gave in to the angle grinder. At least I got it out. Here laid out next to the new 4" Diamond eye exhaust:2020-01-03 17.07.26.jpg
2020-01-03 17.07.28.jpg

Got under the burb and started mounting the exhaust. It was a bit tricky being alone, and the blizzard didn't really help either, so at some point in the evening I gave in, and left the project unfinished. At least - even though its not finished, its at least not ****ed! ;)

So that's basically the end of the rant when it comes to my Christmas advedtures. I've been three weeks away now, heading back home on Thursday, where I will have return lines, turbo shaft and the new casting for the starter waiting for me - so hopefully I´ll be able to get it up and running fairly quickly. I scored some cheap Ac Delco 60g glows the other day, so I´ll be doing the glows while I have everything opened up. I didn't have to, as I did the glows a year ago or so, but it feels good to know that they are 60gs. At the moment I have a mix of Bosch duratherms and some dieselrx plugs that I luckily found locally when all the electrical connectors on the Bosch plugs kept breaking off.

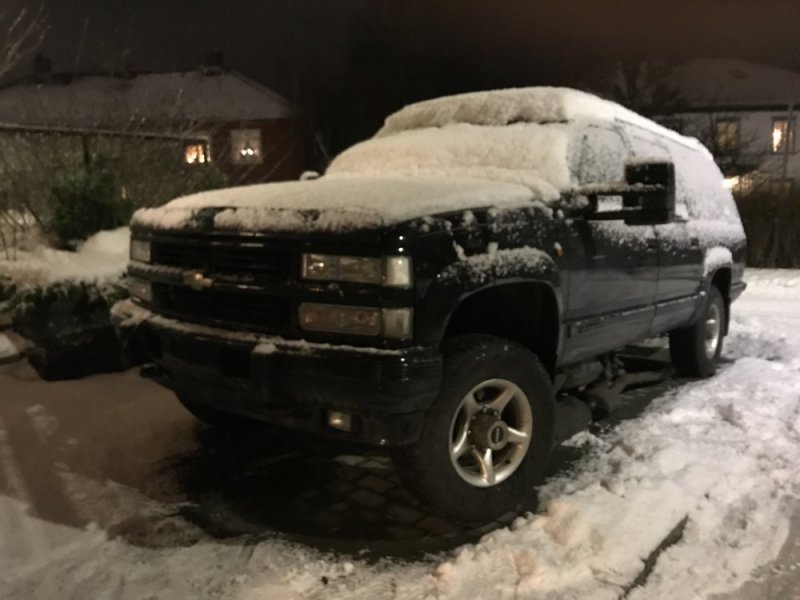
So here she is - waiting for me to come back and finish the work. Can't wait to get home!!
2020-01-04 20.17.51.jpg
 
Anyway, the story continues. As I had ****ed up pretty much everything I tried to work on in the holiday period, I decided, I might as well give the exhaust a go as well. I have red countless posts about people ripping of the heads of the bolts on the crossover, so I decided to let time, rust penetrating oil and heat help me. I even invested in a impact gun to try to loosen the bolts.

Then, a friend of mine gave me THE BEST TIP EVER:
50/50mix of acetone and atf was supposed to be the best rust penetrating goop ever. Okay, I decided to give it a shot. Bought it and a steel oil can to mix it in. Let it work for a night, and then my plan was just to heat it up, let it cool down, and apply more to let time work for me. I just had to feel the bolts. DON`T YOU THINK THEY CAME LOOSE! ALL 6 bolts on the crossover came out quite easily, and I got all the four nuts on the down pipe connection off as well. This is a miracle mix!!

I tried to divide the exhaust without hurting it, but at the end I gave in to the angle grinder. At least I got it out. Here laid out next to the new 4" Diamond eye exhaust:View attachment 59237
View attachment 59238

Got under the burb and started mounting the exhaust. It was a bit tricky being alone, and the blizzard didn't really help either, so at some point in the evening I gave in, and left the project unfinished. At least - even though its not finished, its at least not ****ed! ;)

So that's basically the end of the rant when it comes to my Christmas advedtures. I've been three weeks away now, heading back home on Thursday, where I will have return lines, turbo shaft and the new casting for the starter waiting for me - so hopefully I´ll be able to get it up and running fairly quickly. I scored some cheap Ac Delco 60g glows the other day, so I´ll be doing the glows while I have everything opened up. I didn't have to, as I did the glows a year ago or so, but it feels good to know that they are 60gs. At the moment I have a mix of Bosch duratherms and some dieselrx plugs that I luckily found locally when all the electrical connectors on the Bosch plugs kept breaking off.

So here she is - waiting for me to come back and finish the work. Can't wait to get home!!
View attachment 59239
Yep, take care of her and she will give long and reliable service......
 
Yep, take care of her and she will give long and reliable service......
That's the plan...I´m hoping to get 10 years out of it. Got 9 out of my express van with minimal maintenance, so this time, with less rust to start with, same mileage and a lot more love, it should be possible! :)

I`ll be ordering the 4" diamond eye exhaust system for My K3500, after seeing Your laid out, made My heart do a little thump and now I dont think I`ll be waiting, getter done. LOL
I find that is the problem with all the possible upgrades one can do...once the brains start spinning on it, its kind of hard not to do it eventually!! ;D
 
That's the plan...I´m hoping to get 10 years out of it. Got 9 out of my express van with minimal maintenance, so this time, with less rust to start with, same mileage and a lot more love, it should be possible! :)


I find that is the problem with all the possible upgrades one can do...once the brains start spinning on it, its kind of hard not to do it eventually!! ;D
Yeah, I`d also like to get an upper assembly for an AR10 lower receiver that I have in the garage, that upper unit is in a .243 caliber instead of a .308, 450 bucks for the upper, then another 50 for the buffer/stock and another 50 for the lower parts kit. :banghead:
Cant have it all at once and, I believe that the exhaust is a priority as I get the diesel exhaust smell in the cab when allowing the truck to warm up on a fast idle, using the PTO switched option.
 
Oh, yeah, getting rid of money never seems to be a problem, no matter what the project is - but that exhaust leak is probably the best excuse of the all to Get the diamond eye exhaust!
 
Oh, yeah, getting rid of money never seems to be a problem, no matter what the project is - but that exhaust leak is probably the best excuse of the all to Get the diamond eye exhaust!
YUP, it now is ordered, the Diamond eye exhausting system. I now hope that the exhaust smell coming into the cab is not from a warped turbo flange, top or bottom. LOL
I guess that a easy enough fix if it turns to be that. LOL
Before I take the truck to the muffler/pipe shop, I1ll have the man help Me to determine where the leak is coming from. 260,000 miles and the original exhaust, I cant imagine it not having some leaks somewhere along the line. LOL
 
Yeah, I`d also like to get an upper assembly for an AR10 lower receiver that I have in the garage, that upper unit is in a .243 caliber instead of a .308, 450 bucks for the upper, then another 50 for the buffer/stock and another 50 for the lower parts kit. :banghead:
Cant have it all at once and, I believe that the exhaust is a priority as I get the diesel exhaust smell in the cab when allowing the truck to warm up on a fast idle, using the PTO switched option.
You do know they make nice mufflers in those calibers too......
 
Back
Top