bison
Well-Known Member
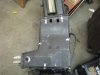
If you would've read my post, it tells exactly where the bolts are against the firewall,one of them is up at least 2'' between the cover and firewall,you might be able to see it with a mirror and a flashlight.??? So the screws you missed, could you have gotten them or did breaking the case save you from haing to pull all that stuff ??
But WTF do i care:rolleyes5:


 To be honest, it wasn't until the thing cracked that I remembered the part about the one in the back. My bad and I'll own the mistake.