The Haynes book misses this. After doing it and assuming the 2500 rotors just come off after caliper removal BS the book says - well another reason to burn that worthless book on the Bar-B-Q...
You need more information when a decision needs to be made to do it yourself or sub it out.
Took 3 days including 1 day to get extra parts. 1993 vintage brake lines were cracked by the calipers and the driver's side dust boot was filled with brake fluid.
I usually do the passenger side first as it will have the most wear and bad parts that you have to replace on both sides. So if the passenger side needs it you get it for the driver's side. I was not happy when I discovered the brake fluid in the driver's side after putting new slider o rings on the passenger side... :mad2:
The heavy 3/4 ton, 8700 LBS, 8 lug has different brake hoses than the lighter 6 lug version. They also appear to require hub removal and pounding out of rusty studs to replace the rotors (Brake Disc).
Parts used:
calipers
brake hoses
slider bolts for calipers
antiseize
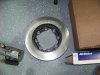
rotors
pads
grease
2 big containers of brake fluid
15 MM 6 point socket - busted...
Others have suggested that you make sure you can obtain new hub bolts...
Lets get started.
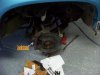
Raise the vehicle and support on jack stands.
Use the trusty impact to remove the wheels.
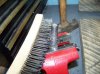
Use penetrating oil on the center axle bolt and knock it off with the impact.
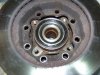
Hit the splines with penetrating oil.
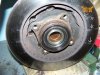
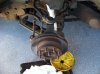
Remove the brake caliper.
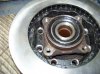
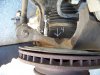
Hit the 4 hub bolts with penetrating oil both by the bolt head and what you can get to with the caliper out of the way. The front bottom bolt requires you to spray it through the rotor vents. (You are tossing the rotors so what if you get some oil on them now? ):h ) You need to get to the rust end of the bolt and that is the hidden by the rotor side!
Let the oil soak...
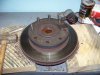
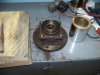
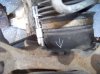
A couple whacks on the axle should free it from the hub. Yes, with the hub bolts in.
I suggest a deep well impact grade 15 MM socket to knock the hub bolts out. The light duty ones break even with a lifetime warranty and a big enough ratchet... Or hit them with an impact. Mine came out with a torque wrench length tool.
If that wasn't fun...
Now you get to remove the studs!
You need more information when a decision needs to be made to do it yourself or sub it out.
Took 3 days including 1 day to get extra parts. 1993 vintage brake lines were cracked by the calipers and the driver's side dust boot was filled with brake fluid.
I usually do the passenger side first as it will have the most wear and bad parts that you have to replace on both sides. So if the passenger side needs it you get it for the driver's side. I was not happy when I discovered the brake fluid in the driver's side after putting new slider o rings on the passenger side... :mad2:
The heavy 3/4 ton, 8700 LBS, 8 lug has different brake hoses than the lighter 6 lug version. They also appear to require hub removal and pounding out of rusty studs to replace the rotors (Brake Disc).
Parts used:
calipers
brake hoses
slider bolts for calipers
antiseize
rotors
pads
grease
2 big containers of brake fluid
15 MM 6 point socket - busted...
Others have suggested that you make sure you can obtain new hub bolts...
Lets get started.
Raise the vehicle and support on jack stands.
Use the trusty impact to remove the wheels.
Use penetrating oil on the center axle bolt and knock it off with the impact.
Hit the splines with penetrating oil.
Remove the brake caliper.
Seriously get it out of the way: remove the brake hose from it. Might as well flush the system while you are at it and this makes putting new slider o rings and seals in cake.
Hit the 4 hub bolts with penetrating oil both by the bolt head and what you can get to with the caliper out of the way. The front bottom bolt requires you to spray it through the rotor vents. (You are tossing the rotors so what if you get some oil on them now? ):h ) You need to get to the rust end of the bolt and that is the hidden by the rotor side!
Let the oil soak...
A couple whacks on the axle should free it from the hub. Yes, with the hub bolts in.
I suggest a deep well impact grade 15 MM socket to knock the hub bolts out. The light duty ones break even with a lifetime warranty and a big enough ratchet... Or hit them with an impact. Mine came out with a torque wrench length tool.
If that wasn't fun...
Now you get to remove the studs!
Attachments
Last edited: