• Welcome to The Truck Stop! We see you haven't REGISTERED yet.

    Your truck knowledge is missing!
    • Registration is FREE , all we need is your birthday and email. (We don't share ANY data with ANYONE)
    • We have tons of knowledge here for your diesel truck!
    • Post your own topics and reply to existing threads to help others out!
    • NO ADS! The site is fully functional and ad free!
    CLICK HERE TO REGISTER!

    Problems registering? Click here to contact us!

    Already registered, but need a PASSWORD RESET? CLICK HERE TO RESET YOUR PASSWORD!

Getting the hot air out.

Paveltolz

Доверяй, но проверяй
Messages
2,886
Reaction score
2,286
Location
Saratoga Springs, UT
Back Ground:
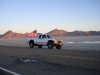
For the first couple of years after buying my 96 K1500 I had to really watch the temperature gauge on any climb over a few minutes as the temps climbed up to 210 w/ or without a load, winter or summer, Rockies or whatever. It always dropped back down to 195 but ratcheted right back up again and seemed to hover forever before repeating the cycle. Needless to say, it was un-nerving.

2.5 years after purchase, I met Bill Heath and Ted "635" last September on at Bonneville and following their advice to cool things down and prolong what's left of my engine's life, I have installed: 4" exhaust kit; Cross over kit; "Super Cool" H/O Water Pump, Fan and Clutch kit and the GLE towing program. There's more but these are the 'heat related' improvements suggested.

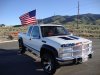
Everything has worked 'as advertised' and I can't thank Bill, Ted, Todd and co. enough 'cause the truck's own weight on any long climb has yet to produce anything over 195. I'm talking "Cabbage Patch" on 1-80 at 70 mph.

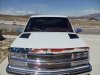
Still, there's the issue of underhood temps that are a subject of debate but, without argument, its fricken hot under there. Ted's solution to keep his new 'Wundermotor' alive for as long as possible was a set of "Run Cool" hood louvers that rivet to the hood.

He'd taped yarn to them and at a stand still with the engine reved up a bit the evidence was visible as to the effectiveness.

Ok, I'm trusting, I liked the look, I can't argue with the results of reduced temps and the benefit to the electronics and they looked cool (yeah, I said that already but one has to have priorities) so I made the call to Run Cool.

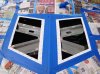
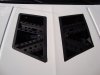
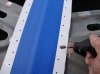
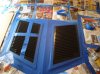
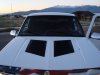
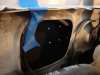
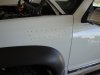
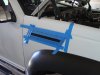
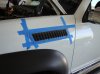
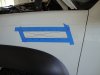
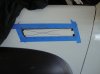
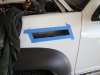
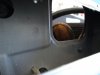
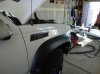
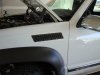
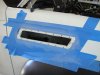
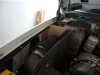
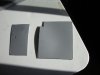
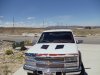
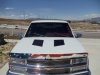
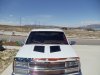
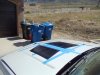
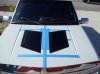
Bob sent out a set of Large and Extra Large hood louvers along with a set of Side Vents so I could do some location comparisons prior to cutting holes in the hood and then deciding...OOPS, which is my want.

Here's what a few of the options looked like.
 

Attachments

  • 1 LRG not.jpg
    1 LRG not.jpg
    43.5 KB · Views: 45
  • 1 LRG.jpg
    1 LRG.jpg
    42.7 KB · Views: 37
  • 1 LRG-C.jpg
    1 LRG-C.jpg
    41.7 KB · Views: 40
  • 1 XL.jpg
    1 XL.jpg
    41.7 KB · Views: 45
Positioning

After deciding on the XL units (I "manned up" according to Bob), there's the issue of centering the things and positioning them.
I ran 2" painter's tape down the hood center and used a Sharpie to outline the hood's center ridge.
Then I ran 2: tape down both sides of the "ridge line" with a second pass on the outsides of those.
This gave me a good 4" off center reference to use in centering the louvers where I wanted them between the Ridge and the creases.
Once I had the width set, there was the front to rear positioning. I measured down from the washer sprayer nozzles to ensure a square right angle off the center at the top and bottom of the louvers.
By the buy, I used painter's tape on the bottom side of the louvers to keep them from scratching the paint as I jockeyed them around.
 

Attachments

  • 17.jpg
    17.jpg
    43.9 KB · Views: 17
  • 16.jpg
    16.jpg
    33.4 KB · Views: 15
  • 14.jpg
    14.jpg
    40.1 KB · Views: 16
Looking good! Glad you chose the big ones :)
Thanks,
With a smooth hood (Pre 6.5 with no outside creases), I would have pushed them further apart and centered over the turbo and driver's side exhaust manifolds, but that wasn't "aesthetically pleasing" so I decided on 3.5" off ridge line which pretty much centers them depending on where you measure from the outside edge/hood creases.
Once I had the final positions down, I marked their outline with a Sharpie which, in retrospect, was a mistake. Old paint, micro cracks/oxidation etc...the pen markings didn't want to come out even with 100% acetone.
Following the enclosed instructions,
- I ran 3/4 inch painters tape on the inside of the edge to give me a reference to make the cuts.
- Removed the hoods liner because the metal cuttings would set that thing on fire. It will be replaced later with
- I found some old bath towels the wife wanted to get rid of (to justify purchasing new ones [I'm just trying to helpful]) and soaked them down. One was placed over the windshield to avoid pitting from the metal cuttings and the other was placed over the engine to catch the shavings succumbing to gravity.
 
CUT!

Sorry, no pictures of the above steps but there's more than a thousand words so far....
I used my 4.5" grinder with an 1/8" cut-off wheel. Having never done this before, I made a lot of shallow passes on the driver's side to avoid cutting into or through the support material...FAIL but not epically. Oh well, live and learn. At least I didn't go too deep and I notched out the edges.
The passenger's side was much better.

This picture was taken post drilling out rivet holes and after taping for eventual black paint. You can see the 'deep' cuts on the cross member supports, driver's side - outside edge.
 

Attachments

  • 20.jpg
    20.jpg
    54.7 KB · Views: 43
After cutting, I taped everything off for the black paint to ward off rust and to keep the white/grey from showing up at me behind the wheel making me wish I'd done it... I double layered the edges because of the sanding that would be needed prior to paint.
Taping the hood louvers back down ensured there wasn't any movement when drilling the holes for the stainless steel pop rivets. The louvers are pre-drilled and aluminum so I could use them as guides for the included drill bit w/o worrying about rust.
Following the rivet holes, I "Swiss Cheesed" the cross members to improve air flow.
After drilling, I used my Dremmel to de-bur the holes and edges of all the cuts. I'm going to be under there working and don't want any more sharp edges etc than necessary. Stock is bad enough.
I then hit all surfaces with 320 grit using my Porter DA sander taking care to feather out chipping/flaking edges to prevent 'delaminating' of the factory paint under the louvers, cleaned everything with more acetone and proceeded to lay down black primer in abundance. Once I removed the tape, and some paint from the driver side hood crease:mad2:
thngs were looking good.
 

Attachments

  • 33.jpg
    33.jpg
    35.2 KB · Views: 24
  • 34.jpg
    34.jpg
    53.3 KB · Views: 20
  • 32.jpg
    32.jpg
    40.6 KB · Views: 20
  • 31.jpg
    31.jpg
    54.7 KB · Views: 22
  • 30.jpg
    30.jpg
    43.2 KB · Views: 22
Riveting Experience.

A good rivet gun would have helped loads. I don't have one as I think I've needed one about 4 times in the 20 years since I first bought one. I still have some of the 'starter kit' rivets that came with it.
At any rate, I had to buy another one as the old one was 'all dead.'
After more swear words than I care to admit muttering and a very sore pair of hands I got the 3.2 bazillion rivets in. Truth after the cutting, drilling, taping, grinding, and then the riveting...My back was one giant knot.
Do yourself a big fat favor and beg, borrow or buy a good rivet gun...enough said.
Lastly, I went around to each rivet to ensure I got the 'nail' either driven back out or de-burred too.
Anyway, no arguing with the aesthetics of the job when done.
 

Attachments

  • 25-s.jpg
    25-s.jpg
    43.5 KB · Views: 42
Nice job, Paul! Patience and care are both important when it's gonna be under your nose every time you drive!
 
Excellent Job, Paul! It looks great. You gotta do some videos with yarn to show us all how cools it runs now!

-Rob :)
 
A little [on] the sides...

A week later, after moving a ton of landscape rocks, it was time for the side vents.

First, I removed the sound insulation from the fender by the radiator reservoir because there is some internal structure thats designed to force air to the intake filter. I didn't want to cut across that structure but, as it turns out, the AFE box extends further back than I realized. More on that fix later.
I used 3/4 tape to identify where the structure I wanted to avoid was and then I ran tape down the body creases to give me a consistent distance down from that feature. The side vents were then taped on for mock up purposes and adjusted.
Once I was satisfied with the placement, I secured them in place with more tape and again used the units themselves as templates to drill the rivet holes prior to cutting out the holes. Yes, this was a departure from the process used for the hood, but the openings for the louvers came w/in a eighth of an inch of the rivets so I wanted as much opening as I could get and not compromise the rivet holes.
 

Attachments

  • Side 4.jpg
    Side 4.jpg
    35.6 KB · Views: 23
  • Side 3.jpg
    Side 3.jpg
    35.7 KB · Views: 21
  • Side 2.jpg
    Side 2.jpg
    40.7 KB · Views: 21
  • Side 1.jpg
    Side 1.jpg
    39.7 KB · Views: 22
Nice job, Paul! Patience and care are both important when it's gonna be under your nose every time you drive!

Thanks again. I'll get the yarn out when I get home and give it a go. I thought about trying to get a demo by means of smoke but....no trial and error there.
 
Painter's tape was used on the inside edge for cutting.
I punched holes in the tape to ID the rivet holes and ensure I had enough material between them and the vent hole to be cut.
Larger holes in the cut corners were bored to keep the over cutting to a minimum.
No structure under there like the hood but I still made several shallow passes just to be sure.

You can see the air cleaner through the hole in the fender.
 

Attachments

  • Side 5.jpg
    Side 5.jpg
    35.8 KB · Views: 15
  • Side 6.jpg
    Side 6.jpg
    36.6 KB · Views: 14
  • Side 7.jpg
    Side 7.jpg
    45 KB · Views: 16
  • Intake From outside Fender.jpg
    Intake From outside Fender.jpg
    38.6 KB · Views: 17
Last edited:
More Dremmel around the edges; taping for paint; paint feathering; cleaning and then black primer.

I sprayed inside the fender as well to ensure things stayed dark w/o white showing through from deeper inside.

Once dry, Pop Rivet Boogie again only much easier as I wasn't splayed across the hood for what felt like hours...whimper whine cry....
 

Attachments

  • Intake From Inside to Fender Vent.jpg
    Intake From Inside to Fender Vent.jpg
    44.4 KB · Views: 18
  • Side R.jpg
    Side R.jpg
    47.5 KB · Views: 22
  • Side L.jpg
    Side L.jpg
    44.3 KB · Views: 22
  • Side 9.jpg
    Side 9.jpg
    50.4 KB · Views: 14
  • Side 8.jpg
    Side 8.jpg
    43.1 KB · Views: 16
To ensure hot air didn't re-circulate back to the air filter-
- Cardboard mock up
- 2nd Mock up of plastic cut from an old storage bin, joined up with some duct tape which was used to cover edges to avoid chaffing through the radiator return hose.
- Paint it up black and hold in place with plastic fastener (OEM).

Not Pictured: Further adjustment to the design was made later because the hinge would grab first the hose when closing the hood and then it hit the mockup itself. More work needed but I'm in Florida for the week. Home Thursday.

Still, the whole job looks nice inside and out. Functional as hell. The hood feels cool even after long runs and the heat just roils out of the vents.

Much of the credit to Ted 635 as I would not have even tried this without his having done it, his confidence in me and his encouragement throughout. He showed me what was possible, gave me tips that he noted during his install trials and now its out here for all of us. Thanks Ted. "Ich hatte einen Kommerad, Ein besser Freund nicht funden...."
 

Attachments

  • Intake Mod Cardboard Mock-up.jpg
    Intake Mod Cardboard Mock-up.jpg
    45.1 KB · Views: 21
  • Intake Mod First Cut.jpg
    Intake Mod First Cut.jpg
    30.7 KB · Views: 19
  • Intake Mod in Place.jpg
    Intake Mod in Place.jpg
    46.4 KB · Views: 25
Postscipt

So, thanks to all of you for your patience with me, this thread, my ramblings and for laughing with me and at me over my trials and errors over the years on this forum and the other Place.

I still have a $550 injection pump, "new" with only 100 miles on it (NOT):icon_bs:. If anyone wants an expensive door stop (Bison can share the story of how I got snookered on this one) PM me. I wouldn't install it on a truck without some serious testing though....:D

Anyway, In just over three years, I've gone from a decent, good looking, but beat up underneath construction truck needing a lot of catch up work to a very reliable and great looking rig that I'm not worried about driving anywhere or anytime there's a road wide enough to put the wheels on.

The best part of it is, most of the work I've done myself, thanks to all of you.

Hope you enjoyed the write up.

Paul
 

Attachments

  • Truck 1 JAN 07 Ebay Photo.JPG
    Truck 1 JAN 07 Ebay Photo.JPG
    32.5 KB · Views: 32
  • Truck 2 MAR 08.jpg
    Truck 2 MAR 08.jpg
    48.3 KB · Views: 32
  • Truck 3 SEP 09 Bonneville Salt Flats.jpg
    Truck 3 SEP 09 Bonneville Salt Flats.jpg
    38.4 KB · Views: 31
  • Truck 5 JUN 10.jpg
    Truck 5 JUN 10.jpg
    49.1 KB · Views: 48
So you closed off the back what about the front?

I've got the side battery post mod in place which puts the bolt heads very close to the front of the box. That's and easy do with plastic or plexiglass which is where I'm actually leaning.

Once I get the RAAMaudio heat/sound barrier material back under the hood
I'll finish the front.

Right now, to be honest, just the card board mock up is sitting there in the front of the box. Sad to say, I was so tired after the landscaping and then the vents etc that I forgot all about it until the other day when I popped the hood to show off the back mod and !@#$%^&*.
:iamwithstupid:

Oh well, just don't tell anyone ok:thumbsup:
 
Very good looking. Whats next?
Thanks, your truck's looking mighty fine too. Nice work on the other vehicles as well.

Next for me-Order and install the sound/heat barrier on the hood and finalize the air box. Then I guess I'll sod the lawn and work on the back yard:mad2:

or

Buy some high quality paint and head out your way.
 
Last edited:
Back
Top