• Welcome to The Truck Stop! We see you haven't REGISTERED yet.

    Your truck knowledge is missing!
    • Registration is FREE , all we need is your birthday and email. (We don't share ANY data with ANYONE)
    • We have tons of knowledge here for your diesel truck!
    • Post your own topics and reply to existing threads to help others out!
    • NO ADS! The site is fully functional and ad free!
    CLICK HERE TO REGISTER!

    Problems registering? Click here to contact us!

    Already registered, but need a PASSWORD RESET? CLICK HERE TO RESET YOUR PASSWORD!

97 K1500 restoration underway

dieselolds

Well-Known Member
Messages
330
Reaction score
724
Location
Canada
Hey guys.The past couple of weeks I've dismantled a 97 K1500 with a 6.5TD and 4L80E.Its an extended cab with short bed.The cab when lifted off revealed a 599 block but when I lowered the starter,a cracked block was noted but the repair looks acceptable.I have a new 660 6.2 diesel short block that I'm going to use instead.I'm bolting on new 6.5 TD heads with new DS4 injection pump and stanadyne injectors.

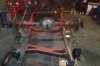
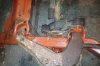
Basically the truck was driven into the ground and I'm trying at this point to bring it back to life.The chassis right now is on four jack stands.I have it partly primed with red oxide and will follow with a nice coat of flat black afterwards.Energy suspension bushings are installed on the rear leaf springs with new spring hangers at the rear.

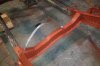
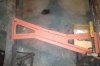
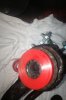
New polyurethane control arm bushings were installed today.I had to fabricate two new cross members from scratch as the originals were rusted out badly.Here are a few pictures to show you guys what I'm up to.

Excuse the mess in the garage...lol.Its a little untidy at the moment.
 

Attachments

  • image.jpg
    image.jpg
    84.4 KB · Views: 17
  • image.jpg
    image.jpg
    84.4 KB · Views: 15
  • image.jpg
    image.jpg
    83.2 KB · Views: 15
  • image.jpg
    image.jpg
    90.3 KB · Views: 13
Great start! I still need to get around to sending you those injection lines, was busy with a move, got sick and then just got hit with almost a foot of snow!
 
Doesn't look like this is your first rodeo either. Care to share why you went w/ 700R4's in your 2 other trucks?

700R4 transmissions were used as I wanted to keep things somewhat simple and straight forward.I thought about using the 4L80E but I didn't want to mess around with a stand alone transmission controller.But hands down,the 4L80E is the better of the two.My two trucks with 700R4's are basically grocery getters.
 
Looking good so far. Looks like you have a bit of work in front of you... looks like fun.

Thanks.Alot more work to go for sure.Tommorrow the chassis will be flipped over and then I'll be able to continue on with the project.I have new delco backing plates for the brake shoes,axle seals and outer bearings which probably will be installed tommorrow.
 
Great start! I still need to get around to sending you those injection lines, was busy with a move, got sick and then just got hit with almost a foot of snow!

Hey Jorge.Nice to see ya!Take your time on the lines.Whenever you can that'll be great.
 
One helluva job recreating the xmembers.

Thanks very much.The fuel tank crossmember was the toughest of the two.I just used some cardboard and placed it against the old crossmember,traced it out and applied it to some 1/8" steel I picked up.I would'nt of been able to do it if I didn't have a plasma cutter.That thing does a great job.
 
Although it's rather expensive... POR 15 will hold up much better then any other paint on the frame / suspension.

Looks like you are doing a great job..!!!
 
Although it's rather expensive... POR 15 will hold up much better then any other paint on the frame / suspension.

Looks like you are doing a great job..!!!

Thanks Mike.I appreciate it.What is POR 15?Never actually heard of it.I'll have some engine pictures in the next week or so.Thats when I'll be assembling the engine.

The chassis was very weak on the end so my father also chipped in and helped me with that area.Thats where the red primer ends from there.We used 1/4" flat bar for the top and bottom section.When that was done we squeezed 1/8" flat bar on the side.After everything was tacked in place I pealed off the outer rusted section.I marked the holes for the spring hangers so I got them back in the right place.
 
Here is a link to a starter kit.

http://www.por15.com/SUPER-STARTER-KIT--Black_p_11.html

My neighbor used this on his transfer case rebuild. It was easy to use and looked awesome after he was done.

In my words, it is like painting a strong fingernail on metal.

It's only downside is uv light. If the part sees the sun they recommend painting over it.

They have some cool stuff! :thumbsup:

That stuff does sound impressive!Thanks for sharing that.
 
POR 15 has been used a lot on old Toyota Landcruiser repairs/restorations (go to ih8mud[dot]com for more info). It works best on used, rusty metal, not new metal. The loose, flaky rust needs to be cleaned off so that what is left is just the rusty surface. The POR 15 goes on over this, encapsulating the rust.

Proper surface preparation is crucial to adhesion, and yes, it is UV sensitive. But, if surface prep directions are carefully followed, and it is top coated soon, after a short curing time, it makes a very tough coating that stops future rust and holds up to UV.

I have no personal experience with it, just lots of reading about it from successful users, so do a lot of reading/research on it.

Don

Thanks for the heads up on that.Definately seems like impressive stuff to be using.Tommorrow I'll apply the flat black and attempt to get the front end and rear backing plates/drums installed.I should make great progress this upcoming week.
 
Today I worked on the upper control arms.I got the old bushings out of there.These are prothane brand polyurethane.The only catch is that you need to reuse the inner sleeve.Here's a picture to show what's been done.
 

Attachments

  • image.jpg
    image.jpg
    40.1 KB · Views: 2
  • image.jpg
    image.jpg
    34.5 KB · Views: 3
Back
Top