Glad it's all good.... sorry for the false alarm..
Navigation
Install the app
How to install the app on iOS
Follow along with the video below to see how to install our site as a web app on your home screen.
Note: This feature may not be available in some browsers.
More options
-
Welcome to The Truck Stop! We see you haven't REGISTERED yet.
Your truck knowledge is missing!
- Registration is FREE , all we need is your birthday and email. (We don't share ANY data with ANYONE)
- We have tons of knowledge here for your diesel truck!
- Post your own topics and reply to existing threads to help others out!
- NO ADS! The site is fully functional and ad free!
Problems registering? Click here to contact us!
Already registered, but need a PASSWORD RESET? CLICK HERE TO RESET YOUR PASSWORD!
You are using an out of date browser. It may not display this or other websites correctly.
You should upgrade or use an alternative browser.
You should upgrade or use an alternative browser.
1994 K3500 extended cab dually
- Thread starter n8in8or
- Start date
n8in8or
I never met a project I didn’t like
I'd rather have a false alarm than no alarm at all.Glad it's all good.... sorry for the false alarm..
Husker6.5
135' diagonal 16:9HD, 25KW sound!
Or bent pushrods/valves/cracked pistons!
n8in8or
I never met a project I didn’t like
More house stuff this week, so just now getting back to the truck. I got the engine prepped and painted. I used KBS Motor Coater in a color they call Chevy Dark Charcoal. So far I’m liking the color.

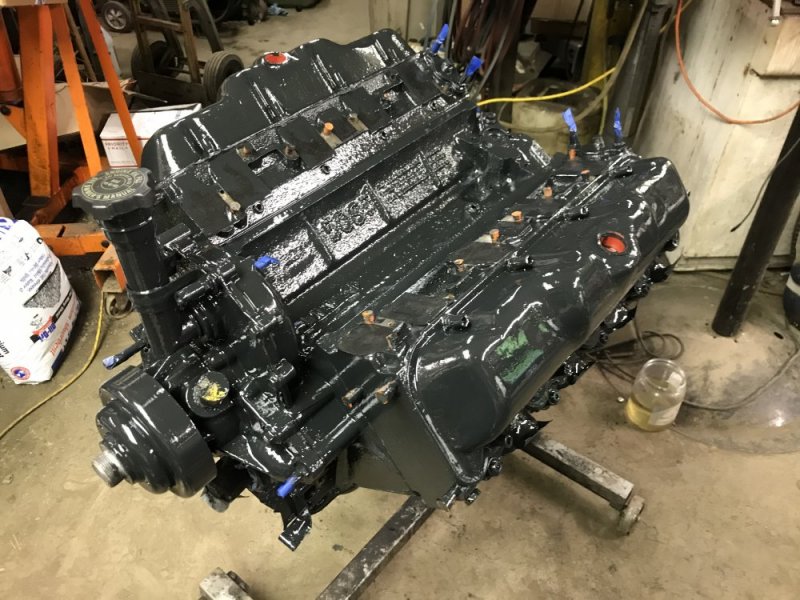
If all goes well tomorrow (which rarely seems to happy anymore), I may have the engine/transmission/transfer case sitting in the frame.


If all goes well tomorrow (which rarely seems to happy anymore), I may have the engine/transmission/transfer case sitting in the frame.
MrMarty51
Well-Known Member
Okay, You can go to the garage today, it is raining. LOLOLOL
n8in8or
I never met a project I didn’t like
Holy balls, something actually worked out!! I was able to get everything done I hoped to. I put the poly motor mounts from the Tahoe on the frame. After that I swapped the old front axle actuator for the updated design since it was easier to access with the engine out. Then it was time to assemble everything. First thing I did was dig out the Hughes converter I bought a few weeks ago. I’m excited to see how much it improves with a quality converter in it
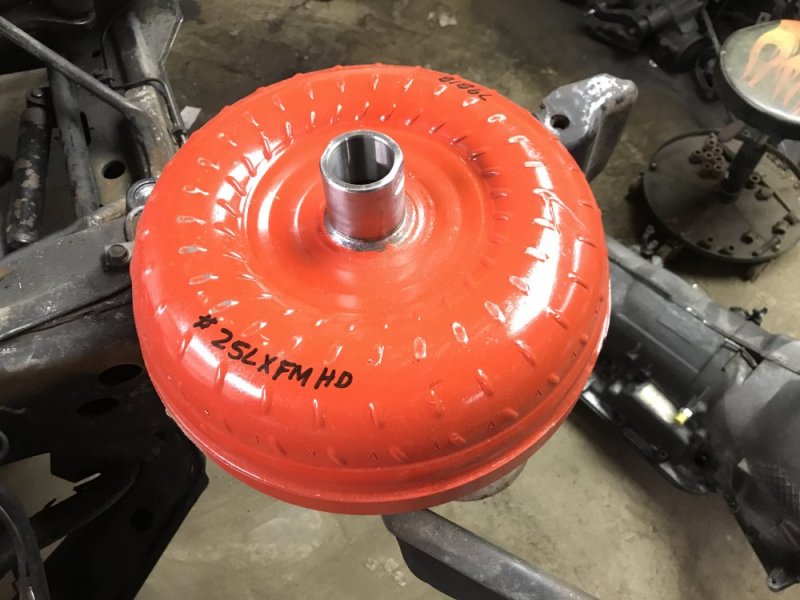
With that installed I bolted the trans to the engine and the transfer case to the trans. Just a few odds and ends and it was ready to install. The gap between the torque converter and flexplate was at the high end of the spec (supposed to be between 1/8“ - 3/16”) so I installed some .045 stainless washers. Then up it went.
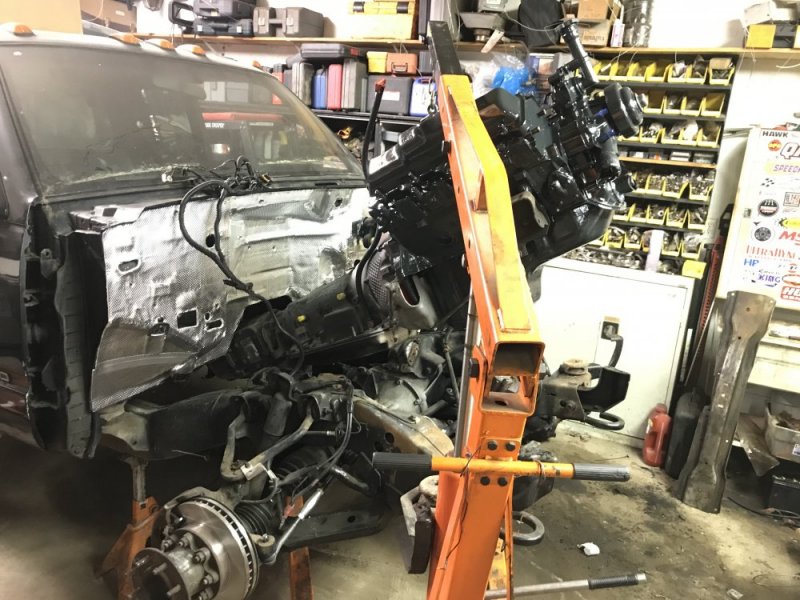
Obligatory ‘it’s going in shot’:
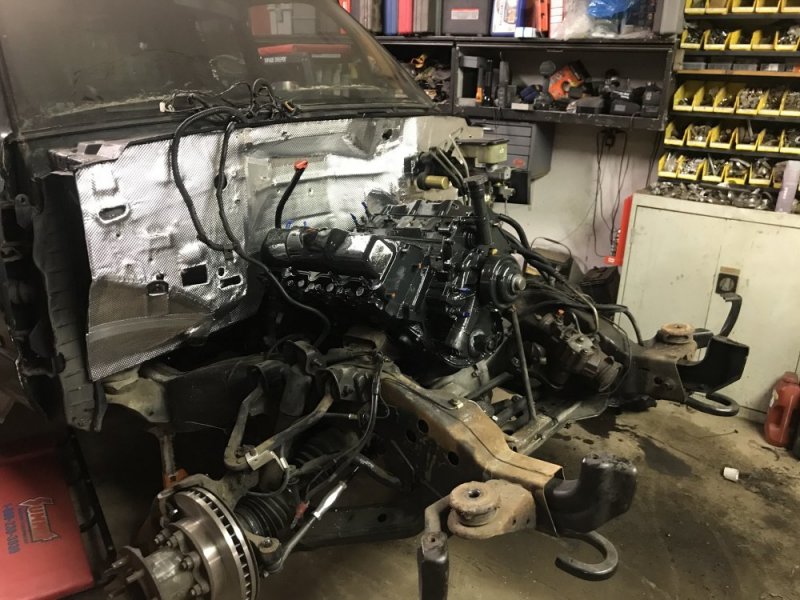
And here it is finally sitting on its mounts.
Now I can finally move on to the next stuff.

With that installed I bolted the trans to the engine and the transfer case to the trans. Just a few odds and ends and it was ready to install. The gap between the torque converter and flexplate was at the high end of the spec (supposed to be between 1/8“ - 3/16”) so I installed some .045 stainless washers. Then up it went.
Obligatory ‘it’s going in shot’:

And here it is finally sitting on its mounts.

Now I can finally move on to the next stuff.
Husker6.5
135' diagonal 16:9HD, 25KW sound!
Dr. Truckenstein!
n8in8or
I never met a project I didn’t like
THAT’S TROOKENSHTEEN!!Dr. Truckenstein!
Yeah it is parts from a few of my trucks combined. Once I get all the final bits n pieces installed it should hopefully be pretty stout.
n8in8or
I never met a project I didn’t like
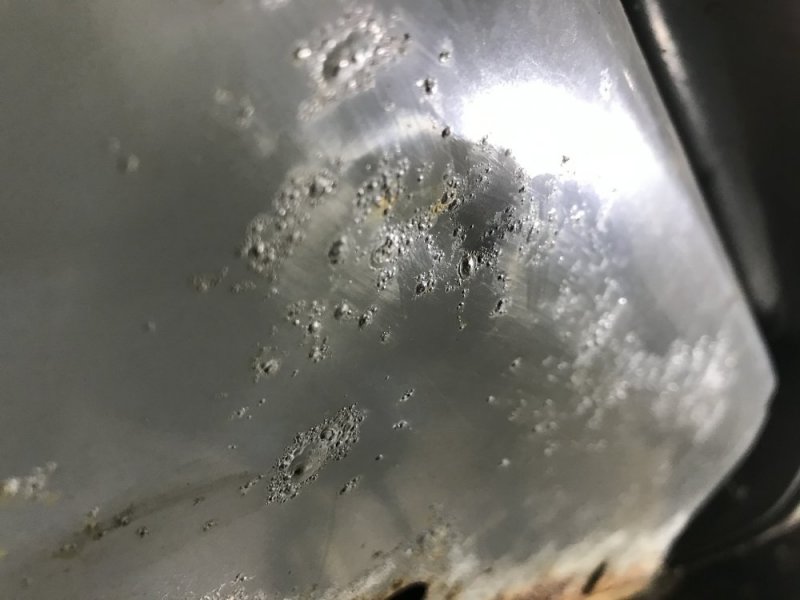
Next up: some rust repair. Overall this truck appeared pretty solid when I looked at it....I mean for a Michigan truck. The frame is a ton cleaner than Krovvy’s and should be much easier to restore later. When I looked at it I noticed the rusty floor; unfortunately that ended up being more extensive than originally thought. The other place that had rust was the passenger side of the extended cab even though the driver side was super solid (the hole in the floor must have allowed the wet feet to drain before it got to the extended cab). The pass side meanwhile felt like it was just paint holding it together. It’s hard to make out in the pics, but there’s some nastiness bubbling just below the surface.
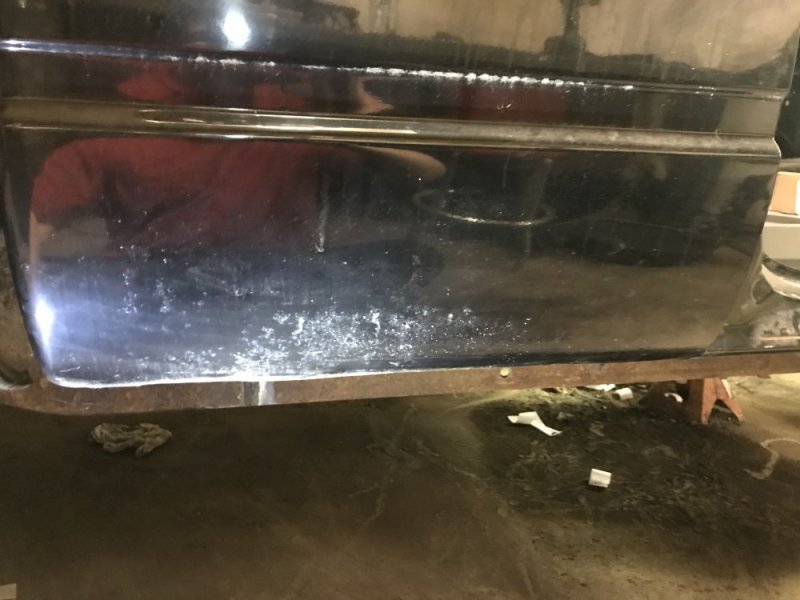
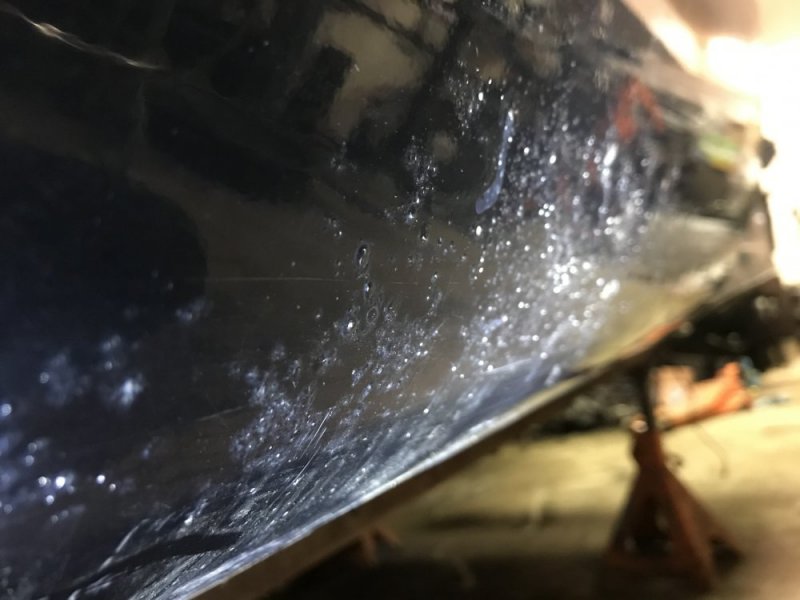
I was going to wait to fix this during the later restoration, but I figured since I had the whole interior out now this was the perfect time to make grinding and welding smoke in there. Plus once I’m done here all of the internal/structural work will be done on the cab so all I have to do in the future is degreasing the underside of the floor and any exterior bodyworkpainting I decide to do. So out came the grinder tonight. Lots of rust sheets down in there that have sloughed off the inside of the panel
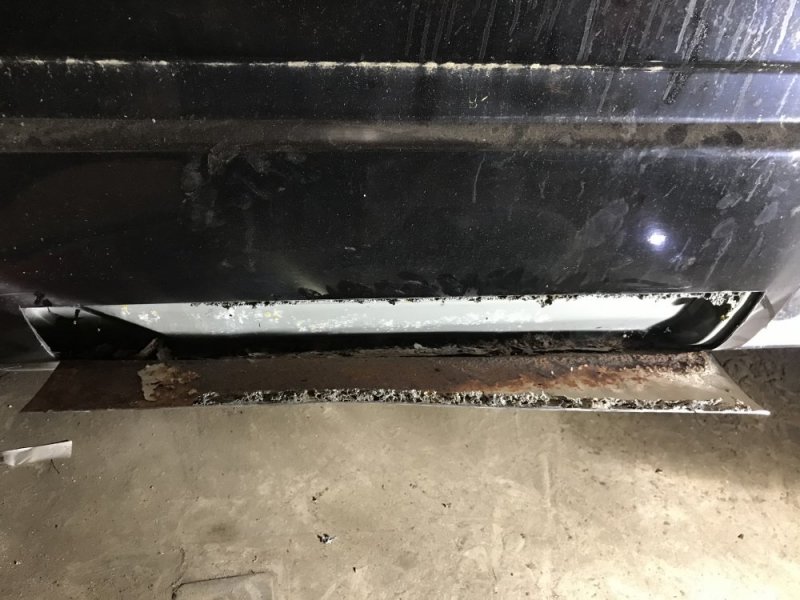
If you look close you can see how the panel cracked due to how thin it is....it’s like foil.
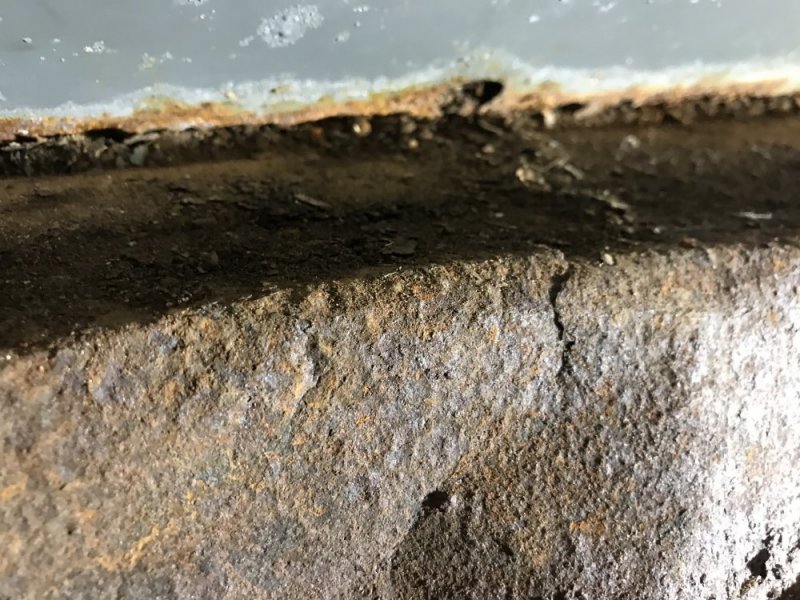
I got a big chunk removed so I could get a lot of the rust, but not go too far.....yet.
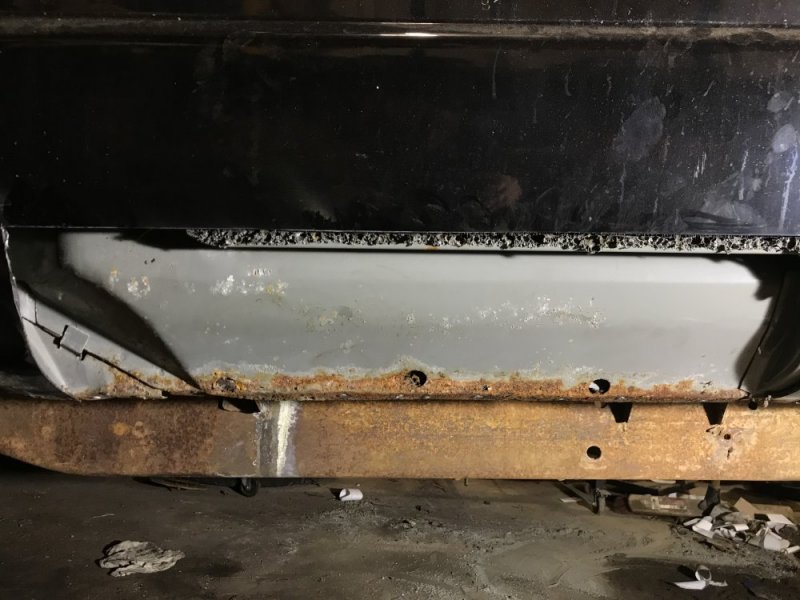


I was going to wait to fix this during the later restoration, but I figured since I had the whole interior out now this was the perfect time to make grinding and welding smoke in there. Plus once I’m done here all of the internal/structural work will be done on the cab so all I have to do in the future is degreasing the underside of the floor and any exterior bodyworkpainting I decide to do. So out came the grinder tonight. Lots of rust sheets down in there that have sloughed off the inside of the panel

If you look close you can see how the panel cracked due to how thin it is....it’s like foil.

I got a big chunk removed so I could get a lot of the rust, but not go too far.....yet.

n8in8or
I never met a project I didn’t like
Then it was time to address the next layer. It was a lot like the outer skin - it LOOKED ok, but a quick inspection would show how thin it was.
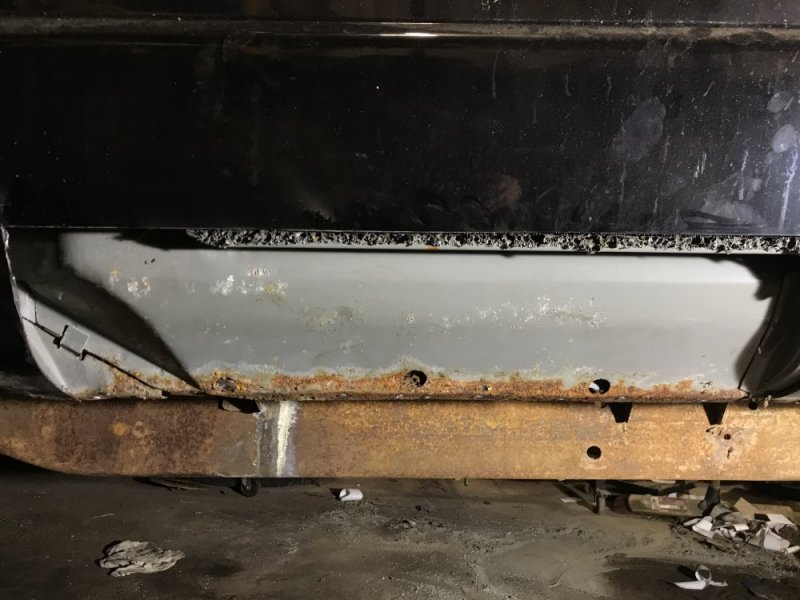
I put a dent in it with light pressure from my finger
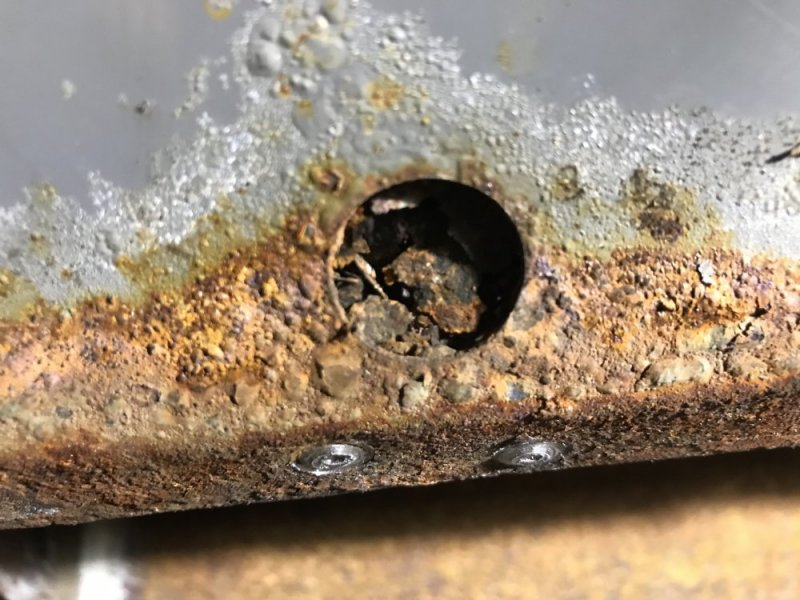
I could see a lot of loose rust in the drain and inspection holes
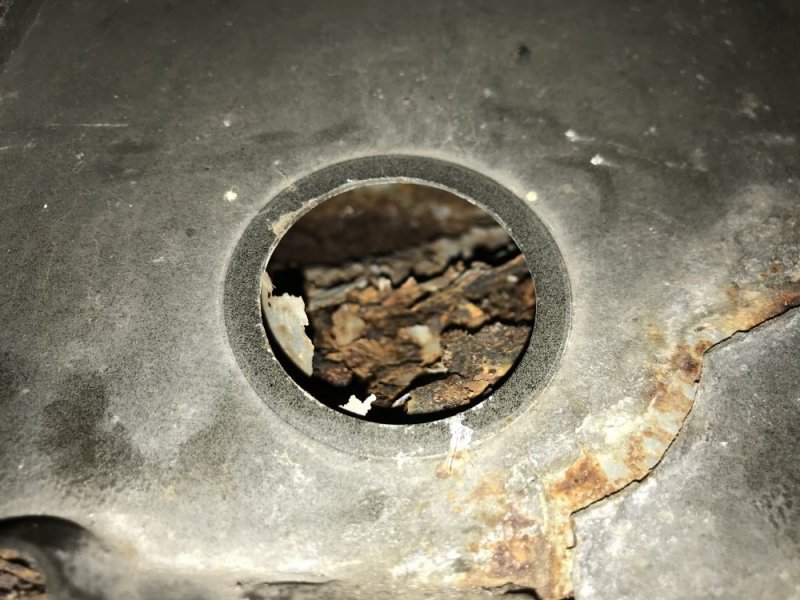
So out came that panel.

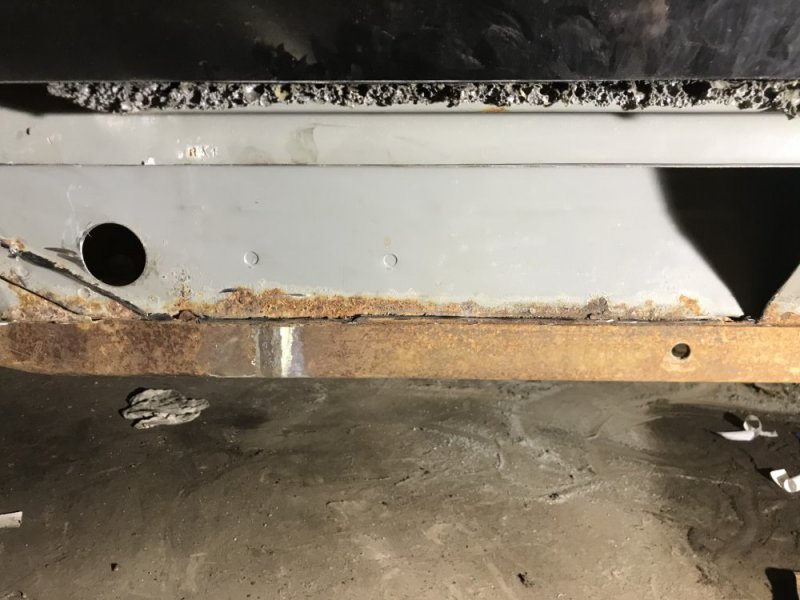
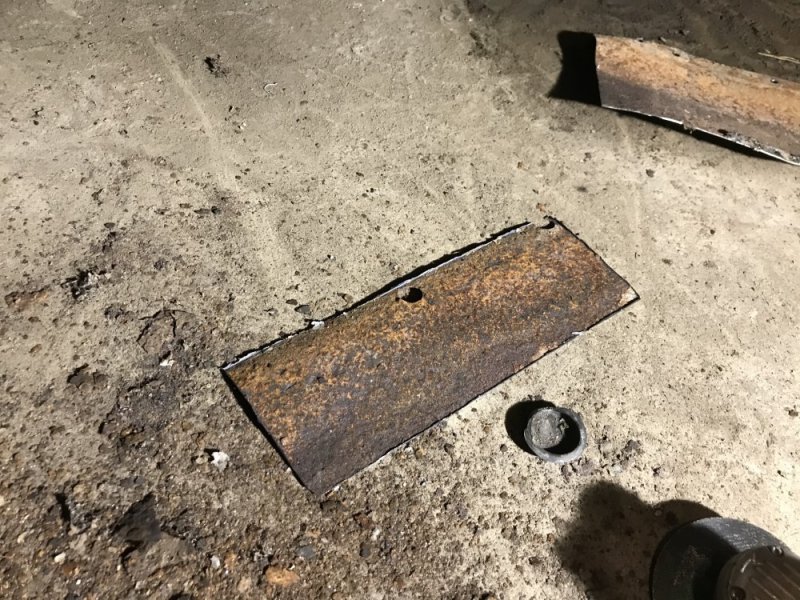
Luckily the inside of the inner rocker is still solid so I have a good foundation to work with. I decided to take a little more of the inner panel so I could be sure to get as much rust as possible. The back side of that chunk was getting cleaner so I’m reaching the end of it.
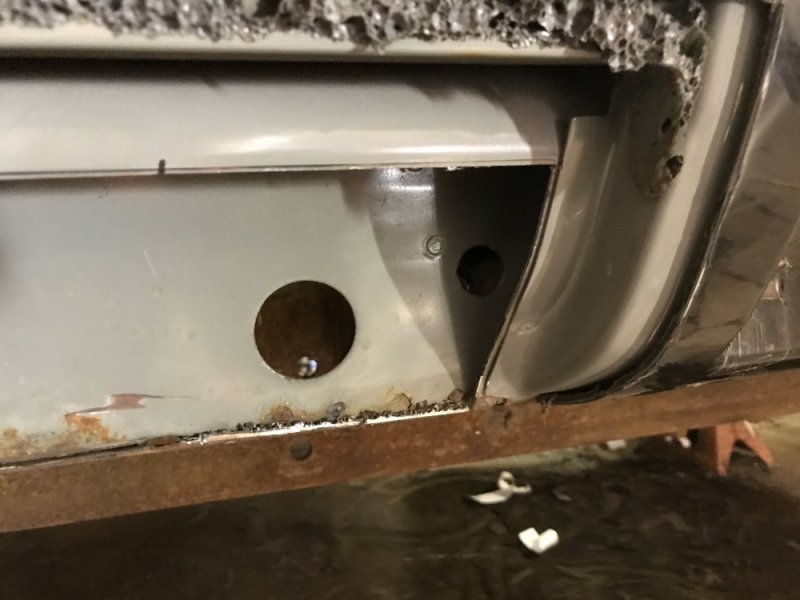
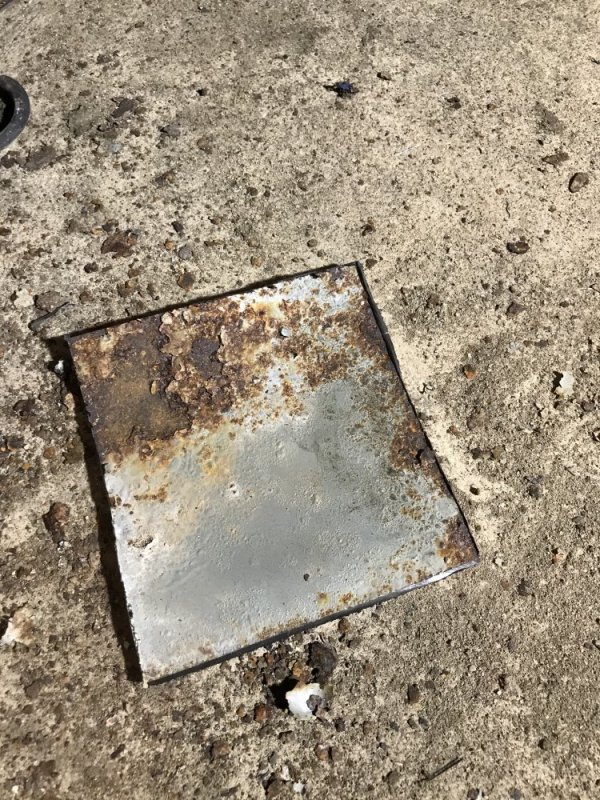
I think I’ve gotten most of what I want to remove cut out, but I still need to evaluate the cab corner more. I was hoping to save it, but I’m not sure if I can. If I get into the cab corner I’m probably going to have to slide the bed back so I can have good access for cutting and welding. Oh well, at this point it is what it is. #PureMichigan
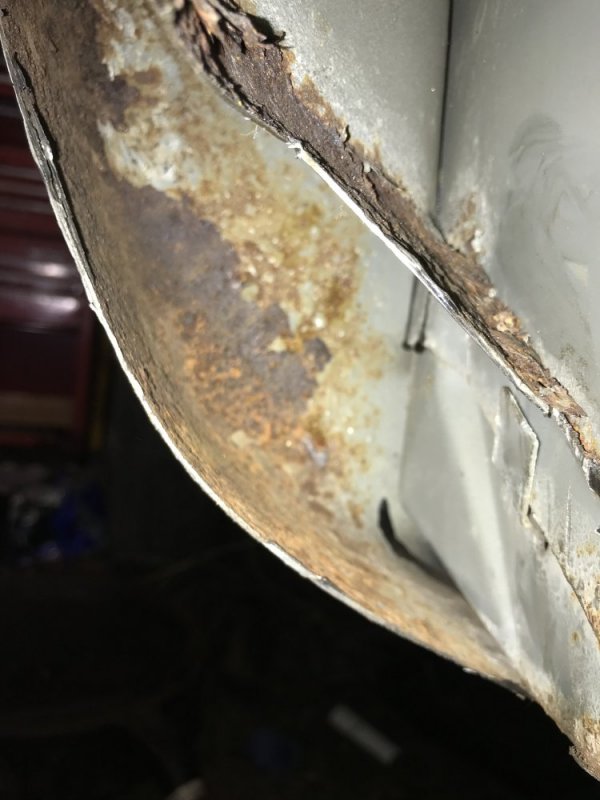

I put a dent in it with light pressure from my finger

I could see a lot of loose rust in the drain and inspection holes


So out came that panel.


Luckily the inside of the inner rocker is still solid so I have a good foundation to work with. I decided to take a little more of the inner panel so I could be sure to get as much rust as possible. The back side of that chunk was getting cleaner so I’m reaching the end of it.


I think I’ve gotten most of what I want to remove cut out, but I still need to evaluate the cab corner more. I was hoping to save it, but I’m not sure if I can. If I get into the cab corner I’m probably going to have to slide the bed back so I can have good access for cutting and welding. Oh well, at this point it is what it is. #PureMichigan

FellowTraveler
Well-Known Member
Lots of work ahead...for sure.
Rockabillyrat
SlIgHtLy StUpId.
You gotta love the rust belt. Im at the point where I'm not buying anything from the midwest for a project again.
Husker6.5
135' diagonal 16:9HD, 25KW sound!
Nate, you just love opening that Can-O-Worms and hope that nothing springs out to surprise you, don't you? SHPROING!!! Out pops Bad Inner Panel Rust!


Husker6.5
135' diagonal 16:9HD, 25KW sound!
At least you did attack it now while it is "easy" to take care of, instead of doing it later when you'd have to tear everything out again and deal with even worse rusting issues.
n8in8or
I never met a project I didn’t like
Actually, it was better than I expected. I was really surprised to see the inner rocker was still so clean. Now the earlier floor which turned into inner and outer rockers on the driver side was definitely a can that surprised me. That can o' worms turned into a barrel o' monkeys.Nate, you just love opening that Can-O-Worms and hope that nothing springs out to surprise you, don't you? SHPROING!!! Out pops Bad Inner Panel Rust!
Husker6.5
135' diagonal 16:9HD, 25KW sound!
"My, what a nice set of rockers."THAT’S TROOKENSHTEEN!!
"Why thank you, Doctor!"
I knew your reference, Nate. One of my favorite Mel Brooks movies along with Blazing Saddles and of course History of the World: Part 1.
n8in8or
I never met a project I didn’t like
Classics!! I was amazed at how much I enjoyed Silent Movie. I’d put Space Balls right up there as well. Maybe I can find some Liquid Shwartz and make this thing go plaid!"My, what a nice set of rockers."
"Why thank you, Doctor!"
I knew your reference, Nate. One of my favorite Mel Brooks movies along with Blazing Saddles and of course History of the World: Part 1.
n8in8or
I never met a project I didn’t like
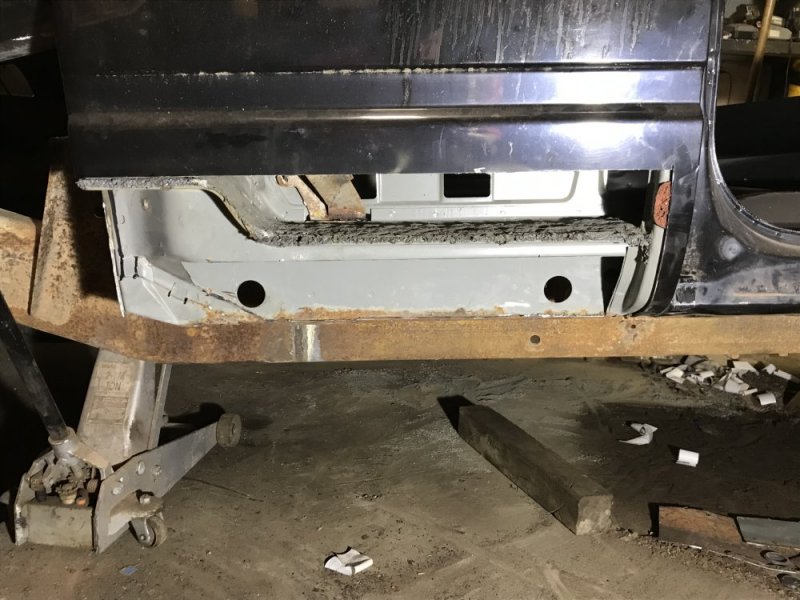
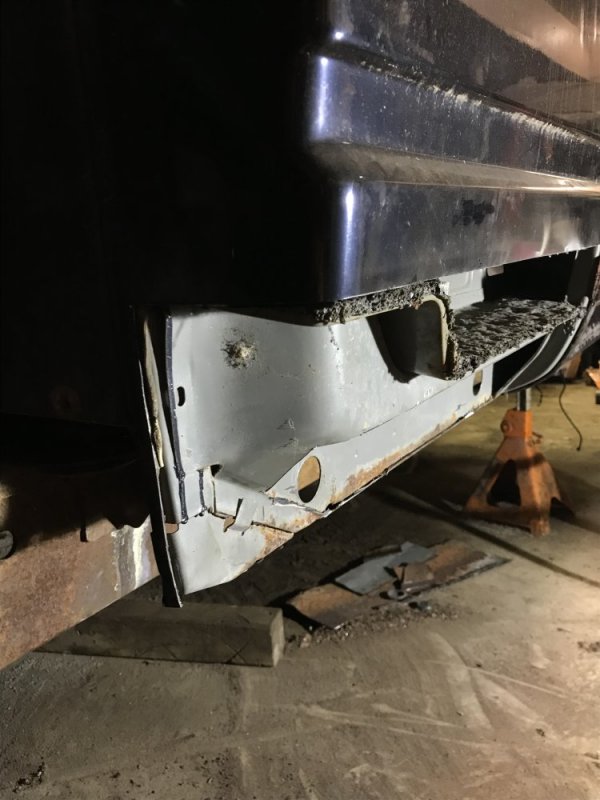
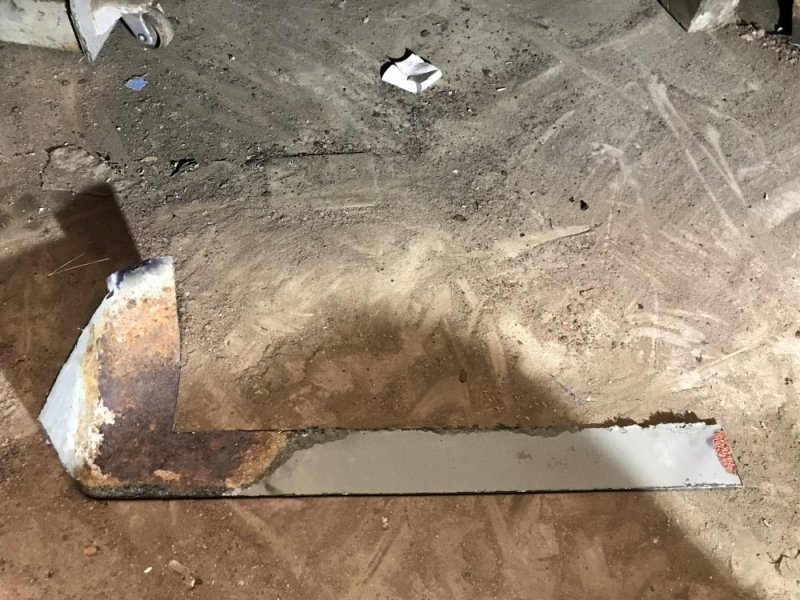
I didn’t like what I was seeing and feeling in the corner so I unbolted the bed and tilted it up. NO, the bed didn’t come OFF, just temporarily tilted. After that I scribed my lines and made more cuts. I need to figure out how I want to do the ends of the patch, but now I’m getting closer to having all the material removed that I need to. Hmmm, funny how all the rust is below that foam......thanks GM.


Husker6.5
135' diagonal 16:9HD, 25KW sound!
I had completely forgotten about Silent Movie. Leave it to Brooks that the only spoken word in the whole movie is the mime, Marcel Marceau, saying "No!"!Classics!! I was amazed at how much I enjoyed Silent Movie. I’d put Space Balls right up there as well. Maybe I can find some Liquid Shwartz and make this thing go plaid!
Yes, Spaceballs is funny, but the funniest movie ever made, IMHO, HAS to be Blazing Saddles! Just for the campfire scene alone! Nevermind Alex Karis's Mongo knocking out a horse scene, the Native American scene, the Klan recruitment scene or the Sheriff hostage scenes!
Although, History of the World: Part 1's "French Royal Court" scene is pretty damn funny, too! Reminds me of a LOT of politicians currently in the Executive Branch!
n8in8or
I never met a project I didn’t like
I haven’t seen these in years, thanks for the refresher!
