For us dummies, full instructions of what I did...or should have
To remove the door panel, start by getting your fingers behind the window/lock control panel and pull. It’s only attached by clips. Let it hang by the wiring harness; you don’t need to disconnect the switches. There are two screws (one in the finger hole for the handle and one just forward of the handle) and 10 push fasteners that hold the door panel in place. After removing the screws, pull the panel free starting from the bottom and working up on both sides. This will protect the two metal clips that hold the fiber based panel to the door at the sill and keeps it from flopping around. You need 10 new push fasteners that sell for a phenomenal 13 bucks per 10 pack. Remove the clear plastic liner. This part will annoy you a little. Run the window to what looks about 3/4 of the way down in preparation for installation. If it hangs up on glass shards, stop and address prior to installation and after you’ve cleaned up the glass shards.
Start removing the inner panel that the motor is attached to by unscrewing all but two of the bottom sheet metal screws. There will be one bolt near the hinge that holds the panel AND the bottom portion of the front track – remove both this bolt and the one above it. Let the track hang from it’s upper attachment whatever it is. Though it won’t likely move by itself, resist any urge to move it around as you’ll just have to line it back up on the re-install of the window.
Leaning the inner metal panel outward, you can now access the two clips on the rods and the additional push pin that attaches the door lockworks to the inner handle. Though you’ll still have the wiring harness connected, the panel should largely come free from the door after you remove the remaining sheet metal screws. This is also where you can easily remove the remaining broken glass assembly. Thoroughly inspect the hinges and tracks of the inner metal panel and remove the glass bits. Consider using a spray solvent on the single track that is greased and likely collect glass shards that won’t vacuum off and then relube. Run a screw driver down the felt tracks in the door then carefully run your finger along the groove to ensure there is no remaining glass in the felt track.
Vacuum thoroughly. There are supports to keep the outer door panel from buckling easily that will collect glass. I vacuumed at night using a flashlight to spot all the shards.
Time to install the glass. I used duct tape on the both sides of the window sill in case the window banged on it during installation. This is where you move the window track to 3/4 down if you haven’t already. With the metal panel out of the way, install the window from below moving up. Once glass is in the door panel, rest it on the rubber bump stop on the bottom of the door. This is where you call for help; get someone to stabilize the window holding it from the top. Move the inner metal panel in position and work the rollers onto the track that came attached to the window getting the back roller in the first using the room provided when you loosened the front track. Push the window firmly into the rear felt window track and then press the front track in place. Verify that the attachment threading on the front track bracket aligns with the proper top hole (that should have a wear ring in the paint to identify it). Re-install the two clips and the additional push pin that attaches the door lockworks to the inner handle and push the rods back into their white plastic guides.
Re-install the remaining panel sheet metal screws and the lower bolt on the front window track. If you didn’t savage the clear plastic sheet, re-attach it. Re-attach the door panel with fresh push fasteners by first fitting the window/lock control panel through the hole in the door panel then hanging the door panel by the two metal clips on the window sill and then work the push fasteners in from the top down. Re-install the two remaining screws that hold the door handle in place and push the window/lock control panel clips back in place.
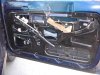
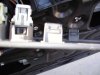
Attached are photos of the bare inner metal door panel, the window/lock control panel, and the window rollers along with the bump stop just below the front(left) roller.