
handcannon
Well-Known Member
This thread is being done over six months after having completed this modification so some of the measurements have been misplaced and my memory has become slightly fuzzy for some of the details. I took pics as I was doing this mod, intending to do a write-up on it, but things got in the way and plans kept getting pushed back. I recently made an off-hand comment about my powered quarter windows in a post to a thread about mirrors and Great White asked for a write-up. So, Great White, this is for you. I think you are the one who I first knew of to talk about wanting to power the quarter windows. My abilities are not as sharpened as yours are, but you have been a great inspiration for me.
I have a 94 K2500 6.5 TD extra cab pickup and had a very strong dislike for the manual towing mirrors that were on it. I got powered, heated, and lighted mirrors just like the ones Burning Oil is now selling.
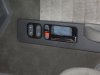
My pickup did not have any wire loom for the power mirrors. So, I proceeded to haunt the pick-n-pulls in a thirty mile radius of me. I got looms, connectors, wire, and a 93-94 era Suburban drivers door switch panel. This was not a complete door panel as I had found that the Sub switch panel could be easily retrofitted to my pickup door panel. The holes were already in the metal interior door panel. All I had to do was mark out and cut out my interior door panel for the Sub switch panel. I don't have any pics of this part yet, but before I finish this write-up I'll get some pics of the finished door and switch panels.
Through all this I was bothered by the fact that the Sub switch panel had switches for four windows, but I had only two power windows. Then I remembered GW talking about wanting to power his quarter windows. It hit me that I could maybe use the rear vent window motor found in mini-vans to power my rear quarter windows.
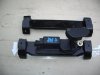
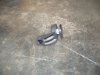
I started digging through mini-vans at the yards and came up with right and left hand motors, and some wiring, out of a Pontiac Montana. According to Rockauto 1999 to 2006 (and other GM models) used the same motors. Go to Rockauto- Pontiac- (choose a year from 1999 to 2006)- body interior- power vent window motor- Dorman #948101 (Rt motor) and # 948100 (Lt motor). Click on the blue colored part number and a complete list of all vehicles that use that motor will pop up. Use this list of vehicles to find motors for this project.
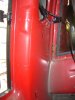
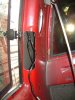
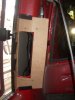
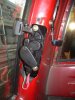
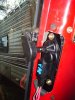
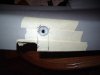
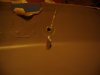
Pic 1--Since I already had a lot of my interior apart it wasn't hard to pop out the rest of the plastic panels. There is very little space between the plastic window surround and the body metal. This required me to recess the motor into the window pillar. Here's where the lost dimensions come into play. Drivers side marked out for cutout.
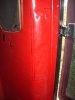
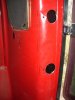
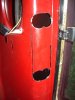
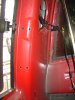
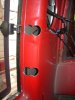
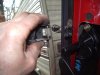
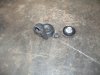
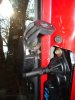
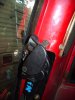
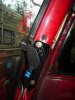
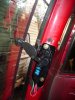
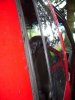
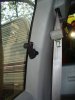
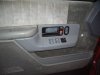
Pics 2 & 3--Starting with this step great care must be taken when drilling, or doing any other process, as the exterior metal of the body is right under your tools and can be easily damaged. Any damage will show up on the exterior as "mountains" and/or chips in an otherwise smooth painted surface.
I used a small drill bit to start pilot holes for a hole saw. I cut two holes side by side for the top, and two more for the bottom. I then used a metal cutting blade in a saber saw and connected the holes. The large radius, round corners was to reduce the chance of stress cracks in the sheet metal from body flexing. Once the cut out was done I used a half round file to clean up all sharp edges.
It's getting late and I'm past my pumpkin hour so the next installment will be sometime tomorrow.
Don
ps--for some reason the pics are in reverse order. #1 is the bottom pic, #2 is the top right pic, and #3 is the top left pic
I have a 94 K2500 6.5 TD extra cab pickup and had a very strong dislike for the manual towing mirrors that were on it. I got powered, heated, and lighted mirrors just like the ones Burning Oil is now selling.
My pickup did not have any wire loom for the power mirrors. So, I proceeded to haunt the pick-n-pulls in a thirty mile radius of me. I got looms, connectors, wire, and a 93-94 era Suburban drivers door switch panel. This was not a complete door panel as I had found that the Sub switch panel could be easily retrofitted to my pickup door panel. The holes were already in the metal interior door panel. All I had to do was mark out and cut out my interior door panel for the Sub switch panel. I don't have any pics of this part yet, but before I finish this write-up I'll get some pics of the finished door and switch panels.
Through all this I was bothered by the fact that the Sub switch panel had switches for four windows, but I had only two power windows. Then I remembered GW talking about wanting to power his quarter windows. It hit me that I could maybe use the rear vent window motor found in mini-vans to power my rear quarter windows.
I started digging through mini-vans at the yards and came up with right and left hand motors, and some wiring, out of a Pontiac Montana. According to Rockauto 1999 to 2006 (and other GM models) used the same motors. Go to Rockauto- Pontiac- (choose a year from 1999 to 2006)- body interior- power vent window motor- Dorman #948101 (Rt motor) and # 948100 (Lt motor). Click on the blue colored part number and a complete list of all vehicles that use that motor will pop up. Use this list of vehicles to find motors for this project.
Pic 1--Since I already had a lot of my interior apart it wasn't hard to pop out the rest of the plastic panels. There is very little space between the plastic window surround and the body metal. This required me to recess the motor into the window pillar. Here's where the lost dimensions come into play. Drivers side marked out for cutout.
Pics 2 & 3--Starting with this step great care must be taken when drilling, or doing any other process, as the exterior metal of the body is right under your tools and can be easily damaged. Any damage will show up on the exterior as "mountains" and/or chips in an otherwise smooth painted surface.
I used a small drill bit to start pilot holes for a hole saw. I cut two holes side by side for the top, and two more for the bottom. I then used a metal cutting blade in a saber saw and connected the holes. The large radius, round corners was to reduce the chance of stress cracks in the sheet metal from body flexing. Once the cut out was done I used a half round file to clean up all sharp edges.
It's getting late and I'm past my pumpkin hour so the next installment will be sometime tomorrow.
Don
ps--for some reason the pics are in reverse order. #1 is the bottom pic, #2 is the top right pic, and #3 is the top left pic
")