• Welcome to The Truck Stop! We see you haven't REGISTERED yet.

    Your truck knowledge is missing!
    • Registration is FREE , all we need is your birthday and email. (We don't share ANY data with ANYONE)
    • We have tons of knowledge here for your diesel truck!
    • Post your own topics and reply to existing threads to help others out!
    • NO ADS! The site is fully functional and ad free!
    CLICK HERE TO REGISTER!

    Problems registering? Click here to contact us!

    Already registered, but need a PASSWORD RESET? CLICK HERE TO RESET YOUR PASSWORD!

Just a 94 k3500 srw thread

bk95td

6.5 nut job/addict
Messages
2,548
Reaction score
31
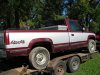
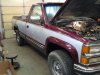
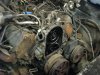
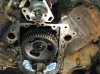
Thought I'd start a thread on the 94 K3500 regular cab srw truck I'm working on.
I bought the truck from a construction company along with 2 other 6.5 trucks this fall. The truck has 150,000 miles on the body. Some rust but not terrible. It had not been used in 5 years since the forman that drove it retired. It had a Goodwrench engine put in it aprox 60,000 miles ago. :thumbsup: It ran and drove when I bought it. It has pretty new Toyo tires on it and new looking front brakes including the rotors.
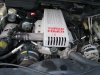
The first thing I did after I got it home and off the trailer was to run the VIN in the compnine decoder[sorry no link]. I found out it came with: 4.10 gears, possi rear end, trailer tow package, snow plow prep package and power doors. It has the big ass borg-warner transfer case:thumbsup: I don't care for the visor on it but won't remove it for now because it would leave 6 big[3/16] holes in the roof:mad2:
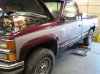
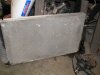
I started work on it by cleaning it up. Many years of dirt built up. I buffed and waxed the paint to make it shine where the clear coat isn't damaged. The hood was sprung from a dent in the front center. I replaced it with a better hood that isn't the exact same color[close]:eek:
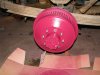
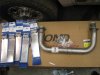
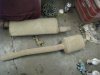
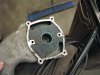
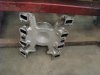
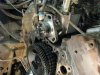
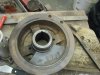
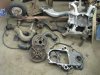
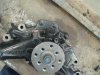
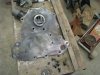
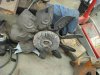
Next was to check up on the rear brakes. This truck has the large ,13 x 3 1/2 rear drums[3/4 tons have 13 x 2 1/2]. The drums on this are over the hub and wheel studs:thumbsup::thumbsup:. The shoes were worn to nothing. The drums were pretty well trashed. Off to NAPA for new drums, shoes,springs,adjusters, wheel cylinders and grease seals. About $500 into the rear brakes:eek:
 

Attachments

  • IMG_1116_3.jpg
    IMG_1116_3.jpg
    46.3 KB · Views: 8
  • IMG_1114_1.jpg
    IMG_1114_1.jpg
    46.4 KB · Views: 7
  • IMG_1115_2.jpg
    IMG_1115_2.jpg
    44.9 KB · Views: 5
  • IMG_1119_6.jpg
    IMG_1119_6.jpg
    35.7 KB · Views: 7
  • IMG_1121_1.jpg
    IMG_1121_1.jpg
    43.6 KB · Views: 6
  • IMG_1316_2.JPG
    IMG_1316_2.JPG
    46.3 KB · Views: 5
  • IMG_1343_29.jpg
    IMG_1343_29.jpg
    43.5 KB · Views: 5
  • IMG_1342_28.jpg
    IMG_1342_28.jpg
    43.8 KB · Views: 5
Next up was the exhaust. It was original and the tailpipe was gone. I ordered up new diamondeye 4" system. I bought stainless steel band clamps to use instead of the regular muffler clamps that come with the kit. I also ordered a crossover pipe from ashland muffler[ebay]
 

Attachments

  • IMG_1317_3.JPG
    IMG_1317_3.JPG
    45.6 KB · Views: 6
  • IMG_1318_4.JPG
    IMG_1318_4.JPG
    42 KB · Views: 6
  • IMG_1319_5.JPG
    IMG_1319_5.JPG
    42.2 KB · Views: 5
  • IMG_1320_6.JPG
    IMG_1320_6.JPG
    47.8 KB · Views: 6
  • IMG_1324_10.JPG
    IMG_1324_10.JPG
    43.6 KB · Views: 7
  • IMG_1321_7.JPG
    IMG_1321_7.JPG
    51.3 KB · Views: 5
  • IMG_1322_8.JPG
    IMG_1322_8.JPG
    45.3 KB · Views: 5
  • IMG_1323_9.jpg
    IMG_1323_9.jpg
    46.8 KB · Views: 7
Nice truck. I really like the look of that DE exhaust, would be my first choice next time. The downpipe looks right, in that I think the last one I tried didnt have that bend about halfway down to clear my 2wd 1500 frame, so the exhaust shop like dented the pipe so it wouldnt rub, thank you exhaust shop guys, who have a pipe bender.
 
The diamondeye exhaust fits perfect on the heavy 3/4 tons and the 1 tons:thumbsup: I did have to move the front hanger to a more forward set of holes. The reason that I use the stainless band clamps is so I can remove the exhaust easily at a later time. :thumbsup::thumbsup:
The ashland muffler crossover fit near perfect also. I only broke one of the crossover bolts off when I removed them. Welded a nut on the broke one and put the hotwrench to the manifold. It spun right out:WTF::WTF:
I did replace the glow plugs while I was in there. Bosch duraterms in it now.
 

Attachments

  • IMG_1326_12.jpg
    IMG_1326_12.jpg
    42.6 KB · Views: 8
  • IMG_1328_14.JPG
    IMG_1328_14.JPG
    55 KB · Views: 7
  • IMG_1329_15.JPG
    IMG_1329_15.JPG
    51.2 KB · Views: 8
  • IMG_1330_16.JPG
    IMG_1330_16.JPG
    46.7 KB · Views: 7
  • IMG_1331_17.JPG
    IMG_1331_17.JPG
    42.1 KB · Views: 7
  • IMG_1332_18.JPG
    IMG_1332_18.JPG
    51 KB · Views: 6
  • IMG_1333_19.JPG
    IMG_1333_19.JPG
    35.7 KB · Views: 5
Moving on to the engine

The mechanic at the construction company where I bought the truck said it was a dog from the day it was new. GM replaced the engine under warrenty because of the lack of power. The new engine didn't change that.
I figured I needed to pop the top to get a look at what I'm dealing with.:cool: The first thing off was the upper intake:eek: It is the clogged up EGR style upper intake Without the EGR:WTF: That one won't be going back on. I took the lower intake off to find the nest in the valley. It doesn't appear that any wires are chewed. I'll be replacing all the rubber fuel line just for fun.
The injection pump is a 5521 so ,it had the IP replaced. This truck should have had the 5068 oddball IP
Next I took the belt off and spun the vacume pump. There was no resistance. Pump was shot. No problem. I have 2 good vacume pumps from parts engines.:thumbsup: That would help explain the lack of power. No boost.
A/c compressor comes off for access to the vac pump. Took the fan and clutch off to keep the skin on my hands. I grab the water pump shaft and feel a loose bearing::mad2: Water pump is on it's way out.
 

Attachments

  • IMG_1337_23.JPG
    IMG_1337_23.JPG
    55.6 KB · Views: 7
  • IMG_1338_24.JPG
    IMG_1338_24.JPG
    41.5 KB · Views: 6
  • IMG_1339_25.jpg
    IMG_1339_25.jpg
    45.2 KB · Views: 8
  • IMG_1340_26.jpg
    IMG_1340_26.jpg
    47.2 KB · Views: 4
Water pump time

Since the water pump needs replacing I ordered up a 97 HO pump. Gates from rock auto.
In past experence I won't replace the water pump if there isn't a gasket between the timing cover and the front of the block. I had a 6.2 that broke the anarobic seal and leaked way worse after a new water pump. This one has no gasket so the timing cover is coming off. The ip can stay connected to the high pressure lines while the timing cover is removed.
Once the timing cover was off I measured the slop in the timing chain. It was at 5/8" Too loose for me to not replace while I was in there. New Cloyes timing set on it's way.The harmonic balancer looked very good ,as did the crank pulley rubber.
I was able to get the pmd off the IP . It had diesel fuel in it between the heat transfer pad and the transister caps. Fuel line going into the ip is right above that. Another reason to replace all the rubber hose.
 

Attachments

  • IMG_1351_8.jpg
    IMG_1351_8.jpg
    45.5 KB · Views: 7
  • IMG_1353_10.JPG
    IMG_1353_10.JPG
    53.3 KB · Views: 7
  • IMG_1356_1.jpg
    IMG_1356_1.jpg
    45.6 KB · Views: 6
  • IMG_1357_2.jpg
    IMG_1357_2.jpg
    45.4 KB · Views: 7
  • IMG_1359_4.jpg
    IMG_1359_4.jpg
    43.5 KB · Views: 7
Barry

Going back to your first post. Would it be very hard, outside of the cost, to change the 3/4 ton 2 1/2" brakes to the 1 ton 3 1/2" brakes? What parts other than the drums and shoes would need to be changed? Hub? Backing plate?

I'm not real happy with the brake capacity of my K2500 when towing. I know that the front brakes are the larger part of the equation and am looking for a way to upgrade them also. So far it seems like the HD (8 lug) 3/4 ton rotors and calipers are the same as the 1 tons, until you get to the dually setup.

Don
 
Very nice! This truck is just like mine! Except mine is 3/4 ton, and is totally maroon. Is the interior maroon also? I like seeing others pics!
 
Barry

Going back to your first post. Would it be very hard, outside of the cost, to change the 3/4 ton 2 1/2" brakes to the 1 ton 3 1/2" brakes? What parts other than the drums and shoes would need to be changed? Hub? Backing plate?

I'm not real happy with the brake capacity of my K2500 when towing. I know that the front brakes are the larger part of the equation and am looking for a way to upgrade them also. So far it seems like the HD (8 lug) 3/4 ton rotors and calipers are the same as the 1 tons, until you get to the dually setup.

Don
The backer plate is different. It is so close to the leaf springs it is near impossible to bleed the wheel cylinders. I bled them with the backer plate removed from the axel. I used a mightyvac. The hubs may be different also. The combination of the more offset of the backer plate and having the drum on the other side of the hub creates the room for the 1 inch wider shoes.
Rotors on a dualley are the same as a single wheel. There is a offset adapter that bolts on the wheel studs so the dualley rim works.
 
Wait a minute, are you saying the intake is the EGR type, but the top has no holes for an EGR? many people with "F" engines could have crappy EGR plumbing in there and not know it? Or did someone just rig that in there on the replacement engine?

Awesome pictures as usual
 
Wait a minute, are you saying the intake is the EGR type, but the top has no holes for an EGR? many people with "F" engines could have crappy EGR plumbing in there and not know it? Or did someone just rig that in there on the replacement engine?

Awesome pictures as usual

Yeah, the engine i put in my truck came out of a '94 vin F dually. It didnt have the holes for the EGR, but it had the webbing in there. Sucked, i wanted to sell the intake, then realized it had the webbing when i took it apart.. I need to grind it out and sell it, but still havent had time, still sits in my basement.. BTW buddy, i sent you the BXRJ yesturday.
 
Wait a minute, are you saying the intake is the EGR type, but the top has no holes for an EGR? many people with "F" engines could have crappy EGR plumbing in there and not know it? Or did someone just rig that in there on the replacement engine?

Awesome pictures as usual
I would bet it is the intake off of the original engine. I'm thinking just a long block was put in by the stealer. It has the same webbing as a "S" intake with out the hole for the egr valve. The lower is a plain "F". Nothing different. That upper is very restrictive compared to a regular "F" upper.
 
Only me driving. I only insure 2 trucks at a time. About $600/yr
 
Only me driving. I only insure 2 trucks at a time. About $600/yr

Old guys and their cheap Insurance. My new truck just cost a grand for 6 months :eek: . No ticket other than a safe driver violation. Its BS they stick to those of us under 25.

Driving only 2 trucks per year would be a good way to keep miles down on them though.
 
I know all about high premiums. I had 2 DWI's on my record at the same time. Over $2000 a year for liability on 1 car. I had that rate for over 3 years. I haven't had a "at fault" accident in over 30 years. A couple before that though.
 
Haven't had anything on my record in 3 years but seat belt tickets, had alot from age 16-20 though. That was full coverage too but it was for the 93 gmc but i couldn't get a farm truck discount for some reason.
 
Got a few more pics today.
I'm replacing the belt tensioner because I'm very suspicous of the one that was on there. The alternater had just been replaced, the water pump bearing was getting loose and the idler bearing in the a/c clutch is getting loose. A binding tensioner would take out all the bearings. I bought a Dayco "No Slack" tensioner from rockauto. They are a different design than the OEM style. Made in USA:thumbsup:
I will be using a 9 blade steel fan from a 97 6.5 I junked. I also have a "k47" air box on this truck with a amzoil nano-fibre washable filter.
The water pump is a "gates" HO pump for a 97. It came painted:thumbsup:
I have a few more pieces to clean before I'm ready for the timing chain that should be here on thursday at the latest.
 

Attachments

  • IMG_1361_6.jpg
    IMG_1361_6.jpg
    43.5 KB · Views: 7
  • IMG_1362_7.jpg
    IMG_1362_7.jpg
    43.8 KB · Views: 6
  • IMG_1365_10.JPG
    IMG_1365_10.JPG
    48.4 KB · Views: 6
  • IMG_1366_11.JPG
    IMG_1366_11.JPG
    46.8 KB · Views: 6
  • IMG_1367_1.jpg
    IMG_1367_1.jpg
    44.6 KB · Views: 6
  • IMG_1368_2.jpg
    IMG_1368_2.jpg
    44.6 KB · Views: 7
  • IMG_1369_3.JPG
    IMG_1369_3.JPG
    56.2 KB · Views: 7
  • IMG_1370_4.jpg
    IMG_1370_4.jpg
    43.2 KB · Views: 6
  • IMG_1371_5.jpg
    IMG_1371_5.jpg
    44.5 KB · Views: 6
Back
Top