shortcircut65
LT OFD N-49
Anybody know anybody who needs/wants a set of fender flares for a GMT800 body? Granted, this isn’t really the thread to advertise that, for this is where I tell you, and upload pictures later, about what I found, when I took my flares off.
It started a while back, when I got the idea to take off my flares, and line-x, or rhino line, or something of that nature. At that same time, I had the idea to do the same to the inside of my rockers, because they were worn down to metal, because of where my boot always hit getting in and out. The only problem was I didn’t have the time, or place to do it. Well, I just so happened to be doing a head gasket job on it just a few short weeks ago, in my uncles 40x70 garage. Now I had time, and place. Once I had the heads off and at the machine shop, the work began.
First thing, was when I finally gave it 2 really good washings just before it went in, I noticed the bottom of the body was all scraped and chipped quite nicely. So my decision was made, do the whole thing from the body line down, and where the flares were. So I taped it all off, above the flares, the body line, inside the doors, tailgate, all the good spots. I used 3/4" tape around the flares, but would highly recommend using 1/4", because it turns corners much nicer. I masked the whole thing 4" high above where I intended to apply the liner, using 2" tape. Then came the removal of the flares. Now I know the real reason as to why I did this job! When I took off the left front, I had a pile of dirt 10" around that fell out of it! And behind the entire thing, the paint was pitted. The paint was the same way behind every other one, but hardly any dirt in the rears.
Now it is sanding time! Thankfully, he had an air palm sander with 60 grit paper in the garage. That made life that much easier. Inside the doors, I had to do it by hand, but it wasn’t all that bad. As I sanded, I kept wiping the dust off with a rag, then when I was done, I went and bought new shop rags. I then took paint thinner and wiped down all the areas to be done 3 times, to clean them up, and remove all the dust off of it. I and the girlfriend had to leave to go look at an apartment, so I let those areas dry for an hour.
Side Note: it would have been much easier to remove the rear bumper to do the rear quarters, but I have a draw-tite hitch, and 2 of the mounting bolts go through 2 of the mounting points of the bumper. I soaked the snot out of them with PB Blaster, and hit them with an impact gun for a minute each. Neither felt like moving. No big deal
When I got back to the garage, I began. I shook the can for 2 minutes, like the DIRECTIONS SAY):h, then got started. it really helps to wear rubber gloves while doing this, because this stuff tends to grab hold of any hair on your skin, and not let go when it dries. the kit I purchased at Advance Auto, was the Dupli-Color bed liner kit. It comes with a gallon of material, a pan, roller, handle, and paint brush. I believe it was $45ish. I had to buy an extra quart, but only used half of that. I started in the left rear, and worked my way forward on the outside of the truck. I used the roller wherever I could, then filled in the rest with the brush. When I used the brush, I "patted" or "blotted" the area, to give it a more textured look. I would recommend doing the exterior first, then opening the doors and doing the interior, as I did. I did the left side exterior, then opened the door and did the interior. Starting with the door, then finishing with the cab, working from front to rear on both of them, so as not to get your arms covered with the liner. It works well that way, so you can leave the door open to dry while doing the other side. The right side was the exact same way.
When I finished with the right side, I gave myself a 5 minute break to walk outside, and clear my head from the fumes. The can says to give it 1-2 hours of drying time before applying the next coat. From start to finish, it was a little over an hour, and it was completely dry. Repeat 2 more times, and call it good. One gallon gave me 3 coats on the left side and the bed on the right side. The other half quart gave me the third coat on the cab and door on the right side. What I wanted to do originally, was put three coats on the whole thing, then put three more where the flares were, to kinda offset them a little bit, but I ran out of time. I think that I will end up doing that down the road, just to give it that little extra protection. Either that, or just do the exterior with 3 more coats. The trick to removing the tape after it is dry and set, is to peel it off slowly, and at a downward angle. Like towards the ground. I got a little too ahead of myself when I started to remove the tape, and had to fill in a few small spots where the liner decided to peel off with the tape. No big deal and you wouldn't notice it unless I showed you.
All in all, I am very pleased with the end result. Now here is a listing of the pictures, starting from tape, to sand, to application, to finish:
Picture
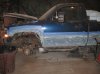
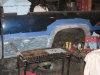
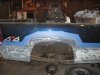
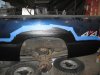
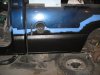
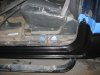
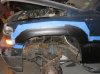
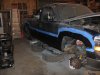
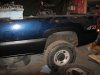
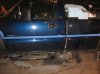
1-5/ Tape with flares still on
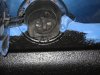
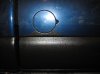
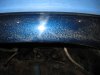
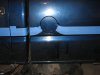
6/ Pitting paint behind the 2 front flares
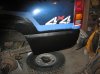
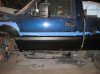
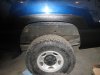
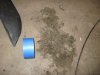
7/ Pile of dirt that fell out of the left front flare. A roll of 2" tape beside it
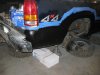
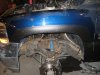
8/ How I rolled it up to the fuel filler
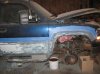
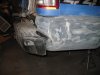
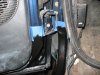
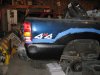
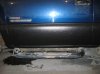
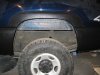
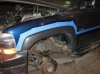
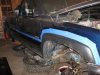
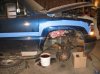
9/ Rear shot of the flare off, with double sided tape
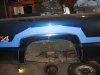
10/ Front shot of the flare off, with double sided tape
There is a limit of 10 attachments to a post, so the rest are in the following posts:
It started a while back, when I got the idea to take off my flares, and line-x, or rhino line, or something of that nature. At that same time, I had the idea to do the same to the inside of my rockers, because they were worn down to metal, because of where my boot always hit getting in and out. The only problem was I didn’t have the time, or place to do it. Well, I just so happened to be doing a head gasket job on it just a few short weeks ago, in my uncles 40x70 garage. Now I had time, and place. Once I had the heads off and at the machine shop, the work began.
First thing, was when I finally gave it 2 really good washings just before it went in, I noticed the bottom of the body was all scraped and chipped quite nicely. So my decision was made, do the whole thing from the body line down, and where the flares were. So I taped it all off, above the flares, the body line, inside the doors, tailgate, all the good spots. I used 3/4" tape around the flares, but would highly recommend using 1/4", because it turns corners much nicer. I masked the whole thing 4" high above where I intended to apply the liner, using 2" tape. Then came the removal of the flares. Now I know the real reason as to why I did this job! When I took off the left front, I had a pile of dirt 10" around that fell out of it! And behind the entire thing, the paint was pitted. The paint was the same way behind every other one, but hardly any dirt in the rears.
Now it is sanding time! Thankfully, he had an air palm sander with 60 grit paper in the garage. That made life that much easier. Inside the doors, I had to do it by hand, but it wasn’t all that bad. As I sanded, I kept wiping the dust off with a rag, then when I was done, I went and bought new shop rags. I then took paint thinner and wiped down all the areas to be done 3 times, to clean them up, and remove all the dust off of it. I and the girlfriend had to leave to go look at an apartment, so I let those areas dry for an hour.
Side Note: it would have been much easier to remove the rear bumper to do the rear quarters, but I have a draw-tite hitch, and 2 of the mounting bolts go through 2 of the mounting points of the bumper. I soaked the snot out of them with PB Blaster, and hit them with an impact gun for a minute each. Neither felt like moving. No big deal
When I got back to the garage, I began. I shook the can for 2 minutes, like the DIRECTIONS SAY):h, then got started. it really helps to wear rubber gloves while doing this, because this stuff tends to grab hold of any hair on your skin, and not let go when it dries. the kit I purchased at Advance Auto, was the Dupli-Color bed liner kit. It comes with a gallon of material, a pan, roller, handle, and paint brush. I believe it was $45ish. I had to buy an extra quart, but only used half of that. I started in the left rear, and worked my way forward on the outside of the truck. I used the roller wherever I could, then filled in the rest with the brush. When I used the brush, I "patted" or "blotted" the area, to give it a more textured look. I would recommend doing the exterior first, then opening the doors and doing the interior, as I did. I did the left side exterior, then opened the door and did the interior. Starting with the door, then finishing with the cab, working from front to rear on both of them, so as not to get your arms covered with the liner. It works well that way, so you can leave the door open to dry while doing the other side. The right side was the exact same way.
When I finished with the right side, I gave myself a 5 minute break to walk outside, and clear my head from the fumes. The can says to give it 1-2 hours of drying time before applying the next coat. From start to finish, it was a little over an hour, and it was completely dry. Repeat 2 more times, and call it good. One gallon gave me 3 coats on the left side and the bed on the right side. The other half quart gave me the third coat on the cab and door on the right side. What I wanted to do originally, was put three coats on the whole thing, then put three more where the flares were, to kinda offset them a little bit, but I ran out of time. I think that I will end up doing that down the road, just to give it that little extra protection. Either that, or just do the exterior with 3 more coats. The trick to removing the tape after it is dry and set, is to peel it off slowly, and at a downward angle. Like towards the ground. I got a little too ahead of myself when I started to remove the tape, and had to fill in a few small spots where the liner decided to peel off with the tape. No big deal and you wouldn't notice it unless I showed you.
All in all, I am very pleased with the end result. Now here is a listing of the pictures, starting from tape, to sand, to application, to finish:
Picture
1-5/ Tape with flares still on
6/ Pitting paint behind the 2 front flares
7/ Pile of dirt that fell out of the left front flare. A roll of 2" tape beside it
8/ How I rolled it up to the fuel filler
9/ Rear shot of the flare off, with double sided tape
10/ Front shot of the flare off, with double sided tape
There is a limit of 10 attachments to a post, so the rest are in the following posts:
Attachments
-
 Clipboard08.jpg36.2 KB · Views: 25
 -
 Clipboard09.jpg33.1 KB · Views: 13
 -
 Clipboard10.jpg35.4 KB · Views: 17
 -
 Clipboard11.jpg36.8 KB · Views: 14
 -
 Clipboard12.jpg34.8 KB · Views: 7
 -
 Clipboard14.jpg33.6 KB · Views: 11
 -
 Clipboard16.jpg30.2 KB · Views: 9
 -
 Clipboard15.jpg33.9 KB · Views: 9
 -
 Clipboard18.jpg33.6 KB · Views: 12
 -
 Clipboard19.jpg35.7 KB · Views: 23
Last edited: