• Welcome to The Truck Stop! We see you haven't REGISTERED yet.

    Your truck knowledge is missing!
    • Registration is FREE , all we need is your birthday and email. (We don't share ANY data with ANYONE)
    • We have tons of knowledge here for your diesel truck!
    • Post your own topics and reply to existing threads to help others out!
    • NO ADS! The site is fully functional and ad free!
    CLICK HERE TO REGISTER!

    Problems registering? Click here to contact us!

    Already registered, but need a PASSWORD RESET? CLICK HERE TO RESET YOUR PASSWORD!

My New (To me) Hummer take out, courtesy of Ted's Trucks 'n Stuff.

OrionThade

Member
Messages
430
Reaction score
17
Location
Orem, Utah
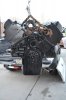
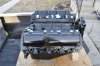
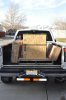
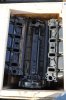
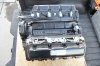
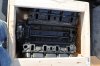
With Paveltolz's help, I got my Optimizer 6500 home and un-crated. Took some pics that I'll post this weekend. (Date night with the wifey tonight)

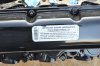
For starters, the Engine Data Sheet provided contains the following information:

Front of Engine
1. 530 2. 530
3. 515 4. 525
5. 515 6. 515
7. 520 8. 520

Engine oil pressure at idle: 60 PSI

Engine serial number: 030311JB
Engine Date Code: 0422L
Block Casting: 506

There are a few things that need to be taken off and moved over from my 599 block.

It's going to be probably 3 weeks before I am able to start into this motor. I have another engine on my stand that I need to finish before I start this project. I foolishly gave away my other engine stand before I decided to buy this motor, so I don't have any place to put it for the moment.

I would like to pull the rotating assembly for balance. I don't think it's in the cards, though. I'll just have to see once I start on the project.

As of right now the plan is to pull the ARP studs from my 599. I'll pull the heads on the 506 to inspect the cylinders, pistons, valves and precups. And to take pics. I can't remember if these motors come with diamond cups, but if not, my 599 has a set that I will move into these heads.

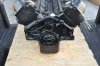
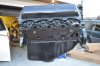
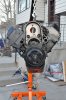
Ted's shop painted the full motor black. The block and heads will be getting a primer and then Daytona Yellow. The timing cover will be getting media blasted, along with the upper and lower intake manifolds. I plan to have my exhaust manifolds ceramic coated, but that will likely have to wait.

I'm excited to get this process started and plan to take plenty of pics.

More to follow.

And thanks to Paveltolz for being willing to put is rig to use to help me out.
 
Last edited:
Happy to help, that's what a truck is for anyway and I enjoy the company. He's got a sweet looking motor and I know it is killing him to not be able to really get into it for a while.

Orion, If you're thinking of getting the manifolds ceramic coated, you could use the three weeks to get those knocked out as you're getting the timing cover done. or, leave them off and use your old manifolds until the new ones are finished the way you would like. I think Advanced Powder Coaters could knock out the whole package for under $200, especially if they don't have to tape off anything as they had to do with my lower intake.
 
Last edited:
OK, here are the pics I snapped today.
 

Attachments

  • 10 - RearHoist.jpg
    10 - RearHoist.jpg
    42.8 KB · Views: 33
  • 07 - Rear.jpg
    07 - Rear.jpg
    76.6 KB · Views: 38
  • 11 - PassengerHoist.jpg
    11 - PassengerHoist.jpg
    68.6 KB · Views: 31
  • 09 - Hoist.jpg
    09 - Hoist.jpg
    55.4 KB · Views: 38
  • 08 - Passenger.jpg
    08 - Passenger.jpg
    76.4 KB · Views: 40
  • 01 - Before unload.jpg
    01 - Before unload.jpg
    44.2 KB · Views: 33
  • 02 - Valley.jpg
    02 - Valley.jpg
    52.3 KB · Views: 45
  • 04 - Front in-crate.jpg
    04 - Front in-crate.jpg
    42.2 KB · Views: 36
  • 05 - Uncrate.jpg
    05 - Uncrate.jpg
    78 KB · Views: 39
  • 06 - GEP sticker.jpg
    06 - GEP sticker.jpg
    78.4 KB · Views: 45
  • 03 - Valley.jpg
    03 - Valley.jpg
    75.3 KB · Views: 37
Last edited:
So am I not looking at it right or does it not have an oil pressure tap in the valley, just the 1 behind the head
 
Looks good other than ted doesn't know what masking tape is. You would think for the $200 crating fee they could have done something to somewhat seal the engine up from dirt and moisture contamination. Still a prize for the money.
 
So am I not looking at it right or does it not have an oil pressure tap in the valley, just the 1 behind the head
Doctored up one of his photos to highlight locations. The paint job tends to hide details if the lighting is just so.
OPS Options.jpg

Thanks for letting me help with the 'delivery' I'm happy to help in anyway I can.
Also, very much appreciate the time spent pointing out "new to me" stuff about these motors and all.
 
Block looks just like the one I picked up recently.

Just wish mine had been a Complete instead of just a bare hunk of iron.

Good luck with the install and such.

Missy sends good wishes.
 
I saw that hole I guess I didn't pay enough attention when I was in there last I was thinking it was closer to the valley
 
I didn't do anything with the motor over the weekend other than daydream and fantasize.

However, I did look into the combustion chamber and based on the size of precup port on the internal side, I'd 99% sure it's got diamonds.

I really want to pull the one head off. I just can't seem to find the time with my other project. The good news is that the other project is nearing completion.

As of right now the plan is to pull off one of the heads and see if the pistons are ceramic topped. If they are, I'll put this engine on the stand.

If they are not, then I'll be pulling the motor that is currently in my truck and dis-assembling it to remove the pistons. I hope I don't have to do this as I'd like to have a spare 6.5 that I can build just-in-case.
 
Mine will be here the 17tth. I can not wait. I stripped the whole engine compartment and Dynamat the whole thing. I also gutted the interior and did the same.

I plan to pull the heads off and put my arp studs in along with new .010 thicker gaskets to drop the comp. some. The bottom end will get DSG's stud and girdle kit. I will keep you guys posted with my build as well. I wish i could get it done before the spring thaw meet and greet!
 
oh i also got 40hp nozzles and am rebuilding my injectors with a pop psi fo 2300 and ditched the stock cooling fan and went wtih tow 16'' elec with and adjustable thernostat.

i am also looking for a HX35 or at least a GM-8
 
oh i also got 40hp nozzles and am rebuilding my injectors with a pop psi fo 2300 and ditched the stock cooling fan and went wtih tow 16'' elec with and adjustable thernostat.

i am also looking for a HX35 or at least a GM-8

I wouldn't go with the electric fans. I'll bet those fans flow 3000 CFM each. Maybe 3500. The 21" fan with HD clutch will flow 10K or more. I thought of that and even bought two 3600 CFM electric fans, but decided not to. They simply won't be able to keep up with the cooling requirements. If you search this place and the other place you'll see several posts regarding this and the problems the installers had.

HX35 would probably be fine. I'm planning to do an HE VGT on mine. I'm hoping to do this by the end of the year.

With the ARP studs, you would probably be fine with leaving the HG standard thickness, even up to 20+ PSI.
 
Back
Top