• Welcome to The Truck Stop! We see you haven't REGISTERED yet.

    Your truck knowledge is missing!
    • Registration is FREE , all we need is your birthday and email. (We don't share ANY data with ANYONE)
    • We have tons of knowledge here for your diesel truck!
    • Post your own topics and reply to existing threads to help others out!
    • NO ADS! The site is fully functional and ad free!
    CLICK HERE TO REGISTER!

    Problems registering? Click here to contact us!

    Already registered, but need a PASSWORD RESET? CLICK HERE TO RESET YOUR PASSWORD!

Eat your heart out, Back Rack!

What do you think?

  • Eh, Its Ok

    Votes: 2 8.3%
  • Don't Like It At All

    Votes: 1 4.2%
  • I Like It!

    Votes: 15 62.5%
  • I Love It!

    Votes: 8 33.3%
  • I Want Some More Of It (For Myself!!)

    Votes: 3 12.5%

  • Total voters
    24

shortcircut65

LT OFD N-49
Messages
2,253
Reaction score
0
Location
Norwich CT
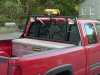
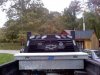
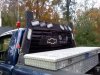
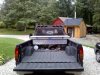
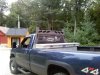
well, i wanted a headache rack, but i didn't just want a normal, regular, run of the mill Back Rack. A friend of mine had just got a new plasma cutter, so that was the inspiration to get myself started. I had the rack all drawn up for about 6 months before i had the chance to start.

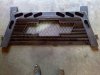
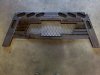
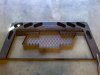
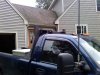
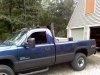
About a year ago, my uncle had made a headboard on his two flatbed pickups out of 5"x2" box steel, and i liked the idea. So i got to thinking, and drawing. this is the final product:

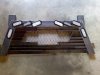
5"x2"x3/16" box steel frame
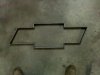
2"x1/8" flat stock for the bowtie outline
3"x1/8" flat stock for the louvers
2"x18" stainless flat stock for the CB antenna mounts
1 pint of POR-15

500 total LED diode's:
2 amber turn signals on the side
2 brake and tail lights on the top
4 (2 front, 2 rear) amber flashers with 10 different self contained flash patterns, available to change by adding 12v power for three seconds
2 cargo lights, on the stock cargo light switch on the dash
 

Attachments

  • rack 2.jpg
    rack 2.jpg
    19.2 KB · Views: 25
  • rack 9.jpg
    rack 9.jpg
    48.1 KB · Views: 29
  • rack 8.jpg
    rack 8.jpg
    42.6 KB · Views: 26
  • rack 7.jpg
    rack 7.jpg
    29.1 KB · Views: 25
  • rqck 6.jpg
    rqck 6.jpg
    31.2 KB · Views: 23
  • rack 5.jpg
    rack 5.jpg
    26.7 KB · Views: 22
  • rack 4.jpg
    rack 4.jpg
    29.6 KB · Views: 22
  • rack 3.jpg
    rack 3.jpg
    29.1 KB · Views: 18
  • rack 10.jpg
    rack 10.jpg
    39.6 KB · Views: 28
  • rack11.jpg
    rack11.jpg
    45.8 KB · Views: 24
I like it.

But I'd take the Mesh out from the Bowtie, and Cut the End Caps Off that are Sticking Up on the Ends, and it'd be good.
 
Stop counting your diode's!! :lol:
Looks damn good. Ill trade ya something for one :D
 
James: i want it to be protective/practical. But i can see where your coming from, it would make it a little cleaner

Justin: i want a 6.5, but im not sure ill take your 94.......
 
I like it.

But I'd take the Mesh out from the Bowtie, and Cut the End Caps Off that are Sticking Up on the Ends, and it'd be good.

:iagree: I like it too Ken. Maybe a couple of iron deer heads on the posts...:D j/k
Nice fab job!

Here's a question though, How come you put your OWB in a shed and located where it is?
 
:iagree: I like it too Ken. Maybe a couple of iron deer heads on the posts...:D j/k if you look in the bed, you will see 2 racks in there. only one still has the scalp:D
Nice fab job!

Here's a question though, How come you put your OWB in a shed and located where it is?


not mine. a friends fathers. he just got it, and put it there central to the house and shed in the back of it. it heats the house, garage, and his workshop/shed. plus, he piles his wood behind it out of the picture. it is a brand new, fancy electronic one, supposed to burn half the wood than before. he heated his hot water all summer with less than half a cord.
 
I made this for my old truck. I took it off 2 years ago when I traded it in and it's still sitting on the floor in the shop.

The rack looks good. If you didn't do it already you should grind the welds smooth. It gives it a cleaner more refined look that a Chevy deserves.
 

Attachments

  • DSC00004.jpg
    DSC00004.jpg
    50.1 KB · Views: 6
Watch how you mount it. I made a drill free mount that ended up cracking the sheetmetal around the steak pockets.

It looks like it may mount the same way mine did.
 
Mike: i drilled right into the bed sides. 4 stainless nuts, bolts, and 8 washers
An your rack looks freakin cool! alot simpler than mine, an im actually a little jealous of that.... haha

That's it you're freakin' banned!! Oh wait, wrong site.:D

):h thats funny right there!


it looks like those vertical tubes should be stacks

alot of my friends have told me that! and i have put a little thought into it....
 
i finally got some finished pics. the red antennas arent what i wanted, i wanted black, with black gumdrops, but that is what i have, so that is what went on, for now. with the finish paint(Por 15), i think the mesh blends in more so than just raw steel
 

Attachments

  • rack 12.jpg
    rack 12.jpg
    47.1 KB · Views: 3
  • rack 13.jpg
    rack 13.jpg
    52.6 KB · Views: 4
  • rack 14.jpg
    rack 14.jpg
    43.3 KB · Views: 4
Back
Top