• Welcome to The Truck Stop! We see you haven't REGISTERED yet.

    Your truck knowledge is missing!
    • Registration is FREE , all we need is your birthday and email. (We don't share ANY data with ANYONE)
    • We have tons of knowledge here for your diesel truck!
    • Post your own topics and reply to existing threads to help others out!
    • NO ADS! The site is fully functional and ad free!
    CLICK HERE TO REGISTER!

    Problems registering? Click here to contact us!

    Already registered, but need a PASSWORD RESET? CLICK HERE TO RESET YOUR PASSWORD!

cucv needs a flatbed

davo727

Member
Messages
471
Reaction score
4
Location
Cleveland, Texas
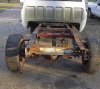
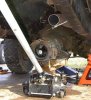
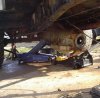
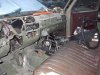
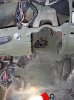
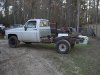
It was sunny and warm today so I pulled the bed off my 86 M1028. This is going to be a working truck for me so im going to weld up a flatbed for it.

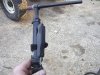
Also will be adding a hoist on a rotating mount on the left front corner of the bed.

Truck frame will be boxed with 1/4 in plate from about the middle of the doors all the way to the rear bumper, and new rectangular rear frame crossmembers as the stock stamped ones are way too wimpy.

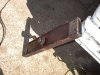
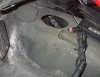
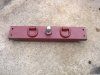
I have already made up a gooseneck hitch crossmember that sits down in the frame, not on top of the frame. Its made from a 6 inch heavy channel with the bottom boxed in with 1/2 in plate.

More pics later, Im researching flatbeds and making up a shopping list for the steelyard so I can get started on the bed.

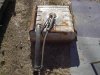
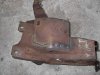
The military rear bumper is coming off also, I have a bad ass pipe bumper from a parts truck I will install.
 

Attachments

  • cucv.jpg
    cucv.jpg
    52.4 KB · Views: 16
The mil bumper is kind of bent up, but its probably saveable so I will offer it up later


Sell that bumper. They are coveted for CUCV restores. The CUCV K30 chassis is a little beefier anyway.

Bottom pic of goose X-member. ---Yeah thats a big nut :)

I spaced this hitch 3 inches forward of the axle centerline. I figured that would get some weight to the front of the truck and also keep the top of the diff from getting centerpunched by that nut.
 

Attachments

  • goose1b.JPG
    goose1b.JPG
    79.9 KB · Views: 6
Worked on it for a few hours today in shorts and t shirt :D

Pulled the fuel tank- removed tank skid plate then pulled the 9/16 bolts that hold the front and rear brackets to the frame and dropped the tank. This is way easier than messing with the tank straps.

Cut the ex pipes and tossed them and the mufflers, removed all the exh hangers from the frame.

Drilled out the rivets holding the rear leaf spring hanger brackets at the rear of the frame- im going to drop the brackets about 2.5 inches so that will raise the rear about 1.25 in. This will req adding material to the bottom of the frame to bolt the brackets back to. And I will have to space the brackets down that contact the overload springs also.

I think this fuel tank will fit in the rear of the frame- its from a 92 C3500 cab and chassis.
 

Attachments

  • cucv2.jpg
    cucv2.jpg
    49.9 KB · Views: 6
  • cctank.jpg
    cctank.jpg
    51.1 KB · Views: 4
What's the matter don't like GM's Safe Design ?? :rofl: It was better than the 1st gen behind the seat. Atleast it doesn't top a Pinto....:rofl:
 
Went to the steel yard today- got a 4x8 sheet of 3/16 steel. Decided to use 3/16 to box in the frame since thats the same thickness as the factory frame rails. 1/4 in is just too heavy- would be ok if this was a 2 1/2 ton truck.

Also got 4x3 in x 3/16 tubing to lay on top of the frame rails from the cab back . The frame kicks up 2 inches for about 40 inches over the rear wheel area- so im going to trim out the bottom of the 4x3 so that it will sit flat. So the frame will be 4 inches higher in the front and the back and 2 inches higher over the rear axle area but flat on top all the way back.

Got some more goodies this eve- SM465 and NP205, bought the whole setup from a guy - pedals and mount, clutch linkage and Z bar and mounts, crossmember, shifters, and a sb clutch and flywheel that I dont need.
 

Attachments

  • sm465np205.jpg
    sm465np205.jpg
    51.2 KB · Views: 6
The sheet of 3/16 was $129 for 245 lbs so 53 cents a pound. At SSS steel Houston.

The 4x3 24 footer was 73 cents a lb. 196 lb, $144 kind of high, I should have complained.


Im gonna pull the T400 and np208 tomorrow, that will give me room to box the frame all the way fwd to the engine.

Im either going to get a slip yoke eliminator that just slides in and you drill and tap the shaft for a retainer bolt, or swap over the rear output to a fixed yoke on the np205.
 
Slipknot=good, slip yoke bad. I like the old style bolted on yokes better as well. The slip ones always leak enough to be annoying.
 
one piece of advice for the sm465. put in new roll pins. and make sure to check/repair the welds on the ball where it attaches to the shaft. makes a world of difference.
 
Thanks, it looks like somebody already replaced that stuff. I pulled the bellhousing, trans , adapter and transfer case apart the other day. Didnt get the T400 out yet.

One of my friends interupted my progress by bringing over 2 hrs of welding for me to do - for which I will get no return help :nonod:

The alum bellhousing has two small holes in it from some kind of clutch failure, I have a syncrowave welder but my aluminum welding sucks so Im having a pro welding buddy fix it .


one piece of advice for the sm465. put in new roll pins. and make sure to check/repair the welds on the ball where it attaches to the shaft. makes a world of difference.
 
Pulled the turbo400 and 208 transfer case out today, finally had a nice warm afternoon on my days off.

Tomorrow I will make patterns and cut out the steel sheet to box the frame and start welding.

Also need to mock up the bellhousing and clutch linkage and figure out what else I need.
 

Attachments

  • 86tran2.jpg
    86tran2.jpg
    75.4 KB · Views: 4
  • 86tran1.jpg
    86tran1.jpg
    37.7 KB · Views: 4
Didnt make a whole lot of visual progress today, but i got a new toy- A thumbwheel remote control for my miller synchrowave 250.

Now I can tig laying under a vehicle or kneeling inside one or wherever and not have to fight with trying to use the foot pedal.
 

Attachments

  • 001.JPG
    001.JPG
    43.9 KB · Views: 5
Last edited:
Worked on the SM465-np205 swap today. Pulled the floor mat out and man it was nasty under it, cleaned it up and started working. Pulled the dash pad, inst cluster, steering column, pedals and mount.

The 4 speed pedal mount had spot welds broken so I tig welded it back together.

2 other small issues with it since it must have been a non hydroboost pedal mount- You have to cut off flush and drill out the two upper mount studs at the firewall end on the pedal mount itself. The cucv has studs on the firewall on the top position and it has holes on the lower for the pedal mount studs to go through.

Next the 4 speed brake pedal has the stud for the brake rod in the wrong hole, since these are pressed in the easiest thing to do is use the original brake pedal and cut the foot pedal piece to the same size as the 4 speed one.

I temp installed the bellhousing, z bar and its pivots and I have the rod that goes from the clutch pedal to the z bar.

One thing I havent figured out if this heavy spring given to me with the 4 speed swap kit actually goes with this setup or not and where it goes??

Seems way too stiff? anyone know?
 

Attachments

  • blowdup.jpg
    blowdup.jpg
    74.9 KB · Views: 3
  • blowdup2.jpg
    blowdup2.jpg
    49.8 KB · Views: 3
  • shifthole.jpg
    shifthole.jpg
    47.1 KB · Views: 2
  • pedalmount.jpg
    pedalmount.jpg
    33.2 KB · Views: 2
  • parts1.jpg
    parts1.jpg
    39.8 KB · Views: 2
  • spring1.jpg
    spring1.jpg
    41.8 KB · Views: 2
As for that spring- i guess i need to slide under one of my parts trucks in the side yard and take a look tomorrow :) One in my collection is a 82 C2500 , 454 and Sm465 2wd.
 
Back
Top