• Welcome to The Truck Stop! We see you haven't REGISTERED yet.

    Your truck knowledge is missing!
    • Registration is FREE , all we need is your birthday and email. (We don't share ANY data with ANYONE)
    • We have tons of knowledge here for your diesel truck!
    • Post your own topics and reply to existing threads to help others out!
    • NO ADS! The site is fully functional and ad free!
    CLICK HERE TO REGISTER!

    Problems registering? Click here to contact us!

    Already registered, but need a PASSWORD RESET? CLICK HERE TO RESET YOUR PASSWORD!

6.5 starter issues revisited

Missy Good Wench

Wild Blonde from Cloud Mt
Messages
1,683
Reaction score
65
Location
Newberg Oregon
Well now, here we are with a starter that has quit, or WORSE.

Yeah, we have all heard or read of the hapless soul who has had a starter fall off due to some P O or shop leaving the support bracket off of the starter.

First off, the starter and related wires on it do not need to be a tough job to get to.

First off, jack up the rig and block it securely, then remove the RH Front tire/wheel

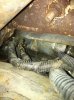
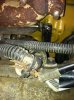
Next remove the inner fender rubber splash guard.

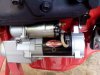
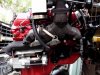
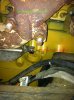
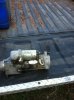
You are now looking right in at the starter wiring and the end of the starter, plus the side of the engine block where the support fastens on.

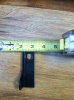
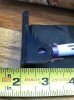
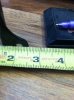
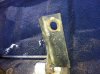
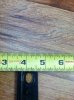
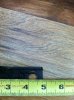
Here are some good pix of the area, the starter, the little support and the dimensions to allow making a support if you don't have one or do not want to buy a GM factory part..

The factory part # is 23502557 and IIRC can still be ordered from Ma General

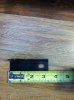
The little steel angle bracket is 1-1/8" x 1-1/8" x 1/8" steel angle
This is a stamping, but standard 1 inch or 1-1/4 inch angle 1/8" thick will work fine.

The slot and hole are 5/16" and the bolt in the block is metric as are all other fasteners on the 6.5 (This tutorial applies to 6.2 trucks as well)

The pix pretty much show all that's needed.

The location and size of the holes is the important part.

NEVER NEVER NEVER leave this bracket off----- NEVER.

The results can be as little as breaking the starter main bolts, butttttttttttttttttttt, can be as bad as breaking the flange off the block and leaving you with little choice but to replace the engine/block or ???? at great expense.

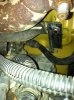
The one piccy that shows the support bolt (red) was shot with an iphone while sitting on a box right by the front wheel house area.
The access is great.

I hope this helps those in need.

Maybe a mod will stick this :agreed:

Missy :hello:
 

Attachments

  • Access2.jpg
    Access2.jpg
    68 KB · Views: 32
  • start1.jpg
    start1.jpg
    59.4 KB · Views: 23
  • start2.jpg
    start2.jpg
    57.5 KB · Views: 22
  • start3.jpg
    start3.jpg
    50.2 KB · Views: 20
  • start4.jpg
    start4.jpg
    52.9 KB · Views: 20
  • start5.jpg
    start5.jpg
    59.5 KB · Views: 23
  • start6.jpg
    start6.jpg
    58.9 KB · Views: 20
  • start7.jpg
    start7.jpg
    67.4 KB · Views: 22
  • start8.jpg
    start8.jpg
    71.5 KB · Views: 21
One or two alternatives discussed for a decent starter: The Powermaster 9052 starter for 6.2 and 6.5.

There are some bad solenoids out there on rebuilt units that work 3 of 4 tries.

Don't forget the nosecone is different for Manual Trans trucks. The Powermaster works on both.

I use a floor jack to raise the rear of the starter to get the bracket bolt to start in the engine. In fact A floor jack with a 4x4 makes installing the heavy starter easier. The starter wants to tilt and prevent the bolts from going in. You think they are started and go for the second bolt and 1 comes back out *boink* on the forehead...

Goggles worn under the truck protect your eyes and keep a lot of the sand etc. from falling into your eyes while under the truck.
 
Starter back in this morning and snapped some pix of the wiring and such
One pic clearly shows the tail hook bolted to the block and the starter.

The wiring is well shown with even the loop clamp that fastens to the top of the frame rail.

For those who are new to these buggers, look closely at the one pic and you can see the wiring coming down under the slightly bulging rear of the heat shield thats just above the starter.

This is important to keep the wires in this area, as it allows them room without being squished or abraded between the starter and the shield.

Use never seaze on the main starter bolts as well as the tail hook to block bolt, as this will allow an easy removal later if need be. (Especially if you live in salt country)

The glow plugs can always use a little never seaze (The silver stuff)

Warwagon

Thanks for the input on the starters.

I really have little experience with the various brands out there, as we had a great rebuilder here locally that made up some of the best starters you could buy.

The factory gear drives IMHO were OK, but there is bound to be other aftermarket stuff that's as good or better.

The thrust of this post is to take a lot of the nightmare out of replacing a starter on a 6.5 TD

With a look at these pix, the entire story is pretty clear.

Simple tools will suffice to do the job.

No special stuff needed, just metric wrenches, sockets, an extension or two and a ratchet.

The nuts on the solenoid (small one) are usually US standard size socket

15mm for the two main starter bolts
13mm for the tail hook bracket at the block
10 or 11mm for the stud on the starter (tail hook)
5/16" for the solenoid (can differ depending on the starter)
15mm for the 12++ cable stud on the solenoid


Missy
 

Attachments

  • start9.jpg
    start9.jpg
    67.4 KB · Views: 27
  • start10.jpg
    start10.jpg
    75 KB · Views: 28
  • start11.jpg
    start11.jpg
    61.9 KB · Views: 28
We can be nice to the admin and maybe it will be so.

With the clean "widdle yellow motor" this was a great time to get some high res pics

There seems to pop up every so often, the request for help on these issues, and I had the iphone right handy, so why not.

Missy
 
Thats a very helpful post, and detailed post.
Here are a couple more pics that show the bracket pretty clearly. In the second pic, thats the 2/0 cable coming from the starter under the wire sleeve. I installed my engine with the starter, and cable already on, so all I had to hook up was the 12v start wire.

Matt
 

Attachments

  • IMG_20140620_174159 (1024x768).jpg
    IMG_20140620_174159 (1024x768).jpg
    90.5 KB · Views: 31
  • IMG_20140705_155841 (1024x768).jpg
    IMG_20140705_155841 (1024x768).jpg
    94.4 KB · Views: 32
Lovely looking engine


Just some thoughts
I myself prefer to leave the starter, manifolds and any extras off the engine until it's in the chassis.

I makes it easier to wiggle things and get the sucker in.
Getting the manifolds on is a breeze using the inner fender access port behind the flap.
 
Lovely looking engine


Just some thoughts
I myself prefer to leave the starter, manifolds and any extras off the engine until it's in the chassis.

I makes it easier to wiggle things and get the sucker in.
Getting the manifolds on is a breeze using the inner fender access port behind the flap.

Thanks for the kind words. Actually, from the time I had the engine lowered down into the hole, to the time I had the dowel pins lined up in the bell housing was only about 10 minutes. The tranny jack I use pivots from one side to the other, which made lining it up with the engine a breeze.

Matt
 
Thats a very helpful post, and detailed post.
Here are a couple more pics that show the bracket pretty clearly. In the second pic, thats the 2/0 cable coming from the starter under the wire sleeve. I installed my engine with the starter, and cable already on, so all I had to hook up was the 12v start wire.

Matt

Is yours a MT truck? If the converter rock guard/ cover will clear the starter the next engine is going in and out with the starter attached. Absolutely manifolds come off (and on) with the engine out where you can get an impact on them to break or remove the exhaust bolts. I have been known to pull the engine with the trans and transfer case attached 2x over. Makes the top two trans bell-housing bolts easy... :thumbsup:
 
Is yours a MT truck? If the converter rock guard/ cover will clear the starter the next engine is going in and out with the starter attached. Absolutely manifolds come off (and on) with the engine out where you can get an impact on them to break or remove the exhaust bolts. I have been known to pull the engine with the trans and transfer case attached 2x over. Makes the top two trans bell-housing bolts easy... :thumbsup:

No my truck is an auto (4L80E). The starter cleared the torque converter with no problems whatsoever. I even left the turbo on it. It made the rest of the assembly very quick once the engine was in. The only PITA was the 2 top bell housing bolts. :thumbsup:

Matt
 
A secret on the two top bolts.

Use bolts the do not have the stud top on them, and this allows an easy install.
All my new metric bolts had stud tops, so the band saw took care of those :hihi:
With the stud top gone the bolts will slip right in easily with the fingers.


Next get a 15 MM Gearwrench with the flex head on it.

Took less than 5 minutes to get the two top ones in and tight, and this included the crawling up in the engine bay.

Make a little suitable strap to coral the fuel lines from below and fasten to one of the easier to reach lower bell housing bolts.
 
After all the threads I have seen of folks going nuts making a bracket... It's like a $15.00 part. o_O

Guess what my project needs...
 
nose cone on manual starter different than manual you say, WarWagon? I guess my thought of swapping starters for my project truck (manual transmission) to see if I can spin the engine over faster with my good starter won't work. Nose Cone hard to change?
 
Back
Top